Traffic Updates On The Seven Seas: Open Source Chart Plotter Using A Raspberry Pi

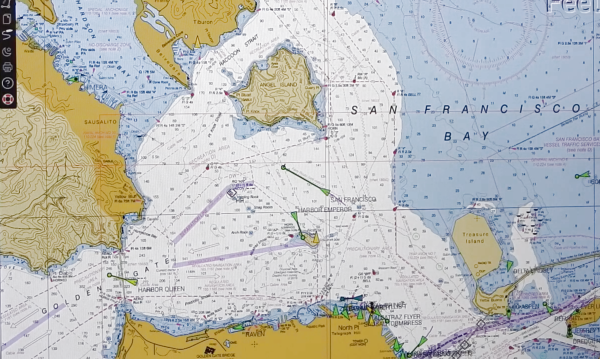
As the Raspberry Pi in its various forms continues to flow into the wild by the thousands, it’s interesting to see its user base expand outside beyond the hacker communities. One group of people who’ve also started taking a liking to it is sailing enthusiasts. [James Conger] is one such sailor, and he built his own AIS enabled chart plotter for a fraction of the price of comparable commercial units.

AIS transponders in the Mediterranean. VesselFinder

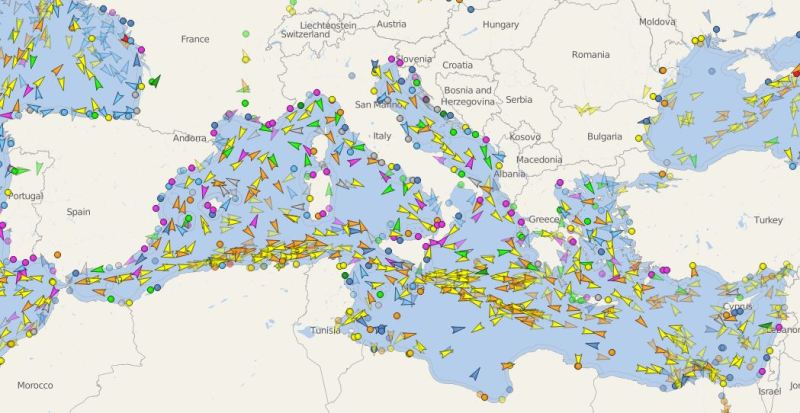
Automatic Identification System (AIS) is a GPS tracking system that uses transponders to transmit a ship’s position data to other ships or receiver stations in an area. This is used for collision avoidance and by authorities (and hobbyists) to keep an eye on shipping traffic, and allow for stricken vessels to be found easily. [James]’ DIY chart plotter overlays the received AIS data over marine charts on a nice big display. A Raspberry Pi 3B+, AIS Receiver Hat, USB GPS dongle and a makes up the core of the system. The entire setup cost about $350. The Pi runs OpenCPN, an open source chart plotter and navigation software package that [John] says is rivals most commercial software. As most Pi users will know the SD card is often a weak link, so it’s probably worth having a backup SD card with all the software already installed just in case it fails during a voyage.

We’ve seen AIS receiver stations built using the RTL-SDR, as well as a number of projects around the AIS equivalent in aviation, ADS-B. Check out [John]’s video after the break. Continue reading “Traffic Updates On The Seven Seas: Open Source Chart Plotter Using A Raspberry Pi”

Intercontinental Radio Communications With The Help Of Fly Fishing Reels

All of us have experience in trying to explain to a confused store assistant exactly what type of kitchen implement you’re looking for, and why it is a perfectly suitable part for your autonomous flying lawn mower. Or in the case of [MM0OPX] trying to find fly fishing reels that are suitable for his  Adjustiwave multi-band VHF-HF  ham radio antenna.

HF radios allow intercontinental communication but require very large antennas which can be tricky to tune properly, and this antenna helps ease both these problems. The basic configuration is quarter wave, linear loaded (folded), vertical antenna. A quarter wave length radiator wire runs up a fibreglass pole, folds over the top, and comes back down, to form a shorter, more practical antenna while remaining the required length. Ground plane radial wires are usually added to improve performance by helping to reflect signals into antenna.

[MM0OPX] expanded this concept by using two pairs of fly fishing reels to quickly adjust the length of the radiators and radials. One reel holds the actual antenna wire while the second holds fishing braid, which is tied to the end of the wire to provided tension. The radials wire is exactly the same, it just runs across the ground.

The four reels are mounted to a plastic junction box, which houses the feed line connector and matching transformer, which is attached to the base of a fibreglass pole with hydraulic pipe clamps. Each wire is marked with heat shrink at defined points to allow quick tuning for the different frequencies. [MM0OPX] tried a couple of wire types and found that 1 mm stainless steel cable worked best.

This being Hackaday, we are big fans of repurposing things, especially when the end product is greater than the sum of its parts, as is the case here. Check out the walk around and build discussion videos after the break. Continue reading “Intercontinental Radio Communications With The Help Of Fly Fishing Reels”

Massive 3D-Printed Ridable Tank Boggles The Mind

Anyone who has used an FDM 3D printer knows just how long the process can take, especially when you really start filling up the available print volume. Apparently [Ivan Miranda] has absolutely zero fear of insanely long print times, and is in the process of building a massive ridable tank (YouTube playlist of the whole build) that is almost completely 3D printed.

[Ivan] is no stranger to large prints, but this tank is on a different level altogether. The chassis, which is reinforced with aluminium and steel square tubing, took around 1200 hours to print and each of the wheels took 6 days! The rolling chassis with wheels and track weighs close to a 100 kg.  Having built a few smaller 3D printed tracked vehicles before, [Ivan] used a lot of that knowledge to design the latest monster.

Connecting the tracked section together has always proven challenging for [Ivan]. This time he used plastic fish tape (wire puller) for the pins, and blocked off the end holes with screws. The bogies (wheel sets) are also interesting, with 3D printed springs that sit parallel to the ground. Almost all the parts are printed in PLA, which can be quite brittle, so it would be interesting to see how it holds up.

[Ivan] has been working on this project since the start of 2019, and we can’t wait to see it completed. We’ve featured his signature red prints a few times, including a RC car that drives on the ceiling and a water jet drive. If you’re keen to build your own tank on the opposite side of the size spectrum, check out this tiny tank for your crawl space. Watch [Ivan] finish the rolling chassis after the break. Continue reading “Massive 3D-Printed Ridable Tank Boggles The Mind”

Making A Bronze Cannon From Scratch

Casting metal at home is somewhat tricky, but there’s no denying the results can be quite rewarding. [FarmCraft101] put his incredible craftsmanship on display, and learned a few new things in the process, by scratch building a scale replica bronze cannon and carriage.

Starting with a sufficient quantity of scrap metal, he first produced bronze ingots. Getting the actual casting right took multiples attempts. First tried a lost foam cast, which failed miserably, but provided a sample metal which was put through tensile strength testing. The second attempt was done using a wood barrel form and a split mold, and was cast horizontally which resulted in shrinkage on top of the barrel. The third attempt, arranged vertically, almost resulted in a high risk game of “the floor is lava”, with molten bronze pouring out across his garage floor after the mold split open during casting.

Attempt number four was finally successful, again using a vertical mold but with more sturdy clamping. This roughcast barrel was then drilled out and finished to a beautiful mirror with the help of a lathe and a lot of elbow grease. He then turned his attention to the carriage, which itself is a real beauty featuring custom wagon wheels with a charred wood finish and linseed oil coating.

You can check out the build video after the break, but we’ll warn you now, [FarmCraft101] never actually fires this gorgeous creation. If you’d like to try your hand at DIY cannoneering and have a 3D printer, you might want to give lost PLA casting a try, or go into mass production with some DIY silicone molds.

Continue reading “Making A Bronze Cannon From Scratch”

Wiping Your Windscreen To The Beat

Nothing spoils your mood quite like your windscreen wipers not feeling it when the beat drops. Every major car manufacturer is focused on trying to build the electric self driving vehicle for the masses, yet ignoring this very real problem. Well [Ian Charnas] is taking charge, and has successfully slaved his car’s wipers to beat of its stereo.

Starting with the basics, [Ian] first needed to control the speed of the wiper motor. This was done using a custom power supply adapted from another project. The brain of the system is a Raspberry Pi 3B+ which runs a phase locked loop algorithm to sync the music and the motor. Detecting the beat turned out to be the most difficult part of the project, and from the research [Ian] did, there is no standard solution. He ended up settling on “madmom“, a Python audio and music signal processing library, which runs a neural net to detect the beat in real time. The Raspi sends the required PWM and Enable signals to an Arduino over serial, which in turn controls the power supply. The entire system was neatly integrated in the car, with a switch in the dash that connects the motor to the new power supply on demand, to allow the wipers to still be used normally (and safely).

[Ian] filed a provisional patent application for the idea, and will be putting it on auction on eBay soon, with the hope that some major car manufacturer would be interested. For older cars, you can shove an Arduino into the stereo, or do a super cheap bluetooth upgrade. Check out the video after the break. Continue reading “Wiping Your Windscreen To The Beat”

Humanoid Robot Has Joints That Inspire

One of the challenges with humanoid robots, besides keeping them upright, is finding compact combinations of actuators and joint mechanisms that allow for good range of smooth motion while still having good strength. To achieve that researchers from the IRIM Lab at Korea University of Technology and Education developed the LIMS2-AMBIDEX robotic humanoid upper body that uses a combination of brushless motors, pulleys and some very interesting joint mechanisms. (Video, embedded below.)

The wrist mechanism. Anyone willing to tackle a 3D printed version?

From shoulder to fingers, each arm has seven degrees of freedom which allows the robot to achieve some spectacularly smooth and realistic upper body motion. Except for the wrist rotation actuator, all the actuators are housed in the shoulders, and motion is transferred to the required joint through an array of cables and pulleys. This keeps the arm light and its inertia low, allowing the arms to move rapidly without breaking anything or toppling the entire robot.

The wrist and elbow mechanisms are especially interesting. The wrist emulates rolling contact between two spheres with only revolute joints. It also allows a drive shaft to pass down the centre of the mechanism and transfer rotating motion from one end to the other. The elbow is a rolling double jointed affair that allows true 180 degrees of rotation.

We have no idea why this took two years to end up in our YouTube feed, but we’re sure glad it finally did. Check out some of the demo videos after the break. Continue reading “Humanoid Robot Has Joints That Inspire”

Miss Nothing With A Hacked 360 Degree Camera Trap

Camera traps are a very common tool in wildlife conservation and research, but placing and pointing them correctly can be a bit of a guessing game. Something very interesting could happen just out of frame and you’d be none the wiser. The [Andrew Quitmeyer] and [Danielle Hoogendijk] at DINALABS (Digital Naturalism Laboratories) in Panama are experimenting with hacked consumer 360° cameras to help solve problem.

The project is called Panatrap and looks very promising. They’ve done very detailed testing with a number of different 360° cameras, and have built functional prototypes with the Xiaomi Misphere and Ricoh Theta V. The Xiaomi had some handy contacts on the bottom of the camera for its selfie stick interface (simply a resistor and button), which allowed full control of the camera. An Arduino compatible board waits for the motion detected signal from a PIR sensor which then sends the required command to the camera to wake-up and take footage. The Ricoh was slightly more challenging, but they discovered that the camera will wake up if an emulated keyboard command is received over it’s USB port from a Teensy. Triggering is then done by a servo pushing against the camera’s button. Everything is housed in a laser cut acrylic case to help it survive the wet jungle. If anyone knows how to hack the Samsung Gear camera to work, the team is keen to hear from you!

All the work is open sourced, with build details and hardware designs available on the project page and software up on Github. Check out some cool 360° test footage after the break with some local wildlife. We are looking forward to more footage! Continue reading “Miss Nothing With A Hacked 360 Degree Camera Trap”