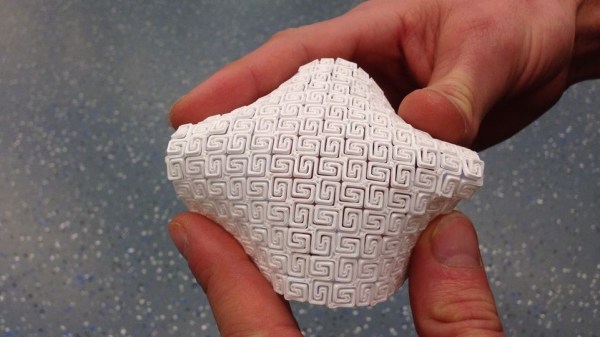
3D Printing Flexible Surfaces Out Of Non-Flexible Material

Here’s some interesting work shared by [Ben Kromhout] and [Lukas Lambrichts] on making flexible 3D prints, but not by using flexible filament. After seeing a project where a sheet of plywood was rendered pliable by cutting a pattern out of it – essentially turning the material into a giant kerf bend – they got interested in whether one could 3D print such a thing directly.
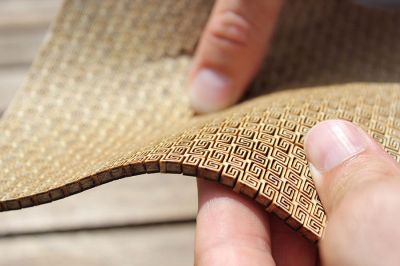
Inspiration for the project was this laser-cut plywood.

The original project used plywood and a laser cutter and went through many iterations before settling on a rectangular spiral pattern. The results were striking, but the details regarding why the chosen pattern was best were unclear. [Ben] and [Lukas] were interested not just in whether a 3D printer could be used to get a similar result, but also wanted to find out what factors separated success from failure when doing so.

After converting the original project’s rectangular spiral pattern into a 3D model, a quick proof-of-concept showed that three things influenced the flexibility of the end result: the scale of the pattern, the size of the open spaces, and the thickness of the print itself. Early results indicated that the size of the open spaces between the solid elements of the pattern was one of the most important factors; the larger the spacing the better the flexibility. A smaller and denser pattern also helps flexibility, but when 3D printing there is a limit to how small features can be made. If the scale of the pattern is reduced too much, open spaces tend to bridge which is counter-productive.

Kerf bending with laser-cut materials gets some clever results, and it’s interesting to see evidence that the method could cross over to 3D printing, at least in concept.
Edge-lit Pendants Show Two Layers Are Better Than One

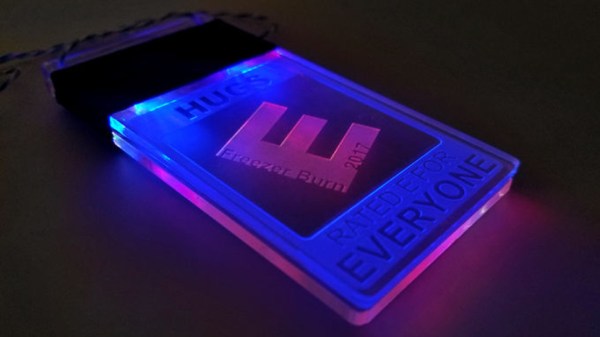
Engraved acrylic lights up nicely with LED lighting. Simply engrave clear acrylic with a laser engraver, then edge-light the acrylic and watch the engraving light up. This badge made by [Solarbotics] shows how they used this principle when creating some pendants for an event that performed particularly well in the dark.

The pendants they created have two engraved acrylic panels each, and that’s about it. Two LEDs and a CR2032 battery nestle into pre-cut holes, and the engraved sides are placed face-to-face, so the outer surfaces of the pendant are smooth. By using some color-cycling RGB LEDs on one panel and blue LEDs on the other panel, the effect is that of an edge-lit outer design with a central element that slowly changes color separately from the rest of the pendant.

The design stacks the LED leads and coin cells in such a way that a simple wrap of tape not only secures things physically, but also takes care of making a good electrical connection. No soldering or connectors of any kind required. [Solarbotics] found that CR2032 cells would last anywhere between a couple of days to a week, depending on the supplier.

This design is great for using a minimum of materials, but if that’s not a priority it’s possible to go much further with the concept. Multiple layers of edge-lit acrylic were used to make numeric 0-9 display modules as well as a full-color image.


This Method Of Gluing Onto Curves Sucks!

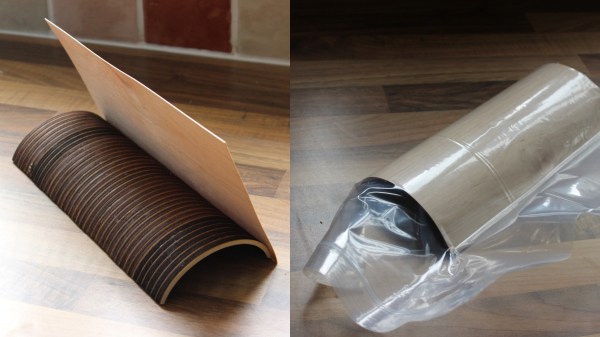
Sometimes the right tool for a job can be unusual, and this sucked only in the sense that vacuum sealing was involved. Recently [Martin Raynsford] found himself in a situation of needing to glue a wood veneer onto a curved surface, but faced a shortage of clamps. His clever solution was to vacuum-seal the whole thing and let the contour-hugging plastic bag take care of putting even pressure across the entire glued surface. After the glue had set enough to grip the materials securely, the bag was removed to let the whole thing dry completely. Gluing onto a curved surface has never been so clamp-free.

The curved piece in question was made from dozens of layers of laser-cut plywood, stacked and glued to make the curved lid of a custom-built chest. It might have been just the right shape, but it wasn’t much to look at. As you can see, giving it a wood veneer improved the appearance considerably. Wood veneers are attractive and versatile; we’ve seen for example that LEDs will shine through wood veneer quite easily.

DIY Illuminator For UV Fluorescence Photography

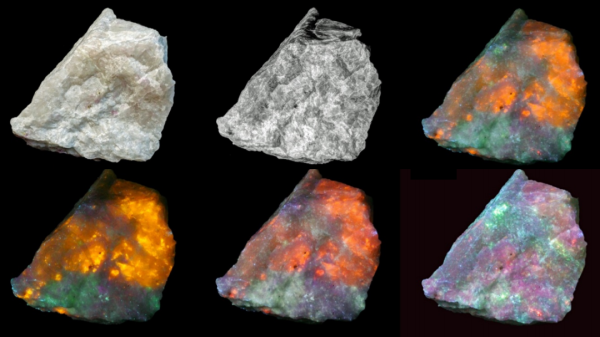
The image shown is the mineral Hackmanite, which fluoresces under ultraviolet lighting. However, not all UV is created equal, and that makes a difference if you’re into UV imaging. The image for this article is from [David Prutchi] and shows the striking results of using different wavelengths of UV. [David] goes into detail on how to make your own DIY Long, Medium, and Short-wave UV Illuminator complete with part numbers and wiring diagram. The device isn’t particularly complicated; the real work was determining the exact part numbers and models of lamp, filters, and ballasts required to get the correct results. [David] has done that work and shared it for anyone interested in serious UV fluorescence photography, along with a white paper on the process.

We’ve seen [David]’s work before. We featured his DIY short-wave UV imager in the past, and his DOLPi camera project was a 2015 Hackaday Prize finalist. It’s clear he really knows his stuff, and genuinely enjoys sharing his discoveries and work.

SCiO “Pocket Molecular Scanner” Teardown

Some of you may remember the SCiO, originally a Kickstarter darling back in 2014 that promised people a pocket-sized micro spectrometer. It was claimed to be able to scan and determine the composition of everything from fruits and produce to your own body. The road from successful crowdsourcing to production was uncertain and never free from skepticism regarding the promised capabilities, but the folks at [Sparkfun] obtained a unit and promptly decided to tear it down to see what was inside, and share what they found.

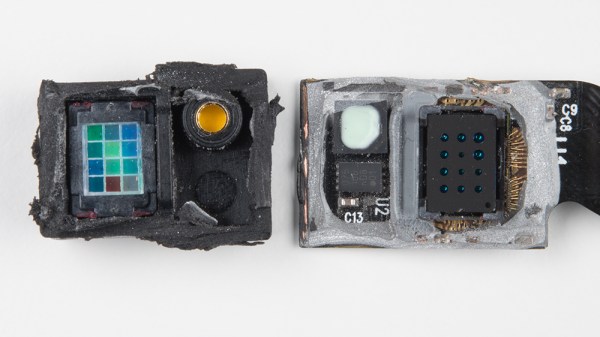
The main feature inside the SCiO is the optical sensor, which consists of a custom-made NIR spectrometer. By analyzing the different wavelengths that reflect off an object, the unit can make judgments about what the object is made of. The SCiO was clearly never built to be disassembled, but [Sparkfun] pulls everything apart and provides some interesting photos of a custom-made optical unit with an array of different sensors, various filters, apertures, and a microlens array.

It’s pretty interesting to see inside the SCiO’s hardware, which unfortunately required destructive disassembly of the unit in question. The basic concept of portable spectroscopy is solid, as shown by projects such as the Farmcorder which is intended to measure plant health, and the DIY USB spectrometer which uses a webcam as the sensor.

Microorganisms Can’t Hide From DropoScope

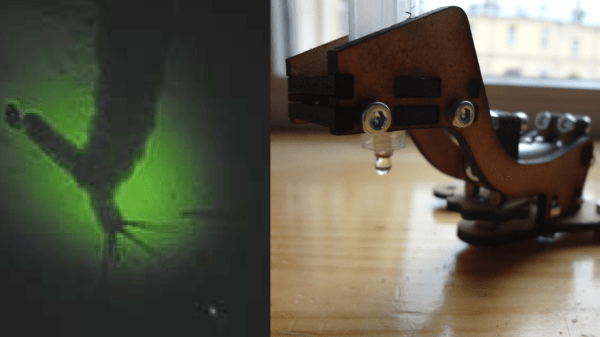
The DropoScope is a water-drop projector that works by projecting a laser through a drop of water, ideally dirty water crawling with microorganisms. With the right adjustments, a bright spot of light is projected onto a nearby wall, revealing a magnified image of the tiny animals within. Single celled organisms show up only as dark spots, but larger creatures like mosquito larvae exhibit definite structure and detail.

While simple in concept and requiring nothing more high-tech than a syringe and a laser pointer, getting useful results can require a lot of fiddly adjustment. But all that is a thing of the past for anyone with access to a laser cutter, thanks to [ingggis].  His design for a laser-cut a fixture lets anyone make and effortlessly adjust their own water-drop projector.

If you’d like to see some microorganisms in action, embedded below is video from a different water-drop projector (one identical in operation, but not lucky enough to benefit from [ingggis]’s design.)

Continue reading “Microorganisms Can’t Hide From DropoScope” →

Reflective Sensor Becomes Kart Racing Lap Counter

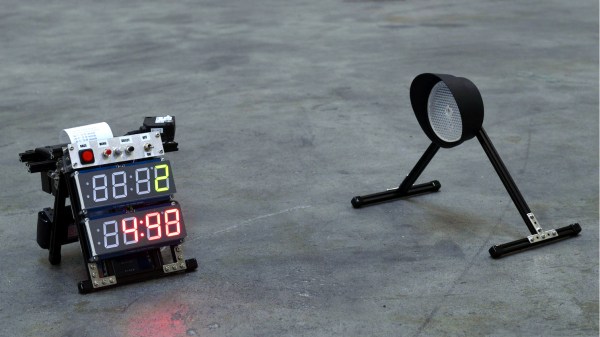
Once you have a track and a kart to race on it, what’s missing? A lap counter that can give your lap times in hardcopy, obviously! That’s what led [the_anykey] to create the Arduino-based Lap Timer to help him and his kids trim those precious seconds off their runs, complete with thermal printer for the results.

The hardware uses an infrared break-beam sensor module (a Velleman PEM10D) to detect when a kart passes by. This module is similar to a scaled-up IR reflective object sensor; it combines an IR emitter and receiver on one end, and is pointed at a reflector placed across the track, up to 10 meters away. When a kart breaks the beam, the module reports the event to the rest of the hardware. Only needing electronics on one side allows the unit to be self-contained.

An obvious shortcoming of this system is the inability to differentiate between multiple karts, but for timing a single driver’s performance it does the trick. What’s great about this project is it showcases how accessible hardware is today; a device like this is possible to put together with what are essentially off-the-shelf components available to any hobbyist, using an Arduino as the glue to hold it together. We’d only comment that a red-tinted piece of plastic as an overlay for the red display (and a grey-tinted one for the green) would make the LED displays much easier to read. Still, this is a very clean and well-documented build. See it in action in the video embedded below.

Continue reading “Reflective Sensor Becomes Kart Racing Lap Counter” →