Some LLMs (Large Language Models) can act as useful programming assistants when provided with a project’s source code, but experimenting with this can get a little tricky if the chatbot has no way to download from the internet. In such cases, the code must be provided by either pasting it into the prompt or uploading a file manually. That’s acceptable for simple things, but for more complex projects, it gets awkward quickly.
To make this easier, [Eric Hartford] created github2file, a Python script that outputs a single text file containing the combined source code of a specified repository. This text file can be uploaded (or its contents pasted into the prompt) making it much easier to share code with chatbots.
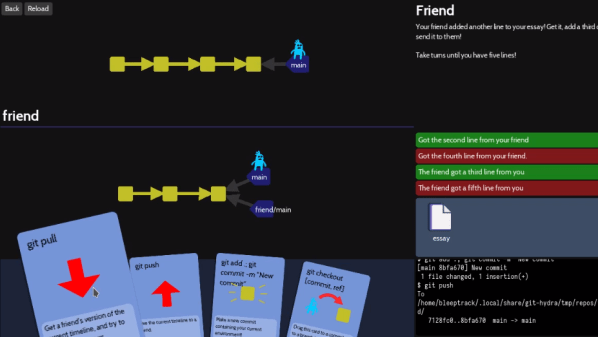
What better way to learn to use Git than a gamified interface that visualizes every change? That’s the idea behind Oh My Git! which aims to teach players all about the popular version control system that underpins so many modern software projects.
Git good, with a gameified git interface.
Sometimes the downside to a tool being so ubiquitous is that it tends to be taken for granted that everyone already knows how to use it, and those starting entirely from scratch can be left unsure where to begin. That’s what creators [bleeptrack] and [blinry] had in mind with Oh My Git! which is freely available for Linux, Windows, and macOS.
The idea is to use a fun playing-card interface to not only teach players the different features, but also to build intuitive familiarity for operations like merging and rebasing by visualizing in real-time the changes a player’s actions make.
The game is made with beginners in mind, with the first two (short) levels establishing that managing multiple versions of a file can quickly become unwieldy without help. Enter git — which the game explains is essentially a time machine — and it’s off to the races.
It might be aimed at beginners, but more advanced users can learn a helpful trick or two. The game isn’t some weird pseudo-git simulator, either. The back end uses real git repositories, with a real shell and git interface behind it all. Prefer to type commands in directly instead of using the playing card interface? Go right ahead!
Oh My Git! uses the free and open-source Godot game engine (not to be confused with the Godot machine, a chaos-based random number generator.)
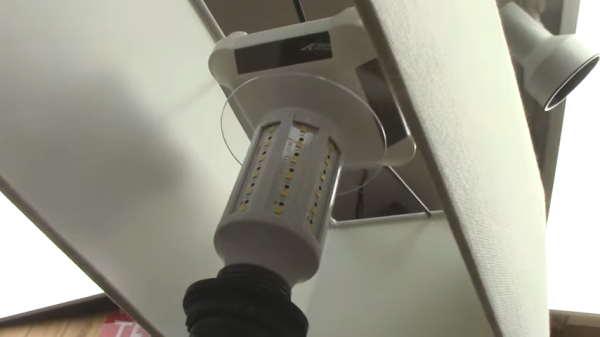
Two things we love are economical solutions to problems, and clever ways to use things for other than their intended purpose. [CelGenStudios] hits both bases with a simple illuminated and spinning sign made from a lamp and a couple economical pieces of hardware: an LED bulb, and a solar-powered product spinner. Both are readily and cheaply available from your favorite overseas source.
The first step in making a cheap illuminated sign is to not buy one, but instead make do with a standing lamp. Plug a bright LED bulb into the socket, decorate the lampshade with whatever logos or signs one wishes to display, and one has an economical illuminated sign suitable for jazzing up a table at an event. But what really kicks it up a notch is making it rotate, and to do that is where the clever bit comes in.
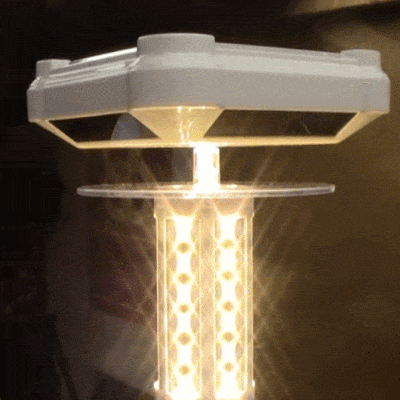
Mounting the lampshade to the solar turntable body yields a simple, rotating, illuminated sign.
The first attempt used a BBQ rotisserie motor to turn the whole lamp, but it was too loud and not especially stable. The second attempt used a “disco ball effect” LED bulb with a motorized top; it worked but turned too quickly and projected light upward instead of into the lampshade.
The winning combination is LED bulb plus a little solar-powered turntable onto which the lampshade mounts. As a result, the lampshade spins slowly when the lamp is turned on. It might not be the most durable thing to ever come out of a workshop, but as [CelGenStudios] says, it only needs to last for a weekend.
The basic concept is far more simple than it might sound, so check it out in the video (embedded below) to see it in action. Curious about what’s inside those little solar spinners? Skip to 5:55 in the video to see how they work. And if you’re intrigued by the idea of using solar power for motive force but want to get more hands-on with the electrical part, we have just the resource for turning tiny motors with tiny solar cells.
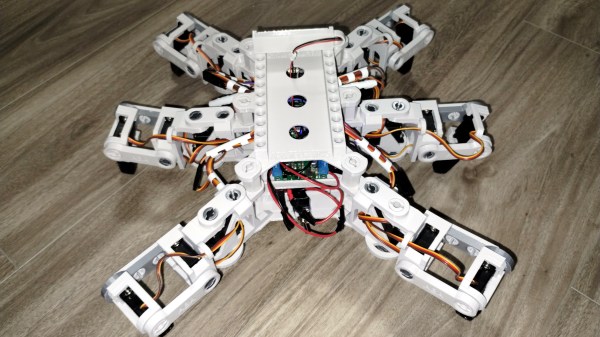
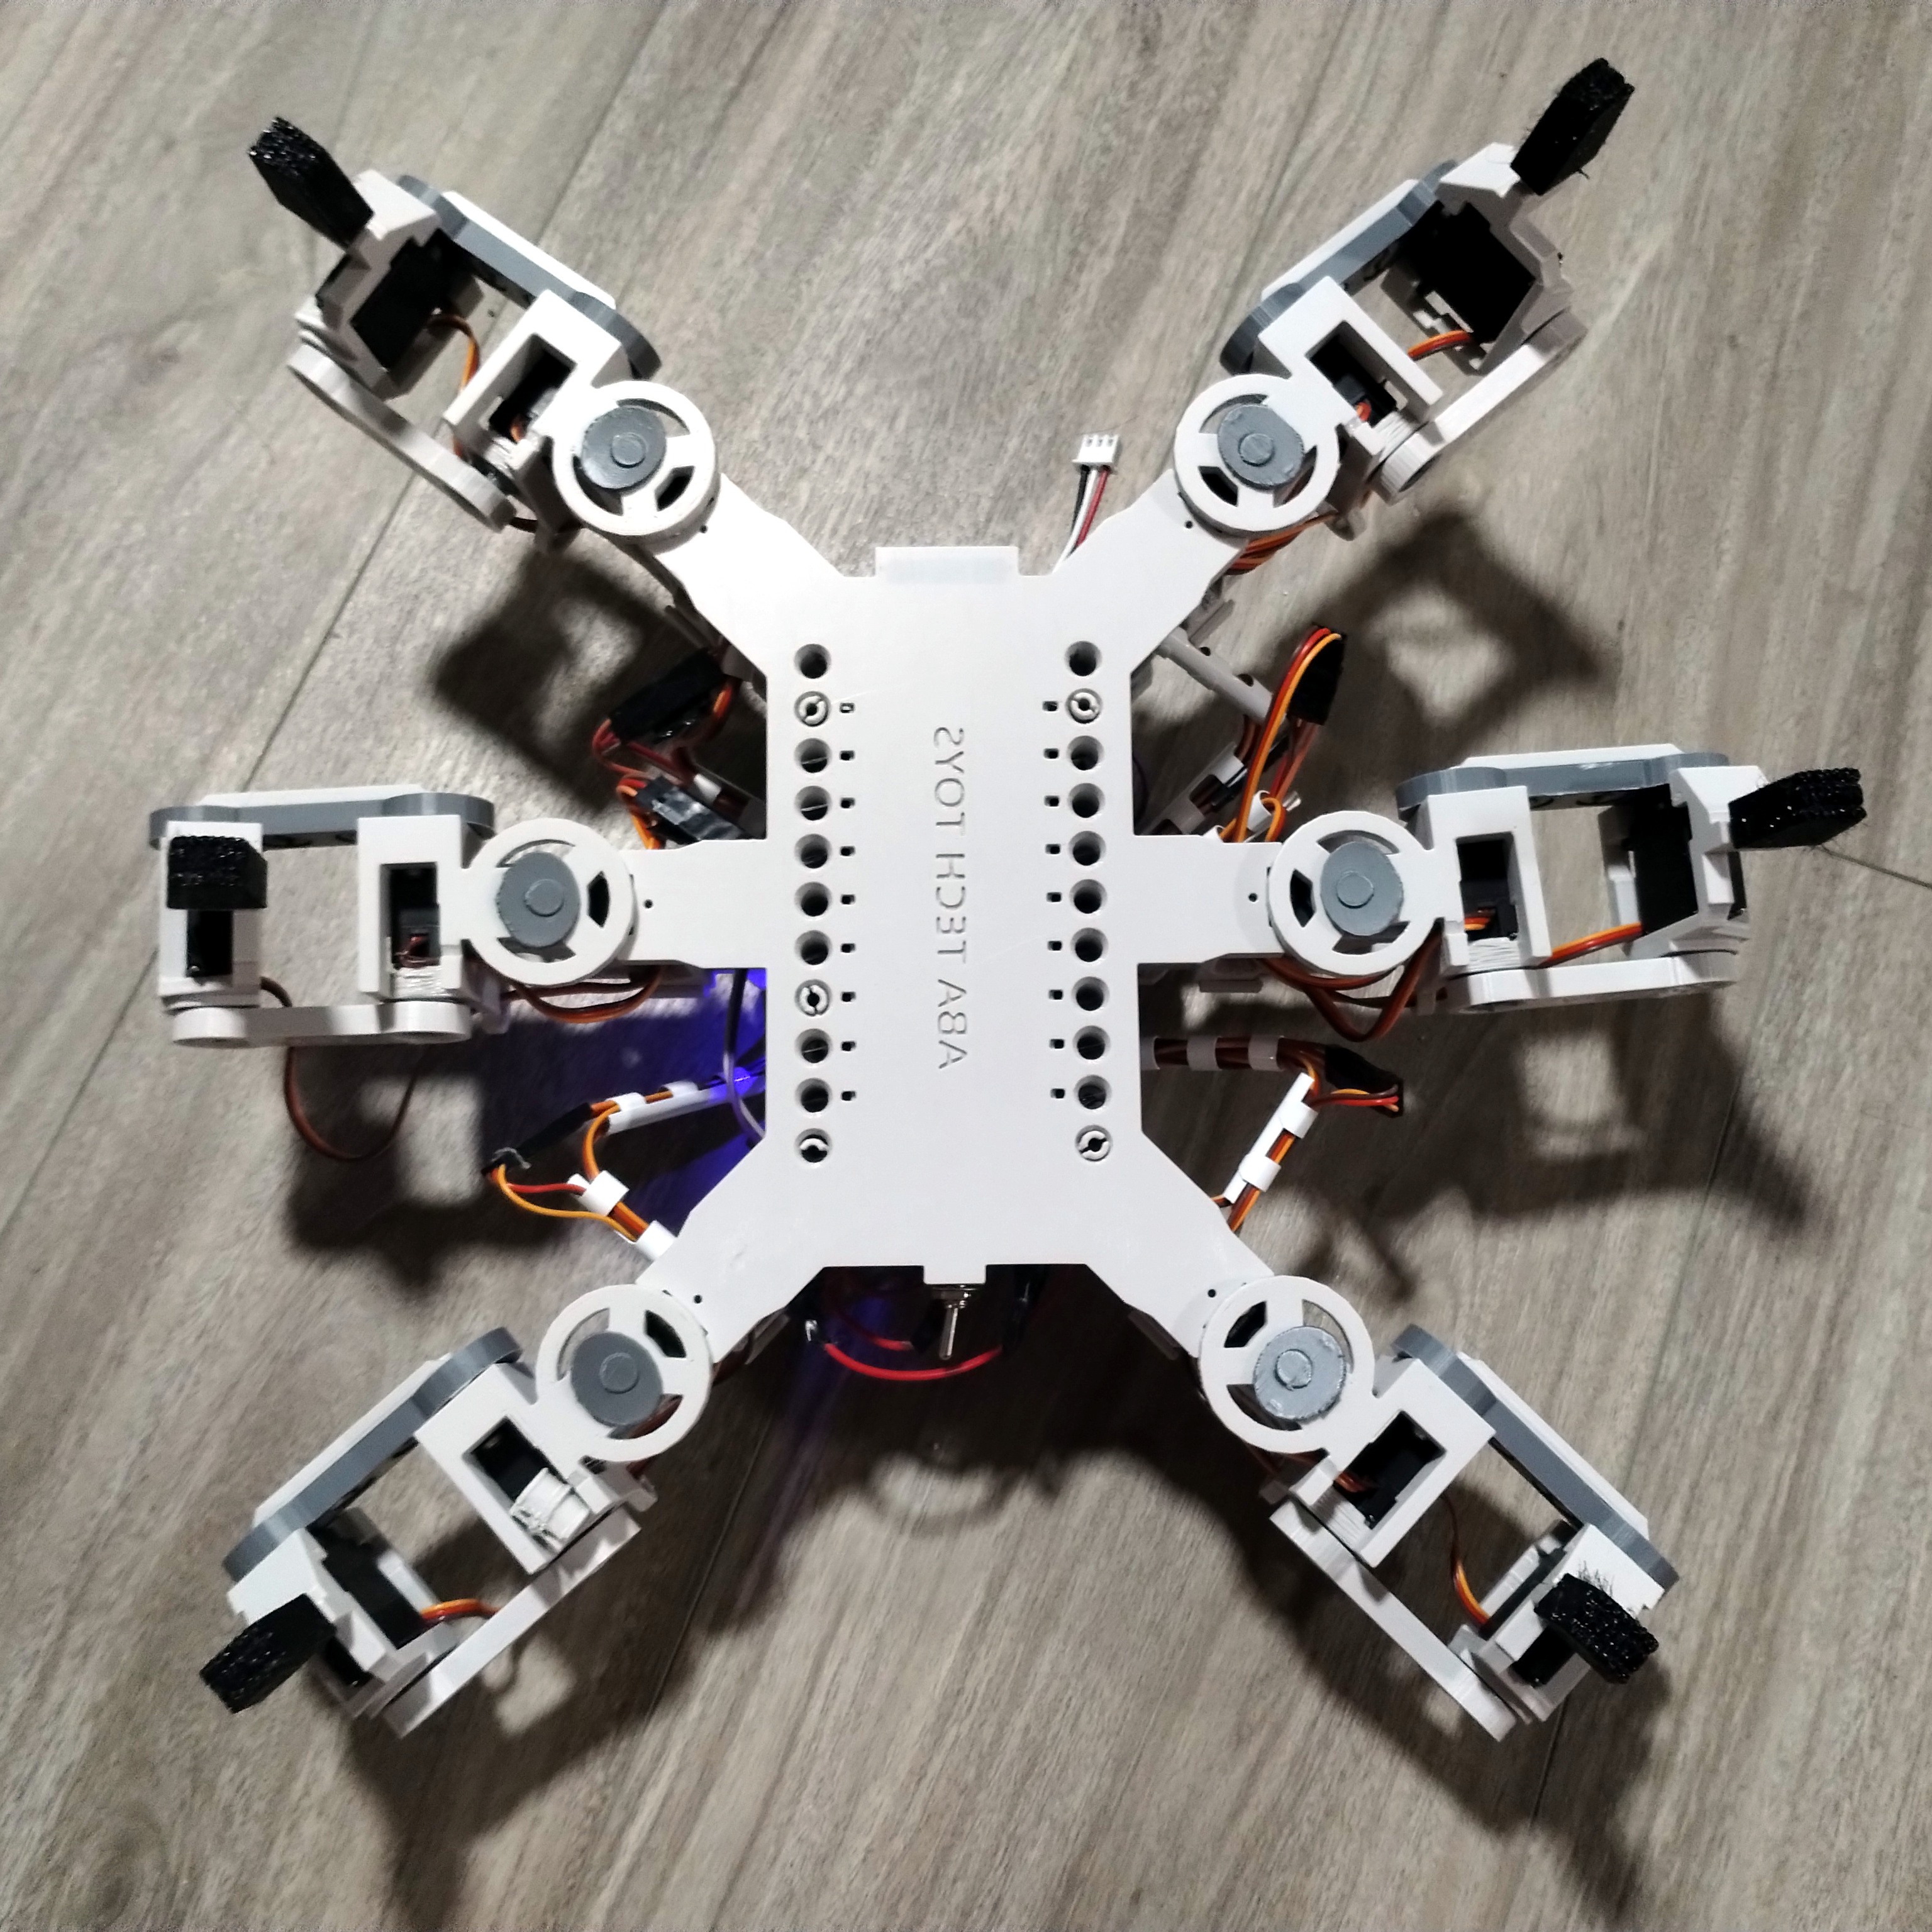
Robots are cool, so check out [Atlin Anderson]’s Spiderbot (video, embedded below) which can be made with 3D printed parts, hobby servos, and ESP32-CAM module for control and a first-person view. Looking for a new project? All of the design details are shared online if you’d like to make a hexapod of your own.
We like the effort [Atlin] put into minimizing hardware fasteners in the design of the 3D-printed parts, and aiming for a modular concept that leaves things open for expansion or modification. There’s plenty of room in the chassis for more hardware, with a convenient peg system for snap-fitting assemblies.
Control is done wirelessly via a mobile phone with an app created using the MIT App Inventor, a fantastic tool that is still going strong as a capable and accessible way to make an Android app.
As for the ESP32-CAM module that drives it all, it is a great piece of hardware with capabilities that are leveraged very nicely here. We’ve seen other projects make good use of it as well, from this 1/64 scale micro RC car to an oddball tripod camera robot.
A recent security vulnerability — a potential ssh backdoor via the liblzma library in the xz package — is having a lot of analysis done on how the vulnerability was introduced, and [Rob Mensching] felt that it was important to highlight what he saw as step number zero of the whole process: exploit the fact that a stressed package maintainer has burned out. Apply pressure from multiple sources while the attacker is the only one stepping forward to help, then inherit the trust built up by the original maintainer. Sadly, [Rob] sees in these interactions a microcosm of what happens far too frequently in open source.
Maintaining open source projects can be a high stress activity. The pressure and expectations to continually provide timely interaction, support, and updates can easily end up being unhealthy. As [Rob] points out (and other developers have observed in different ways), this kind of behavior just seems more or less normal for some projects.
The xz/liblzma vulnerability itself is a developing story, read about it and find links to the relevant analyses in our earlier coverage here.
[enhydra] needed to modify a bunch of side inserts from some cheap ABS enclosures, and to save time and effort, he created a simple vacuum table with swappable inserts to precisely fit the parts. Suction is provided by a shop vacuum (plugged in near the bottom in the photo above) and it worked very well! Sealing and gaskets weren’t even required.
A vacuum table provides a way to hold workpieces flat and secure while a CNC machine does its thing, and because no clamps are involved, it can really speed up repetitive work. [enhydra]’s solution combines a vacuum table with a jig that ensures every rectangular piece is held exactly where the machine expects it to be, making the whole process of modifying multiple units significantly more efficient.
The whole thing — vacuum table and modular top — was straightforward to CNC cut out of what looks like particle board and worked as-is, no added gaskets or seals required, making this a very economical solution.
Vacuum tables can be pretty versatile and applied in more than one way, so keep that in mind the next time you’re wondering how best to approach a workshop problem. We’ve seen a well-engineered table used to speed up PCB milling, and we’ve also seen a DIY vacuum table combined with a heat gun and plastic plates from the dollar store make a bare-bones thermoforming rig.
Can you play chess against your printer? The answer will soon be yes, and it’s thanks to [Nicolas Seriot]’s PSChess. It’s a chess engine implemented in PostScript, of all things. It’s entirely working except for one last hurdle, but more on that in a moment.
What’s it like to play PSChess? Currently, one uses a PostScript interpreter (such as GhostScript) to run it, much like one would use the Python interpreter to run Python code. The user inputs moves by typing in commands like d2d4 (representing a piece’s source coordinate and a destination coordinate on the 2D board). Then the program makes a move, and outputs an updated board state to both the console and a PDF document. Then it’s the user’s turn again, and so on until somebody loses.
The chess parts are all working, but there’s one last feature in progress. The final step of the project is to enable PSChess to be run directly on a printer instead of using GhostScript as the interpreter. Intrigued? You can find the code at the project’s GitHub repository.
So why PostScript? While it is a Turing-complete stack-based interpreted language, it was never intended to be used directly by humans. There are no meaningful development tools to speak of. Nevertheless, [Nicolas] finds PostScript an appealing tool for programming projects and provides tips and techniques for like-minded folks. One of the appeals is working within constraints to solve a problem, just like implementing a chess engine in only 4k, or draw poker in 10 lines of BASIC.