A Macro Keyboard In A Micro Package

Remember back in the early-to-mid 2000s when pretty much every cheap USB keyboard you could find started including an abundance of media keys in its layout? Nowadays, especially if you have a customized or reduced-sized mechanical keyboard, those are nowhere to be seen. Whenever our modern selves need those extra keys, we have to turn to external peripherals, and [Gary’s] Knobo is one that looks like it could’ve come straight out of a fancy retail package.

The Knobo is a small macro keypad with 8 mechanical Cherry-style keys and a clickable rotary encoder knob as its main feature. Each key and knob gesture can be customized to any macro, and with five gestures possible with the knob, that gives you a total of thirteen inputs. On top of that, the build and presentation look so sleek and clean we’d swear this was a product straight off of Teenage Engineering’s money-printing machine.

The actions you can do with those inputs range from simple media controls with a volume knob all the way to shortcuts to make a Photoshop artist’s life easier. Right now you can only reprogram the Knobo’s Arduino-based firmware with an In-Circuit Serial Programmer to change what the inputs do, but [Gary] is currently working on configuration software so that users without any programming knowledge will be able to customize it too.

Knobs are just one of those things that everyone wants to use to control their computers, much like giant red buttons. Alternative input devices can range from accessibility-designed to just downright playful. Whatever the inspiration is for them, it’s always nice to see the creativity of these projects.


Continue reading “A Macro Keyboard In A Micro Package”

Workbench Fume Extractor Sucks, But Has A Charming Personality

Shop safety is important regardless of what kind of work you do. For those of us soldering, that means extracting the noxious fumes released by heating up the solder flux used in our projects. [yesnoio] brings to us his own spin on the idea of a fume extractor, and it pulls out all stops with bells and whistles to spare.

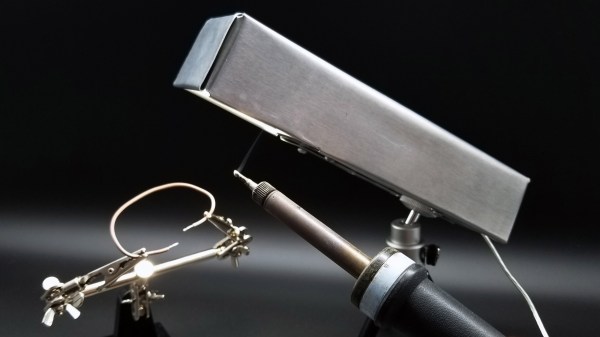
The Workbench Assistant bot, as [yesnoio] describes it, is an integrated unit mounted atop a small tripod which extends over the working area where you’re soldering. Inside the enclosure are RGBW lights, an IR camera, and an Adafruit ItsyBitsy M4 Express driving the whole show. Aside from just shining a light onto your soldering iron though, the camera senses thermal activity from it to decide when to ramp up the server-grade fan inside which powers the whole fume extraction part of the project.

But the fun doesn’t stop there, as [yesnoio] decided to go for extra style points. The bot also comes with an amplified speaker, playing soundbites whenever actions such as starting or stopping the fan are performed. These soundbites are variations on a theme, like classic Futurama quotes or R2-D2’s chattering from Star Wars. The selectable themes are dubbed “performers”, and they can be reprogrammed easily using CircuitPython. This is a neat way to give your little desktop assistant some personality, and a fun way to break up the monotony of soldering up all those tiny SMD components on your next prototype.

If even after all this you still need more than just a cute little robotic voice beeping at you to convince you to get a fume extractor for your bench, then maybe some hands-on results could give you that little push you need. And if you’re already convinced and want to build your own, there is no shortage of DIY solutions we’ve seen around here at Hackaday. Check out this one in action after the break!

Continue reading “Workbench Fume Extractor Sucks, But Has A Charming Personality”

Doing What Id Couldn’t: Returning Music To Jaguar Doom

While the rest of the world has by and large forgotten the Atari Jaguar, the generously marketed console still has a fan base, and even some dedicated hackers prodding away at it. [Cyrano Jones] is one of them, and he managed something many considered unthinkable: restoring in-game music to the Jaguar port of Doom.

The Jaguar version of the classic shooter was developed by id Software themselves, and is generally considered one of the better console ports. For example, the large number of buttons on the Jaguar controller allowed players to select weapons directly rather than having to cycle through them. Unfortunately, the complete lack of music during gameplay was a glaring omission that took several points off of an otherwise fairly solid presentation.

The common culprit blamed for this was that the Jaguar’s DSP was already being used for math processing, so it didn’t have any cycles left for music playback. Coupled with a tight deadline, id probably cut their losses and released it without in-game music rather than try and spend more time engineering a solution. To compensate for the lack of in-game music, id did include the famous soundtrack in the intermission screens rather than entirely strip it out.

As [Cyrano] found out by studying the source code that’s been available since 2003, sound effects in the Jaguar version of Doom are played using something called a “ring buffer”: a cyclical fixed-length data buffer which constantly gets outputted as audio. With a patch of unused memory he could fit a second ring buffer in, rendering the music to it with close to no performance hit elsewhere in the code and then mixing both buffers for the final audio output. It looks as though id already had some of this solution in place, but with enough issues that forced them to abandon the idea in order to release the game on time.

Software hacks are not the only things that the Jaguar fan base can do though, and a fine example of a hardware one is this custom mod showing what it could’ve looked like with the CD add-on in an integrated unit.

Continue reading “Doing What Id Couldn’t: Returning Music To Jaguar Doom”

Probability-Based Drummer Leaves The Beats Up To Chance

Drum machines may seem like one of the many rites of passage for hardware makers, they’re a concept you can implement simply or take into the extreme making it as complex as you want. [Matt’s] DrumKid is one of them, and its long development history is wonderfully documented in the project logs.

[Matt’s] original intention was to use the automatic drummer as part of his band, wanting “the expressiveness of a good drummer but without the robotic tendencies of a simple drum machine”. For that, he created the first iteration of the DrumKid, a web-based project using the Web Audio API. The interface consisted of bars showing levels for different settings which could be intuitively tweaked, changing the probability of a drum sound being played. This gave the “drummer” its unpredictability, setting itself apart from any regular old drum machine.

Fast forward a few years, and [Matt] now wants to recreate his DrumKid as a proper piece of musical gear, porting the concept into a standalone hardware drum machine you can plug into your mixer. He decided to go with the Arduino framework for his project rather than the Teensy platform in order to make it cheaper to build. The controls are simplified down to a few buttons and potentiometers, and the whole thing runs off of three AAA batteries. Also, targeting the project for hardware like this allowed for new features to be added, such as a bit-crush filter.

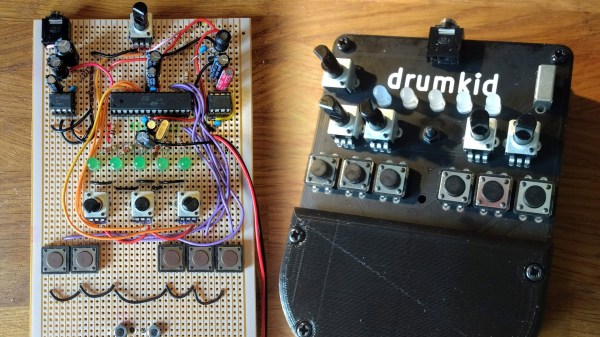
We already saw the first prototype here on Hackaday when it was featured in a Hackaday Prize mentor session, and it’s nice to see how the project evolved since. After a number of revisions, the new prototype takes design cues from Teenage Engineering’s “Pocket Operator” drum machine, using the main PCB as its own faceplate rather than a 3D printed case in a familiar way we’ve seen before. Unfortunately, the latest board is non-functional due to a routing mistake, but you can see the previous working prototypes in his project logs.

3D Printed Prosthesis Reads Your Mind, Sees With Its Hand

Hobbyist electronics and robotics are getting cheaper and easier to build as time moves on, and one advantage of that is the possibility of affordable prosthetics. A great example is this transhumeral prosthesis from [Duy], his entry for this year’s Hackaday Prize.

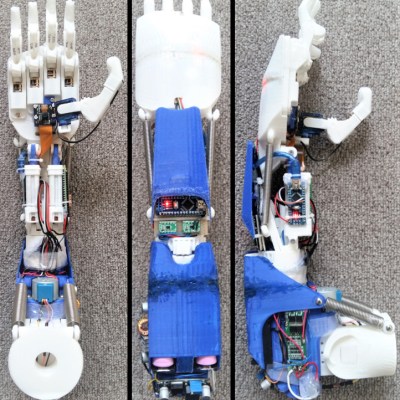
Side views of the 3D printed prosthesis arm.With ten degrees of freedom, including individual fingers, two axes for the thumb and enough wrist movement for the hand to wave with, this is already a pretty impressive robotics build in and of itself. The features don’t stop there however. The entire prosthesis is modular and can be used in different configurations, and it’s all 3D printed for ease of customization and manufacturing. Along with the myoelectric sensor which is how these prostheses are usually controlled, [Duy] also designed the hand to be controlled with computer vision and brain-controlled interfaces.

The palm of the hand has a camera embedded in it, and by passing that feed through CV software the hand can recognize and track objects the user moves it close to. This makes it easier to grab onto them, since the different gripping patterns required for each object can be programmed into the Raspberry Pi controlling the actuators. Because the alpha-wave BCI may not offer enough discernment for a full range of movement of each finger, this is where computer aid can help the prosthesis feel more natural to the user.

We’ve seen a fair amount of creative custom prostheses here, like this one which uses AI to allow the user to play music with it, and this one which gives its user a tattoo machine for an appendage.

Continue reading “3D Printed Prosthesis Reads Your Mind, Sees With Its Hand”

Curbing Internet Addiction In A Threatening Manner

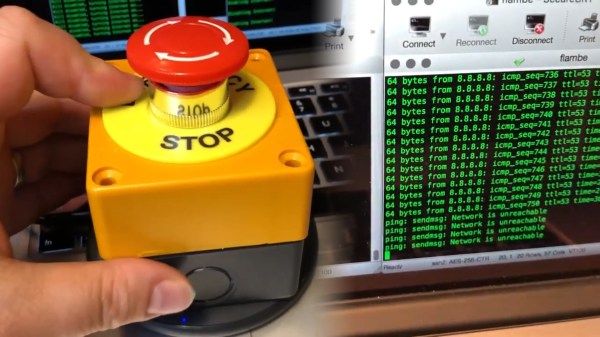
Those who have children of their own might argue that the youth of today are getting far too much internet time. [Nick] decided to put an emergency stop to it and made this ingenious internet kill switch to threaten teenagers with. Rather unassuming on the outside, the big red button instantly kills all network traffic as soon as you push it down, doing its label justice. Reset the toggle button, and the connection is restored, simple as that.

In order to achieve this, [Nick] fit inside the enclosure a Raspberry Pi Zero W, along with a battery and a wireless charging circuit for portability and completely wireless operation. The button is wired into the Pi’s GPIO and triggers a command to the router via SSH over WiFi, where a script listening to the signal tells it to drop the network interfaces talking to the outside world. It’s simple, it’s clean, and you can carry it around with you as a warning for those who dare disobey you. We love it.

Another use for big red buttons we’ve seen in the past is an AC power timer, but you can do just about anything with them if you turn one into an USB device. Check this one in action after the break.

Continue reading “Curbing Internet Addiction In A Threatening Manner”

A Power Bank For Soldering On The Go

If you have a portable gadget, the chances are you’ve probably used power banks before. What few could have predicted when these portable battery packs first started cropping up is that they would one day be used to power soldering irons. Dissatisfied with the options currently available on the market, [Franci] writes in with his own power bank specifically designed for use with his TS80 portable soldering iron.

The electronics side of this build is simple and easy to replicate, with 4 18650 Li-ion cells standard to most high-capacity power banks and an off-the-shelf Fast Charge module serving as the brains of the operation. The beauty of this project however lies in the design of the actual case, completely custom-made from scratch to be 3d printed.

Unlike most power banks, where the outputs stick out to the side and leave the connectors prone to being bumped and damaged, [Franci] engineered his case so the ports are stacked on top and facing inwards. That way, USB plugs are contained within the footprint of the power bank’s body, and therefore protected from bending or snapping off in the socket. He also gracefully provides all instructions needed to make your own, including a wiring guide and a reminder about safety when dealing with battery packs.

If you’re unfamiliar with the TS80 soldering iron, we’ve featured the younger sibling of the TS100 in a previous post. And if you think this power bank is too simple for you, don’t worry, we’ve got you covered.