SingLock

SingLock Protects Your Valuables From Shy People

Two Cornell students have designed their own multi-factor authentication system. This system uses a PIN combined with a form of voice recognition to authenticate a user. Their system is not as simple as speaking a passphrase, though. Instead, you have to sing the correct tones into the lock.

The system runs on an ATMEL MEGA1284P. The chip is not sophisticated enough to be able to easily identify actual human speech. The team decided to focus their effort on detecting pitch instead. The result is a lock that requires you to sing the perfect sequence of pitches. We would be worried about an attacker eavesdropping and attempting to sing the key themselves, but the team has a few mechanisms in place to protect against this attack. First, the system also requires a valid PIN.  An attacker can’t deduce your PIN simply by listening from around the corner. Second, the system also maintains the user’s specific voice signature.

The project page delves much more deeply into the mathematical theory behind how the system works. It’s worth a read if you are a math or audio geek. Check out the video below for a demonstration. Continue reading “SingLock Protects Your Valuables From Shy People”

Copter rotor hub

UAV Coaxial Copter Uses Unique Drive Mechanism

Personal UAV’s are becoming ubiquitous these days, but there is still much room for improvement. Researchers at [Modlab] understand this, and they’ve come up with a very unique method of controlling pitch, yaw, and roll for a coaxial ‘copter using only the two drive motors.

In order to control all of these variables with only two motors, you generally need a mechanism that adjusts the pitch of the propeller blades. Usually this is done by mounting a couple of tiny servos to the ‘copter. The servos are hooked up to the propellers with mechanical linkages so the pitch of the propellers can be adjusted on the fly. This works fine but it’s costly, complicated, and adds weight to the vehicle.

[Modlab’s] system does away with the linkages and extra servos. They are able to control the pitch of their propellers using just the two drive motors. The propellers are connected to the motors using a custom 3D printed rotor hub. This hub is specifically designed to couple blade lead-and-lag oscillations to a change in blade pitch. Rather than drive the motors with a constant amount of torque, [Modlab] adds a sinusoidal component in phase with the current speed of the motor. This allows the system to adjust the pitch of the blades multiple times per rotation, even at these high speeds.

Be sure to watch the demonstration video below. Continue reading “UAV Coaxial Copter Uses Unique Drive Mechanism”

nixieclock

Simple And Elegant Single Digit Nixie Tube Clock

We’ve seen a few Nixie projects around here before, but this one might be the simplest yet. [Pinomelean] designed this simple nixie tube clock with just a handful of components.

The Nixie tube chosen for the project is an IN-12a. This tube can be purchased for around just four dollars. It is capable of displaying one digit at a time, zero through nine. Since the tube can only display one digit at a time, the clock is programmed to flash each digit of the current time one by one. There is a longer pause in between each cycle to make it easier to tell when the cycle begins and ends.

The system is broken into two main components. The first is the clock circuit. The clock runs off a PIC microcontroller with a 4MHz crystal. All of the logic is performed via the PIC and only a handful of other components are required. This includes some resistors and capacitors as well as a few high voltage SMD transistors to control the Nixie tube. [Pinomelean] has made this PCB design available so anyone can download it and make their own clock.

The second component to the clock is the power supply. The system is powered by a lithium-ion rechargeable battery, but [Pinomelean] notes that it can also be powered with USB. The lower voltage works well for the microcontroller, but the Nixie tube needs a higher voltage. [Pinomelean] built his own high voltage supply using components scavenged from an old disposable camera. This power supply board design is also made available for download, but it plugs into the main board so you can use another design if desired.. Check out the demo video below to see it in action. Continue reading “Simple And Elegant Single Digit Nixie Tube Clock”

laser keyboard

MIDI Keyboard With Frickin’ Laser Keys

MIDI instruments are cool, but they’re not laser cool. That is, unless you’ve added lasers to your MIDI instrument like [Lasse].

[Lasse] started out with an old MIDI keyboard. The plan was to recycle an older keyboard rather than have to purchase something new. In this case, the team used an ESi Keycontrol 49. They keyboard was torn apart to get to the creamy center circuit boards. [Lasse] says that most MIDI keyboards come withe a MIDI controller board and the actual key control board.

Once the key controller board was identified, [Lasse] needed to figure out how to actually trigger the keys without the physical keyboard in place. He did this by shorting out different pads while the keyboard was hooked up to the computer. If he hit the correct pads, a note would play. Simple, but effective.

The housing for the project is made out of wood. Holes were drilled in one piece to mount 12 laser diodes. That number is not arbitrary. Those familiar with music theory will know that there are 12 notes in an octave. The lasers were powered via the 5V source from USB. The lasers were then aimed at another piece of wood.

Holes were drilled in this second piece wherever the lasers hit. Simple photo resistors were mounted here. The only other components needed for each laser sensor were a resistor and a transistor. This simple discreet circuit is enough to simulate a key press when the laser beam is broken. No programming or microcontrollers required. Check out the demonstration video below to see how it works. Continue reading “MIDI Keyboard With Frickin’ Laser Keys”

Desk lamp

Sleek Desk Lamp Changes Colors Based On Sun Position

[Connor] was working on a project for his college manufacturing class when he came up with the idea for this sleek desk lamp. As a college student, he’s not fond of having his papers glowing brightly in front of him at night. This lamp takes care of the problem by adjusting the color temperature based on the position of the sun. It also contains a capacitive touch sensor to adjust the brightness without the need for buttons with moving parts.

The base is made from two sheets of aluminum and a bar of aluminum. These were cut and milled to the final shape. [Connor] found a nice DC barrel jack from Jameco that fits nicely with this design. The head of the lamp was made from another piece of aluminum bar stock. All of the aluminum pieces are held together with brass screws.

A slot was milled out of the bottom of the head-piece to make room for an LED strip and a piece of 1/8″ acrylic. This piece of acrylic acts as a light diffuser.  Another piece of acrylic was cut and added to the bottom of the base of the lamp. This makes for a nice glowing outline around the bottom that gives it an almost futuristic look.

The capacitive touch sensor is a pretty simple circuit. [Connor] used the Arduino capacitive touch sensor library to make his life a bit easier. The electronic circuit really only requires a single resistor between two Arduino pins. One of the pins is also attached to the aluminum body of the lamp. Now simply touching the lamp body allows [Connor] to adjust the brightness of the lamp.

[Connor] ended up using an Electric Imp to track the sun. The Imp uses the wunderground API to connect to the weather site and track the sun’s location. In the earlier parts of the day, the LED colors are cooler and have more blues. In the evening when the sun is setting or has already set, the lights turn more red and warm. This is easier on the eyes when you are hunched over your desk studying for your next exam. The end result is not only functional, but also looks like something you might find at that fancy gadget store in your local shopping mall.

Keurig

Dead Simple Hack Allows For “Rebel” Keurig K-Cups

If you haven’t actually used a Keurig coffee machine, then you’ve probably at least seen one. They are supposed to make brewing coffee simple. You just take one of the Keurig “k-cups” and place it into the machine. The machine will punch a hole in the foil top and run the water through the k-cup. Your flavored beverage of choice comes out the other side. It’s a simple idea, run by a more complex machine. A machine that is complicated enough to have a security vulnerability.

Unfortunately newer versions of these machines have a sort of DRM, or lockout chip. In order to prevent unofficial k-cups from being manufactured and sold, the Keurig machines have a way to detect which cups are legitimate and which are counterfeit. It appears as though the machine identifies the lid specifically as being genuine.

It turns out this “lockout” technology is very simple to defeat. All one needs to do is cut the lid off of a legitimate Keurig k-cup and place it on top of your counterfeit cup. The system will read the real lid and allow you to brew to your heart’s content. A more convenient solution involves cutting off just the small portion of the lid that contains the Keurig logo. This then gets taped directly to the Keurig machine itself. This way you can still easily replace the cups without having to fuss with the extra lid every time.

It’s a simple hack, but it’s interesting to see that even coffee machines are being sold with limiting technology these days. This is the kind of stuff we would have joked about five or ten years ago. Yet here we are, with a coffee machine security vulnerability. Check out the video demonstration below. Continue reading “Dead Simple Hack Allows For “Rebel” Keurig K-Cups”

YikYak

Yik Yak MITM Hack (Give The Dog A Bone)

Yik Yak is growing in popularity lately. If you are unfamiliar with Yik Yak, here’s the run down. It’s kind of like Twitter, but your messages are only shared with people who are currently within a few miles of you. Also, your account is supposed to be totally anonymous. When you combine anonymity and location, you get some interesting results. The app seems to be most popular in schools. The anonymity allows users to post their honest thoughts without fear of scrutiny.

[Sanford Moskowitz] decided to do some digging into Yik Yak’s authentication system. He wanted to see just how secure this “anonymous” app really is. As it turns out, not as much as one would hope. The primary vulnerability is that Yik Yak authenticates users based solely on a user ID. There are no passwords. If you know the user’s ID number, it’s game over.

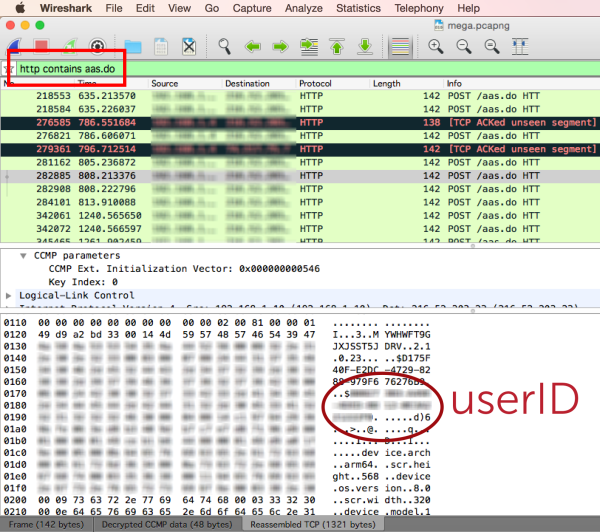
The first thing [Sanford] looked for was an encrypted connection to try to sniff out User ID’s. It turned out that Yik Yak does actually encrypt the connection to its own servers, at least for the iPhone app. Not to worry, mobile apps always connect to other services for things like ad networks, user tracking, etc. Yik Yak happens to make a call to an analytics tool called Flurry every time the app is fired. Flurry needs a way to track the users for Yik Yak, so of course the Yik Yak App tells Flurry the user’s ID. What other information would the anonymous app have to send?

Unfortunately, Flurry disables HTTPS by default, so this initial communication is in plain text. That means that even though Yik Yak’s own communications are protected, the User ID is still exposed and vulnerable. [Sanford] has published a shell script to make it easy to sniff out these user ID’s if you are on the same network as the user.

Once you have the user ID, you can take complete control over the account. [Sanford] has also published scripts to make this part simple. The scripts will allow you to print out every single message a user has posted. He also describes a method to alter the Yik Yak installation on a rooted iPhone so that the app runs under the victim’s user ID. This gives you full access as if you owned the account yourself.

Oh, there’s another problem too. The Android app is programmed to ignore bad SSL certificates. This means that any script kiddie can perform a simple man in the middle attack with a fake SSL certificate and the app will still function. It doesn’t even throw a warning to the user. This just allows for another method to steal a user ID.

So now you have control over some poor user’s account but at least they are still anonymous, right? That depends. The Yik Yak app itself appears to keep anonymity, but by analyzing the traffic coming from the client IP address can make it trivial to identify a person. First of all, [Sanford] mentions that a host name can be a dead giveaway. A host named “Joe’s iPhone” might be a pretty big clue. Other than that, looking out for user names and information from other unencrypted sites is easy enough, and that would likely give you everything you need to identify someone. Keep this in mind the next time you post something “anonymously” to the Internet.

[via Reddit]