Tetris Handheld Powered By Tritium Cell, Eventually

The idea of a tritium power cell is pretty straightforward: stick enough of the tiny glowing tubes to a photovoltaic panel and your DIY “nuclear battery” will generate energy for the next decade or so. Only problem is that the power produced, measured in a few microwatts, isn’t enough to do much with. But as [Ian Charnas] demonstrates in his latest video, you can eke some real-world use out of such a cell by storing up its power over a long enough period.

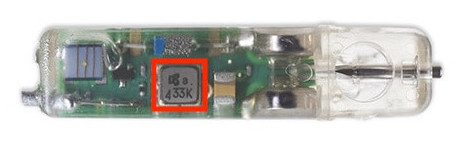
As with previous projects we’ve seen, [Ian] builds his cell by sandwiching an array of keychain-sized tritium tubes between two solar panels. Isolated from any outside light, power produced by the panels is the result of the weak green glow given off by the tube’s phosphorus coating as it gets bombarded with electrons. The panels are then used to charge a bank of thin-film solid state batteries, which are notable for their exceptionally low self-discharge rate.
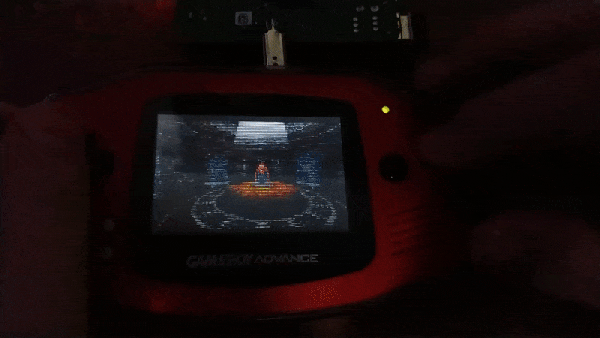
Some quick math told [Ian] that a week of charging should build up enough of a charge to power a knock-off handheld Tetris game for about 10 minutes. Unfortunately, after waiting the prescribed amount of time, he got only a few seconds of runtime out of his hacked together power source.

His best guess is that he got a bad batch of thin-film batteries, but since he could no longer find the exact part number he used originally, he had to design a whole new PCB for the second attempt. After waiting two long months to switch the game on this time, he was able to play for nearly an hour before his homebrew nuclear energy source was depleted.

We wouldn’t consider this terribly practical from a gaming standpoint, but like the solar harvesting handheld game we covered last year, it’s an interesting demonstration of how even a minuscule amount of power can be put to work for intermittent applications. Here it’s a short bout of wonky Tetris, but the concept could just as easily be applied to an off-grid sensor.

Continue reading Tetris Handheld Powered By Tritium Cell, Eventually”

PlayStation Games On The GBA, With A Few Extra Steps

It might seem impossible, but what you’re looking at is a Sony PlayStation game being played on a Nintendo Game Boy Advance. The resolution is miserable and the GBA doesn’t have nearly enough buttons to do most 3D games justice, but it’s working. There’s even audio support, although turning it on will slow things down considerably.

How does it work? The trick is that creator [Rodrigo Alfonso] is actually emulating the PlayStation on a Raspberry Pi and simply using Nintendo’s handheld as an external display and controller. We say “simply”, but of course, it’s anything but. The GitHub page for the project goes into impressive detail on how the whole thing works, but the short version is that the video data is sent from the Linux framebuffer to a small program running on the GBA over the handheld’s serial port using SPI. In testing he was able to push 2.56 Mbps through the link, which is a decent amount of bandwidth when you’ve only got to keep a 240 × 160 screen filled.

Perhaps the best part is that you don’t even need a flash cart to try it at home. [Rodrigo] is using a trick we’ve seen in other GBA projects, where the program is actually transferred to the handheld over the link cable at boot time.

Nintendo introduced this “multiboot” feature so multiplayer games could be played between systems even if they didn’t all have a physical cartridge, but now that hackers have cracked the code, it means you can run arbitrary code on a completely unmodified console; though it does get wiped as soon as you power it off.

[Rodrigo] provides all the information and software you need to try it at home, you just need a Raspberry Pi, a Game Boy Advance, and Link Cable you don’t mind cutting up; far less hardware than is required by the similar project to run DOOM on the NES. Since he’s tied everything into the popular RetroPie frontend, we imagine it would even work when emulating earlier 2D consoles; which would be a much better fit for the GBA’s display and limited inputs.

Muse Group Continues Tone Deaf Handling Of Audacity

When we last checked in on the Audacity community, privacy-minded users of the free and open source audio editor were concerned over proposed plans to add telemetry reporting to the decades old open source audio editing software. More than 1,000 comments were left on the GitHub pull request that would have implemented this “phone home” capability, with many individuals arguing that the best course of action was to create a new fork of Audacity that removed any current or future tracking code that was implemented upstream.

For their part, the project’s new owners, Muse Group, argued that the ability for Audacity to report on the user’s software environment would allow them to track down some particularly tricky bugs. The tabulation of anonymous usage information, such as which audio filters are most commonly applied, would similarly be used to determine where development time and money would best be spent. New project leader Martin “Tantacrul” Keary personally stepped in to explain that the whole situation was simply a misunderstanding, and that Muse Group had no ill intent for the venerable program. They simply wanted to get a better idea of how the software was being used in the real-world, but after seeing how vocal the community was about the subject, the decision was made to hold off on any changes until a more broadly acceptable approach could be developed.

Our last post on the subject ended on a high note, as it seemed like the situation was on the mend. While there was still a segment of the Audacity userbase that was skeptical about remote analytics being added into a program that never needed it before, representatives from the Muse Group seemed to be listening to the feedback they were receiving. Keary assured users that plans to implement telemetry had been dropped, and that should they be reintroduced in the future, it would be done with the appropriate transparency.

Unfortunately, things have only gotten worse in the intervening months. Not only is telemetry back on the menu for a program that’s never needed an Internet connection since its initial release in 2000, but this time it has brought with it a troubling Privacy Policy that details who can access the collected data. Worse, Muse Group has made it clear they intend to move Audacity away from its current GPLv2 license, even if it means muscling out long-time contributors who won’t agree to the switch. The company argues this will give them more flexibility to list the software with a wider array of package repositories, a claim that’s been met with great skepticism by those well versed in open source licensing.

Continue reading “Muse Group Continues Tone Deaf Handling Of Audacity”

Teardown: VTech Smart Start

Regular readers may be aware that I have a certain affinity for vintage VTech educational toys, especially ones that attempted to visually or even functionally tie in with contemporary computer design. In the late 1980s, when it became obvious the personal computer was here to stay, these devices were seen as an affordable way to give kids and even young teens hands-on time with something that at least somewhat resembled the far more expensive machines their parents were using.

Much Smarter: VTech PreComputer 1000

A perfect example is the PreComputer 1000, released in 1988. Featuring a full QWERTY keyboard and the ability to run BASIC programs, it truly blurred the line between toy and computer. In fact from a technical standpoint it wasn’t far removed from early desktop computers, as it was powered by the same Zilog Z80 CPU found in the TRS-80 Model I.

By comparison, the Smart Start has more in common with a desktop electronic calculator. Even though it was released just two years prior to the PreComputer 1000, you can tell at a glance that it’s a far more simplistic device. That’s due at least in part to the fact that it was aimed at a younger audience, but surely the rapid advancement of computer technology at the time also played a part. Somewhat ironically, VTech did still at least attempt to make the Smart Start look like a desktop computer, complete with the faux disk drive on the front panel.

Of course, looks can be deceiving. While the Smart Start looks decidedly juvenile on the outside, that doesn’t mean there aren’t a few surprising technical discoveries lurking under its beige plastic exterior. There’s only one way to find out.

Continue reading “Teardown: VTech Smart Start”

Chip Transplant Brings Timex 2048 Back From Grave

The 1984 Timex Computer 2048 that [Drygol] recently got his hands on was in pretty poor shape. Not only did it have the mangled exterior that comes from several decades of hard use and furious typing, but the internals appeared to be shot as well, with the machine showing nothing but vertical lines when powered up. Thankfully, this retro computer virtuoso was more than up to the challenge of bringing it back from the brink.

After a good cleaning and the installation of a reproduction front panel, the Timex was already looking much better. Unfortunately [Drygol] says he doesn’t currently have the equipment necessary to touch up the graphics and lettering on the key caps, but the fact that he had to qualify that statement with “currently” has us all sorts of excited to see what he’s planning down the line.

A bevy of fresh chips.

Of course beauty is only skin deep, and this particular TC-2048 was still bad to the bone. [Drygol] had a hunch its Z80 processor was dead, but after swapping it and its socket out, the machine still wouldn’t start. Though he did note that the garbled graphics shown on the screen had changed, which made him think he was on the right track. He then replaced all the RAM on the board, but that didn’t seem to change anything.

There isn’t a whole lot else to go wrong on these old machines, so the final step was to try and replace the ROM. Sure enough, after installing a new Winbond W27C512 chip with the appropriate software burned onto it, the nearly 40 year old computer sprang back to life.

Another classic computer saved from the trash heap, but it’s all in a day’s work for [Drygol]. Over the years we’ve seen him perform meticulous repairs on computer hardware that any reasonable person would have given up on. Even if you’re not into retro hardware, his restorations are always full of fascinating tips and tricks that can be applied when repairing gadgetry from whatever era happens to tickle your fancy.

Motorized Camera Slider Gives Your Shots Style

We’ve all seen those smooth panning shots, which combined with some public domain beats, are a hallmark of the modern YouTube tech video. Recreating that style in your own productions is as easy as pointing your browser to Amazon and picking up a motorized camera slider, so long as you don’t mind parting with a few hundred bucks, anyway. But [Paweł Spychalski] had a better idea. He decided to build his own camera slider and make it an open source project so others could spin up their own versions.

His design uses many components that have become popular and affordable thanks to the desktop 3D printer explosion, such as 2020 aluminum extrusion, LM8UU linear bearings, an 8 mm lead screw, and a NEMA 17 stepper motor. In fact, if you’ve got a broken 3D printer that you don’t know what to do with, stripping it for parts would get you a long way towards completing the BOM for this project.

To control the slider, [Paweł] is using an ESP32 and TMC2209 “StepStick” driver connected to an OLED display and a few buttons. As designed, a smartphone connected to a simple web page hosted by the ESP32 is the primary method of controlling the camera, but the buttons and display on the slider itself gives you a physical backup should you need it.

If you need something a bit more advanced than a linear slider, we’ve seen some impressive DIY motion rigs that can spin the camera around the target and produce some very professional looking shots.

Continue reading “Motorized Camera Slider Gives Your Shots Style”

Tuning Into Medical Implants With The RTL-SDR

With a bit of luck, you’ll live your whole life without needing an implanted medical device. But if you do end up getting the news that your doctor will be installing an active transmitter inside your body, you might as well crack out the software defined radio (SDR) and see if you can’t decode its transmission like [James Wu] recently did.

Before the Medtronic Bravo Reflux Capsule was attached to his lower esophagus, [James] got a good look at a demo unit of the pencil-width gadget. Despite the medical technician telling him the device used a “Bluetooth-like” communications protocol to transmit his esophageal pH to a wearable receiver, the big 433 emblazoned on the hardware made him think it was worth taking a closer look at the documentation. Sure enough, its entry in the FCC database not only confirmed the radio transmitted a 433.92 MHz OOK-PWM encoded signal, but it even broke down the contents of each packet. If only it was always that easy, right?

The 433 ended up being a coincidence, but it got him on the right track.

Of course he still had to put this information into practice, so the next step was to craft a configuration file for the popular rtl_433 program which split each packet into its principle parts. This part of the write-up is particularly interesting for those who might be looking to pull data in from their own 433 MHz sensors, medical or otherwise

Unfortunately, there was still one piece of the puzzle missing. [James] knew which field was the pH value from the FCC database, but the 16-bit integer he was receiving didn’t make any sense. After some more research into the hardware, which uncovered another attempt at decoding the transmissions from the early days of the RTL-SDR project, he realized what he was actually seeing was the combination of two 8-bit pH measurements that are sent out simultaneously.

We were pleasantly surprised to see how much public information [James] was able to find about the Medtronic Bravo Reflux Capsule, but in a perfect world, this would be the norm. You deserve to know everything there is to know about a piece of electronics that’s going to be placed inside your body, but so far, the movement towards open hardware medical devices has struggled to gain much traction.