Google Calls It Quits With VR, But Cardboard Lives On

Google giving up on one of their projects and leaving its established userbase twisting in the wind hardly counts as news anymore. In fact, it’s become something of a meme. The search giant is notorious for tossing out ideas just to see what sticks, and while that’s occasionally earned them some huge successes, it’s also lead to plenty of heartache for anyone unlucky enough to still be using one of the stragglers when the axe falls.

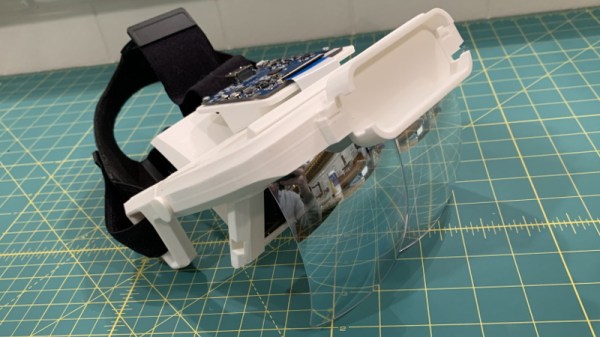
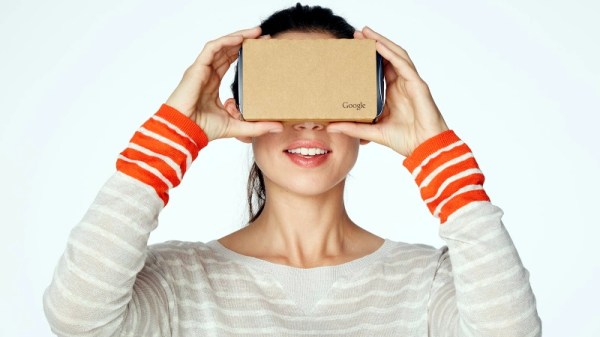
So when the search giant acknowledged in early March that they would no longer be selling their Cardboard virtual reality viewer, it wasn’t exactly a shock. The exceptionally low-cost VR googles, literally made from folded cardboard, were a massive hit when they were unveiled back in 2014. But despite Google’s best efforts to introduce premium Cardboard-compatible hardware with their Daydream View headset two years later, it failed to evolve into a profitable business.

Google Cardboard

Of course if you knew where to look, the writing had been on the wall for some time. While the Daydream hardware got a second revision in 2017, and Google even introduced a certification program to ensure phones would work properly with the $100 USD headset, the device was discontinued in 2019. On the software side, Android 7 “Nougat” got baked-in VR support in 2016, but it was quietly removed by the time Android 11 was released in the fall of 2020.

With Cardboard no longer available for purchase, Google has simply made official what was already abundantly clear: they are no longer interested in phone-based virtual reality. Under normal circumstances, anyone still using the service would be forced to give it up. Just ask those who were still active on Google+ or Allo before the plug was pulled.

But this time, things are a little different. Between Google’s decision to spin it off into an open source project and the legions of third party viewers on the market, Cardboard isn’t going down without a fight. The path ahead might be different from what Google originally envisioned, but the story certainly isn’t over.

Continue reading “Google Calls It Quits With VR, But Cardboard Lives On”

Bluetooth PS3 Controllers Modernize The Nintendo GameCube

While the PlayStation 3 and Gamecube come from opposing sides of the aisle, and in fact aren’t even from the same generation of hardware, this DIY adapter built by [Jeannot] allows Nintendo’s console to use Sony’s Bluetooth controllers with surprisingly little fuss. This might seem unnecessary given the fact that Nintendo put out an official wireless controller for the system, but given how expensive they are on the second-hand market, you’d need to have pretty deep pockets for an untethered four-player session. Plus, there’s plenty of people who simply prefer the more traditional control layout offered by Sony’s pad.

The internals of the 3D printed adapter are actually quite straightforward, consisting of nothing more than an Arduino Nano wired to a MAX3421E USB host shield. A common USB Bluetooth adapter is plugged into the shield, and the enclosure has an opening so it can be swapped out easily; which is important since that’s what the PS3 controller is actually paired to.

A Gamecube controller extension cable must be sacrificed to source the male connector, though if you wanted to fully commit to using Bluetooth controllers, it seems like you could turn this into an internal modification fairly easily. That would let you solder right to the controller port’s pads on the PCB, cutting the bill of materials down ever further.

[Jeannot] says the firmware is the product of combining a few existing libraries with a fair amount of experimentation, but as demonstrated in the video below, it works well enough to navigate the console’s built-in menu system. Future enhancements include getting the stick sensitivity closer to the values for the Gamecube’s standard controller, and adapting the code to work with newer PS4 controllers.

We’ve seen a fair amount of projects dedicated to the Gamecube’s official wireless controller, the Wavebird. From reverse engineering its RF communications protocol to adapting it for use with Nintendo’s latest console. There’s little debate that the Wavebird is a fine piece of engineering, but with how cheap and plentiful PlayStation controllers are, they tend to be the one hackers reach for when they want a dual-stick interface for their latest creation.

Continue reading “Bluetooth PS3 Controllers Modernize The Nintendo GameCube”

NVMe Boot Finally Comes To The Pi Compute Module 4

Since the introduction of the Raspberry Pi Compute Module 4, power users have wanted to use NVMe drives with the diminutive ARM board. While it was always possible to get one plugged in through an adapter on the IO Board, it was a bit too awkward for serious use. But as [Jeff Geerling] recently discussed on his blog, we’re not only starting to see CM4 carrier boards with full-size M.2 slots onboard, but the Raspberry Pi Foundation has unveiled beta support for booting from these speedy storage devices.

The MirkoPC board that [Jeff] looks at is certainly impressive on its own. Even if you don’t feel like jumping through the hoops necessary to actually boot to NVMe, the fact that you can simply plug in a standard drive and use it for mass storage is a big advantage. But the board also breaks out pretty much any I/O you could possibly want from the CM4, and even includes some of its own niceties like an RTC module and I2S DAC with a high-quality headphone amplifier.

Once the NVMe drive is safely nestled into position and you’ve updated to the beta bootloader, you can say goodbye to SD cards. But don’t get too excited just yet. Somewhat surprisingly, [Jeff] finds that booting from the NVMe drive is no faster than the SD card. That said, actually loading programs and other day-to-day tasks are far snappier once the system gets up and running. Perhaps the boot time can be improved with future tweaks, but honestly, the ~7 seconds it currently takes to start up the CM4 hardly seems excessive.

NVMe drives are exciting pieces of tech, and it’s good to see more single-board computers support it. While it might not help your CM4 boot any faster, it definitely offers a nice kick in performance across the board and expands what the system is capable of. Continue reading “NVMe Boot Finally Comes To The Pi Compute Module 4”

Triton AR Headset Blends Stock And Printed Parts

Augmented reality (AR) and natural gesture input provide a tantalizing glimpse at what human-computer interfaces may look like in the future, but at this point, the technology hasn’t seen much adoption within the open source community. Though to be fair, it seems like the big commercial players aren’t faring much better so far. You could make the case that the biggest roadblock, beyond the general lack of software this early in the game, is access to an open and affordable augmented reality headset.

Which is precisely why [Graham Atlee] has developed the Triton. This Creative Commons licensed headset combines commercial off-the-shelf components with 3D printed parts to provide a capable AR experience at a hacker-friendly price. By printing your own parts and ordering the components from AliExpress, basic AR functionality should cost you $150 to $200 USD. If you want to add gesture support you’ll need to add a Leap Motion to your bill of materials, but even still, it’s a solid deal.

Exploded view of the Triton

The trick here is that [Graham] is using the reflectors from a surprisingly cheap AR headset designed to work with a smartphone. By combining these mass produced optics with a six inch 1440 x 2560 LCD panel inside of the Triton’s 3D printed structure, projecting high quality images over the user’s field of view is far simpler than you might think.

If you want to use it as a development platform for gesture interfaces you’ll want to install a Leap Motion in the specifically designed socket in the front, but otherwise, all you need to do is plug in an HDMI video source. That could be anything from a low-power wearable to a high-end gaming computer, depending on what your goals are.

[Graham] has not only provided the STLs for all the 3D printed parts and a bill of materials, but he’s also done a fantastic job of documenting the build process with a step-by-step guide. This isn’t some theoretical creation; you could order the parts right now and start building your very own Triton. If you’re looking for software, he’s also selling a Windows-based “Triton AR Launcher” for the princely sum of $4.99 that looks pretty slick, but it’s absolutely not required to use the hardware.

Of course, plenty of people are more than happy to stick with the traditional keyboard and monitor setup. It’s hard to say if wearable displays and gesture interfaces will really become the norm, of they’re better left to science fiction. But either way, we’re happy to see affordable open source platforms for experimenting with this cutting edge technology. On the off chance any of them become the standard in the coming decades, we’d hate to be stuck in some inescapable walled garden because nobody developed any open alternatives.

Homebrew 68K Micro-ATX Computer Runs Its Own OS

We’re no stranger to home built Motorola 68000 computers here at Hackaday, but more often than not, they tend to be an experiment in retro minimalism. The venerable processor is usually joined by only a handful of components, and there’s an excellent chance they’ll have taken up residence on a piece of perfboard. Then [NotArtyom] sent in his Blitz, and launched the bar into the stratosphere.

Make no mistake, the Blitz isn’t just some simple demo of classic chips. The open hardware motherboard has onboard floppy, IDE, and PS/2 interfaces, with a trio of 8-bit ISA expansion slots for good measure. The  Motorola 68030 CPU is humming along at 50 MHz, with 4 MB of RAM and 512 KB of ROM along for the ride. Designed to fit the Micro-ATX motherboard standard, you can even mount the Blitz in a contemporary PC case and run it on a standard ATX power supply.

An earlier prototype of the Blitz motherboard.

As if the hardware wasn’t impressive enough, [NotArtyom] went ahead and created his own open source DOS-like operating system for it to run. Written in portable C, G-DOS can run on various m68k boards as well as ARM and PowerPC machines. It’s an incredible project in its own right. If you’re looking for something to show off your homebrew computer, you could certainly do worse than pulling down a copy of G-DOS. If you do port it to a new board, make sure to let [NotArtyom] know.

It’s taken [NotArtyom] three years to develop Blitz and G-DOS with his only goal being to better understand homebrew computers. He has no interest in monetizing the design or turning it into a kit, but instead hopes it will be a resource and inspiration for others with similar interests. Oh yeah, and he did all of this before he even graduated high school. If you weren’t questioning your life’s accomplishments before, now would be a great time to start.

Interested in building your own Motorola 68000 computer, but haven’t yet attained the wizarding level of [NotArtyom]? You could start with something a bit simpler like the 68k-nano, or if you’re really in a pinch, just dead bug a Dragonball 68328.

The Future’s So Bright, You Gotta Wear Arduglasses

Tiny OLED displays are an absolute must-have in the modern parts bin, so what better way to show your allegiance to the maker movement than with a pair of Arduino-compatible OLED glasses? Created by Arduboy mastermind [Kevin Bates], these digital spectacles might not help you see any better — in fact, you’ll see a bit worse — but they’ll certainly make you stand out in the crowd at the next hacker con. (Whenever we can have one of those again, anyway.)

The key to this project is a pair of transparent CrystalFonts OLED displays, just like the ones [Sean Hodgins] recently used to produce his gorgeous volumetric display. In fact, [Kevin] says it was his success with these displays that inspired him to pursue his own project. With some clever PCB design, he came up with some boards that could be manufactured by OSH Park and put together with jewelry box hinges. Small flexible circuits, also from OSH Park, link the boards and allow the frames to fold up when not being worn.

The Arduglasses use the same ATmega32U4 microcontroller as the Arduboy, and with a few basic controls and a small 100 mAh rechargeable battery onboard, they can technically run anything from the open source handheld’s extensive software library. Of course, technically is the operative word here. While the hardware is capable of playing the games, [Kevin] reports that the OLED displays are too close to the wearer’s eyes to actually focus on them. That said the ability to easily create software for these glasses offers plenty of opportunity for memes, as we see in the video below.

For reasons that are probably obvious, [Kevin] considers the Arduglasses an experiment and isn’t looking to turn them into a commercial product or kit. But if there’s interest, he’s willing to put the design files up on GitHub for anyone who wants to add a pair of Arduino glasses to their cyberpunk wardrobe.

Continue reading “The Future’s So Bright, You Gotta Wear Arduglasses”

Open Source Motion Controller For DIY Drones

DJI recently introduced a slick motion controller that eschews the traditional dual-stick transmitter and allows you to fly their new “FPV Drone” with just one hand. The fact that it looks like it could double as the control stick for an X-Wing is just an added bonus. Unfortunately, that single model is the only thing the $199 USD controller is currently compatible with. Unwilling to get locked into the DJI ecosystem, [Paweł Spychalski] has developed an open source work-alike motion controller that brings gesture flying to home-built quadcopters and airplanes.

Now to be clear, you’ll still need a traditional transmitter to use this device. Rather than trying to reinvent the wheel, [Paweł] decided to implement his motion controller as an add-on for OpenTX hardware like the RadioMaster TX16S. It simply plugs into the trainer port on the back of the transmitter and acts as a secondary input. This greatly simplifies the design, as it essentially just needs to read angle data from its MPU-6050 gyro/accelerometer and forward it along to OpenTX over the serial port. Plus the fact that it’s connected to the trainer port means you can disable it and return to traditional controls in an instant if anything goes wrong.

Outside of the motion sensing gear, the ESP32-powered peripheral also has a thumb stick and a pair of push buttons nestled into its 3D printed frame. An OLED display provides some user feedback, and a holder for a 18650 cell is mounted to the back side as the controller will need its own power source when [Paweł] gets around to making its connection to the transmitter wireless.

In the video below, [Paweł] takes the motion controller for a test flight and comes away largely satisfied with the results. Some tweaks are in the works as you might expect for a first attempt, but nothing that would prevent you from building your own version today and experiencing what might be the next evolution of RC flying.

Continue reading “Open Source Motion Controller For DIY Drones”