This Stackable Pi Portable Is Ready To Rumble

The proliferation of desktop 3D printing and powerful single-board computers like the Raspberry Pi has given rise to an absolute explosion of small bespoke computing devices. Whether or not you think these cobbled together devices are close enough to Gibson’s original vision to call them cyberdecks, it’s a remarkable shift from the norm that brings us closer to the “High Tech, Low Life”  philosophy so prevalent in cyberpunk literature and films.

[Jay Doscher] has been on the front lines of this movement for some time now, producing several very popular designs. His latest creation leans hard into the more utilitarian aspects of the cyberpunk ethos, inspired more by the grit of The Expanse than the lusciously upholstered interiors of Star Trek’s Enterprise-D. The culmination of lessons learned over the last several years, the new Kuiper Deck is cheaper and easier to build than his previous designs, thanks at least in part to the fact that you no longer need to go out and get an expensive Pelican case.

Like his previous designs, the Kuiper Deck makes extensive use of 3D printed components. But this time around, [Jay] is using an array of smaller pieces that are bolted together on an acrylic front panel. This not only means the project is compatible with a wider array of machines, such as the Prusa Mini, but it’s also easier to print as larger parts have an annoying tendency to warp. The downside is that you’ll need some way to get the acrylic panel cut to shape, though you can buy one through him if you don’t have any way to get it made locally.

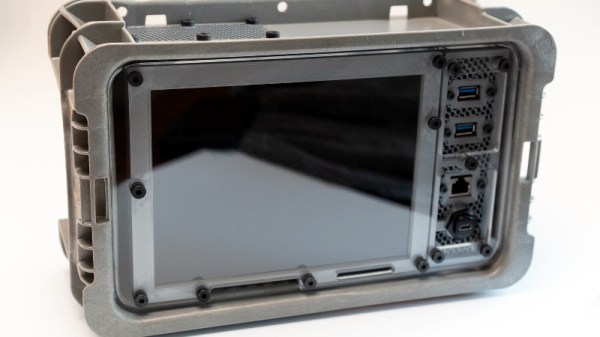
In place of the Pelican case his previous designs used as an enclosure, [Jay] has found a heavy-duty stackable plastic tote available from McMaster Carr for $12 USD. It’s not particularly nice looking, nor is it waterproof. But that’s also sort of the point. If you’re just trying to put together a small computer that you can toss around the shop and not have to worry about breaking, the Pelican case was always a bit overkill.

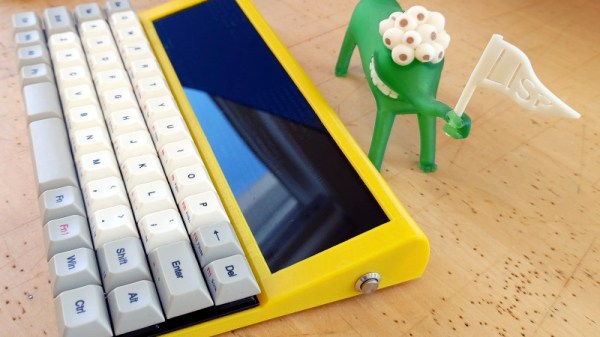
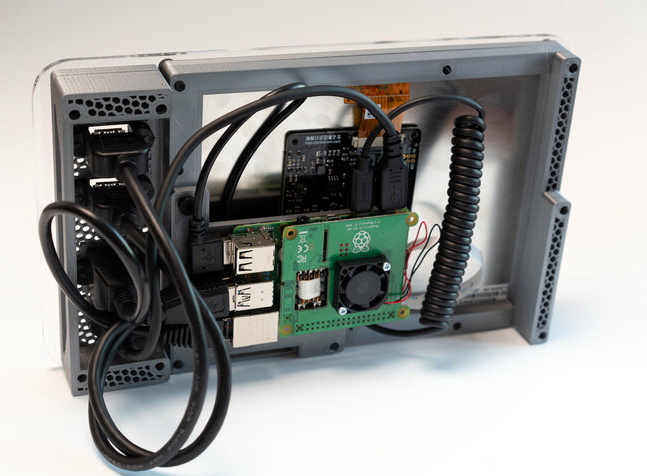
The electronics bill of materials is similarly sparse, comprising mainly of the Raspberry Pi 4, a cooling fan, and a 10 inch LCD from Pimoroni. Everything gets screwed to the rear of the panel and connected with pre-made cables, making assembly very simple. That said, there’s still plenty of room inside the case for custom hardware should you want to put something custom together such as a mobile software defined radio rig.

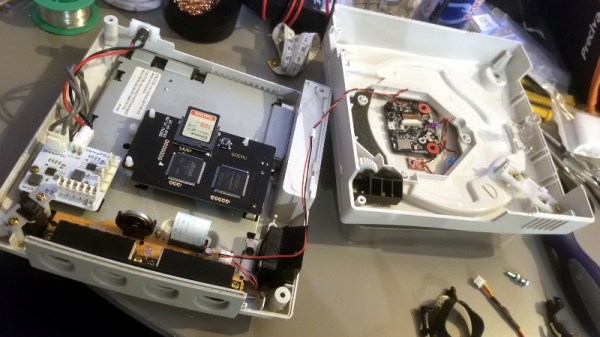
[Jay] created the original Raspberry Pi Field Unit in 2015, but it wasn’t until he unveiled the revised Raspberry Pi Recovery Kit in 2019 that the idea of sticking a Raspberry Pi into a Pelican case became something of hacker meme. It sounds like the Kuiper Deck is going to be his final word on the subject for now, but it’s a safe bet we’ll be seeing folks putting together similar builds for years to come.

Europa Decision Delivers Crushing Blow To NASA’s Space Launch System (SLS)

These days, NASA deciding to launch one of their future missions on a commercial rocket is hardly a surprise. After all, the agency is now willing to fly their astronauts on boosters and spacecraft built and operated by SpaceX. Increased competition has made getting to space cheaper and easier than ever before, so it’s only logical that NASA would reap the benefits of a market they helped create.

So the recent announcement that NASA’s Europa Clipper mission will officially fly on a commercial launch vehicle might seem like more of the same. But this isn’t just any mission. It’s a flagship interplanetary probe designed to study and map Jupiter’s moon Europa in unprecedented detail, and will serve as a pathfinder for a future mission that will actually touch down on the moon’s frigid surface. Due to the extreme distance from Earth and the intense radiation of the Jovian system, it’s considered one of the most ambitious missions NASA has ever attempted.

With no margin for error and a total cost of more than $4 billion, the fact that NASA trusts a commercially operated booster to carry this exceptionally valuable payload is significant in itself. But perhaps even more importantly, up until now, Europa Clipper was mandated by Congress to fly on NASA’s Space Launch System (SLS). This was at least partly due to the incredible power of the SLS, which would have put the Clipper on the fastest route towards Jupiter. But more pragmatically, it was also seen as a way to ensure that work on the Shuttle-derived super heavy-lift rocket would continue at a swift enough pace to be ready for the mission’s 2024 launch window.

But with that deadline fast approaching, and engineers feeling the pressure to put the final touches on the spacecraft before it gets mated to the launch vehicle, NASA appealed to Congress for the flexibility to fly Europa Clipper on a commercial rocket. The agency’s official line is that they can’t spare an SLS launch for the Europa mission while simultaneously supporting the Artemis Moon program, but by allowing the Clipper to fly on another rocket in the 2021 Consolidated Appropriations Act, Congress effectively removed one of the only justifications that still existed for the troubled Space Launch System.

Continue reading “Europa Decision Delivers Crushing Blow To NASA’s Space Launch System (SLS)”

PCB Mods Silence Voltage Warnings On The Pi 4

If you’ve ever pushed the needle a bit on your Raspberry Pi, there’s a good chance you’ve been visited by the dreaded lightning bolt icon. When it pops up on the corner of the screen, it’s a warning that the input voltage is dipping into the danger zone. If you see this symbol often, the usual recommendation is to get a higher capacity power supply. But experienced Pi wranglers will know that the board can still be skittish.

Sick of seeing this icon during his MAME sessions, [Majenko] decided to attack the problem directly by taking a close look at the power supply circuitry of the Pi 4. While the official schematics for everyone’s favorite single-board computer are unfortunately incomplete, he was still able to identify a few components that struck him as a bit odd. While we wouldn’t necessarily recommend you rush out and make these same modifications to your own board, the early results are certainly promising.

The first potential culprit [Majenko] found was a 10 ohm resistor on the 5 V line. He figured this part alone would have a greater impact on the system voltage than a dodgy USB cable would. The components aren’t labeled on the Pi’s PCB, but with a little poking of the multimeter he was able to track down the 0402 component and replace it with a tiny piece of wire. He powered up the Pi and ran a few games to test the fix, and while he definitely got fewer low-voltage warnings, there was still the occasional brownout.

Do we really need this part?

Going back to the schematic, he noticed there was a 10 uF capacitor on the same line as the resistor. What if he bumped that up a bit? The USB specifications say that’s the maximum capacitive load for a downstream device, but he reasoned that’s really only a problem for people trying to power the Pi from their computer’s USB port.

Tacking a 470 uF electrolytic capacitor to the existing SMD part might look a little funny, but after the installation, [Majenko] reports there hasn’t been a single low-voltage warning. He wonders if the addition of the larger capacitor might make removing the resistor unnecessary, but since he doesn’t want to mess with a good thing, that determination will be left as an exercise for the reader.

It’s no secret that the Raspberry Pi 4 has been plagued with power issues since release, but a newer board revision released last year helped smooth things out a bit. While most people wouldn’t go this far just to address the occasional edge case, it’s good to know folks are out there experimenting with potential fixes and improvements.

Restored Dreamcast Is A SEGA Fan’s Dream Come True

[Bren Sutton] has been a long time fan of SEGA’s Dreamcast, eagerly snapping one up right around its October 1999 European release. But after years of neglect and a somewhat questionable paint job a decade or so back, he decided it was time to spruce his old friend up. He could have just cleaned the machine and been done with it, but he took the opportunity to revamp the console’s internals with both practical and cosmetic trickery.

The first step was getting the system looking a bit fresher. Removing the silver metallic paint he applied in his youth with a rattle can wasn’t going so well, so he ended up buying a broken donor console on eBay so he’d have a new shell to work with. The donor was yellowed with age, but a coating of peroxide cream and a few hours under a cheap UV light got it whitened up nicely. Now that he had a fresh new case, [Bren] turned his attention to the internal components.

Those who might be plugged into the active Dreamcast homebrew scene may already know that several upgrade modules exist for SEGA’s last home game console. One of the most popular replaces the optical drive with an SD card filled with your favorite game ISOs. You can also get a modern high efficiency power supply, as well as a board that replaces the original soldered-on clock battery with a slot that fits a CR2032. [Bren] threw them all in, ensuring several more years of gaming bliss.

But he wasn’t done yet. He also wanted to add some visual flair to his new and improved console. After some consideration, he gingerly cut the logo out of the Dreamcast’s lid, and installed an Adafruit CLUE board underneath it. With a few carefully crafted GIFs installed onto the CircuitPython-powered board, the console now has a gorgeous fully animated logo that you can see in the video after the break.

[Bren] could have really taken his console to the next level by doubling its available RAM to an eye-watering 32 MB, but considering the limited software support for that particularly bodacious modification, we’ll let it slide. Continue reading “Restored Dreamcast Is A SEGA Fan’s Dream Come True”

Stay Focused With This Distraction Free Cyberdeck

While on the surface they might seem like little more than cosplay accessories, there are perfectly valid and practical reasons for building a custom cyberdeck. For one thing, a hand-built deck is going to be easier to upgrade and modify down the line. A bespoke rig can also be made to fit your exacting specifications, with each and every design choice made specifically to support your personal style and workflow.

For [Conrad Barski], that meant a computer that would stay out of his way and allow him to take notes and write code while keeping distractions to the absolute minimum. All he wanted in his dream machine was a nice mechanical keyboard, a widescreen display, and enough battery power to go mobile should the need arise. Anything else would be gilding the lily. For those who want to distill personal computing down to its simplest form, this build is really the high water mark.

[Conrad] is currently in the early stages of turning his Lisperati1000 into a kit others can build for themselves, so details are a bit sparse at the moment. But we do know there’s a Raspberry Pi Zero W, a Vortex Core 40% keyboard, and 4,400 mAh worth of battery power wrapped up in that slick 3D printed enclosure. Readers may recognize the 1920×480 ultra-wide LCD from the modernized TRS-80 Model 100 we covered recently, or perhaps the gorgeously reimagined retro terminals of [Oriol Ferrer Mesià]. If you’ve got retro-futurism on the brain, this seems to be the display to beat.

Whether you want to explore vintage computing, stylishly take control of your custom race car, or cruise the airwaves with an integrated software defined radio, a completely custom portable computing device can make for an interesting alternative to another ho-hum laptop from the Big Box electronics store.

Teardown: Bug Zapper Bulb

Up here in the Northern Hemisphere, mosquitoes and other flying pests are the last thing on anyone’s mind right now. The only bug that’s hindering gatherings at the moment goes by the name of COVID-19, but even if we weren’t social distancing, insects simply aren’t a concern at this time of year. So it’s little surprise that these months are often the best time to find a great deal on gadgets designed to deter or outright obliterate airborne insects.

Whatever PIC stands for…it’s not that.

Case in point, I was able to pick up this “Bug Zapper LED Bulb” at the big-box hardware store for just a few bucks. This one is sold by PIC Corporation, though some press release surfing shows the company merely took over distribution of the device in 2017. Before then it was known as the Zapplight, and was the sort of thing you might see advertised on TV if you were still awake at 3 AM. It appears there are several exceptionally similar products on the market as well, which are likely to be the same internally.

In all fairness, it’s a pretty clever idea. Traditional zappers are fairly large, and need to be hoisted up somewhere next to an electrical outlet. But if you could shrink one down to the size of a light bulb, you could easily dot them around the porch using the existing sockets and wiring. Extra points if you can also figure out a way to make it work as a real bulb when the bugs aren’t out. Obviously the resulting chimera won’t excel at either task, but there’s certainly something to be said for the convenience of it.

Let’s take a look inside one of these electrifying illuminators and see how they’ve managed to squeeze two very different devices into one socket-friendly package.

Continue reading “Teardown: Bug Zapper Bulb”

VESA Arm Turned Low-Cost Overhead Camera Rig

Whether you’re live streaming builds or just want to take your project photography to the next level, you can’t beat an overhead camera setup. Unfortunately, they tend to be cumbersome and more often than not quite pricey. Looking for an affordable solution that could easily be moved out of the way when not in use, [Jay Doscher] had the clever idea of adapting a common VESA monitor arm to give his camera a bird’s eye view of the action.

If you think about it, one of these monitor arms is a nearly perfect base for a camera rig. They’re easily mounted to a desk or work bench, can be quickly repositioned by design, and perhaps best of all, you don’t have to spend a lot of money to get a decent one. A camera is also a far lighter and less awkward payload than the arm was designed to hold, so you don’t have to worry about it potentially dropping your expensive gear. Or cheap webcam, as the case may be.

All [Jay] had to do was come up with a way to securely mount his Sony A7R3 on the end of one. While there’s certainly a few ways you could solve this particular problem, he went the extruded plastic route and 3D printed a beefy adapter plate with the standard VESA bolt pattern. His Smallrig camera cage attaches to the plate, and thanks to a pair of press-fit bubble levels from McMaster Carr, he’s able to get everything lined up properly over the bench.

Of course, there’s an excellent chance you don’t have the same camera as [Jay]. But that doesn’t mean you can’t modify the design of his adapter to fit your own gear. To that end, he’s not only shared the final STLs, but he’s provided a link to the TinkerCAD project that you can actually edit right in the browser.

If you’ve got a light enough camera, you could put something similar together with PVC pipes or even an articulated arm intended for a desk lamp. But if you’ve got a DSLR or other full-sized camera, we think it’s more than worth the $30 USD one of these will cost you on Amazon to make sure your gear doesn’t end up smashing into the deck during a live stream.