GBA Gets Homebrew USB Charging Upgrade

Sure there are pre-made kits to add a rechargeable battery and USB-C compatibility to Nintendo’s venerable Game Boy Advance, but [HorstBaerbel] thought he could throw together something similar for a fraction of the price. Plus, he wouldn’t have to wait on shipping. The end result might not be quite as polished, but it’s certainly impressive for what’s essentially a junk bin build.

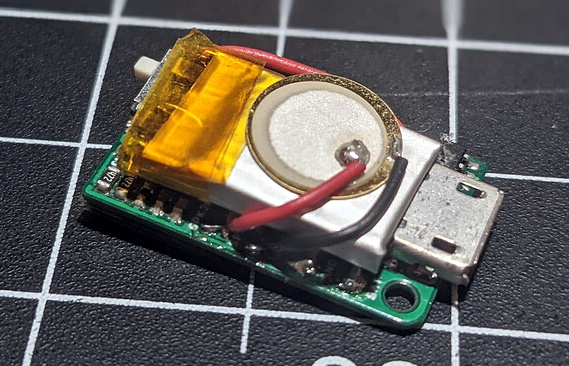
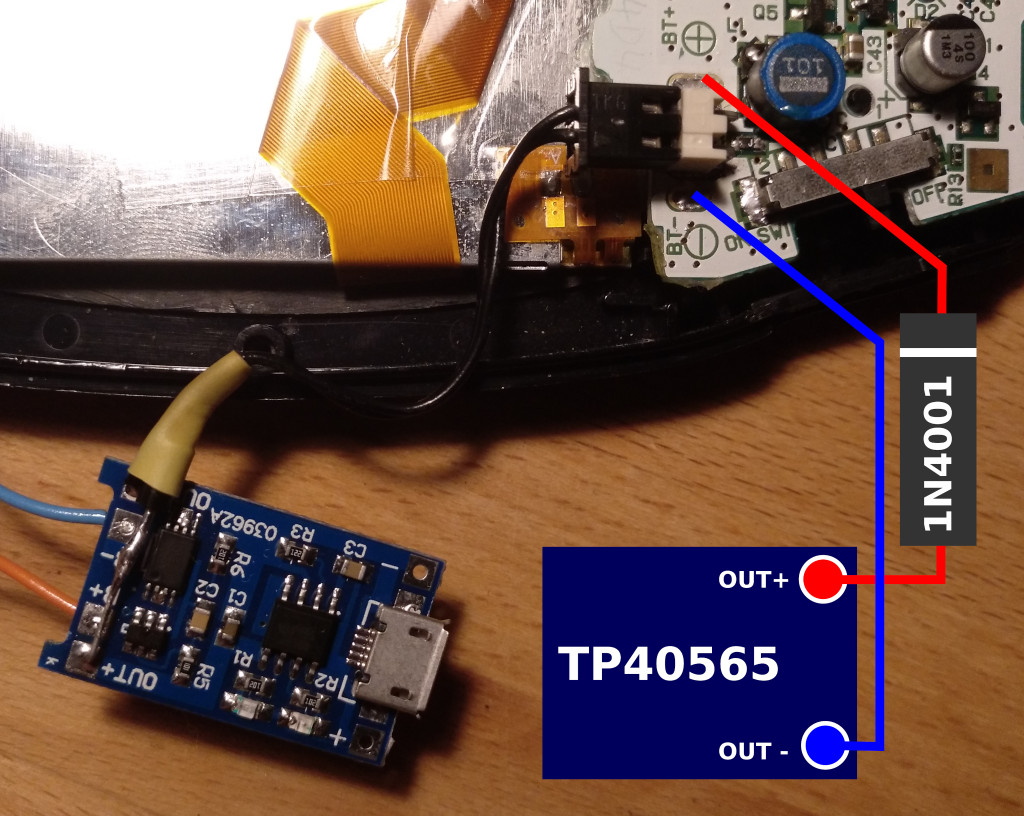
The star of the show is the popular TP4056 lithium-ion charger module. [HorstBaerbel] went with the more common micro USB version, but these boards are also available with USB-C should you want to embrace the future. The module fits nicely inside the original battery compartment while while still leaving room for a 1,000 mAh pouch cell. The 4.2 V output of the fully charged battery is a bit too high for the Game Boy’s liking, so he used the forward voltage drop of a diode to bring it down to a more acceptable 3.5 V.

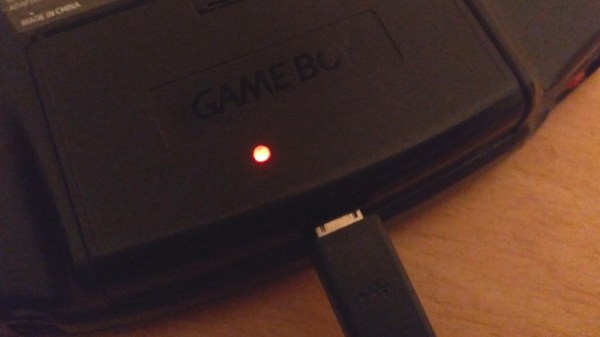
Naturally this does waste a good deal of energy, especially compared to the DC-DC converters used in commercial offerings like the CleanJuice, but it still delivers a respectable seven hours of runtime. The only issue with this modification seems to be that you’ve got just five minutes to save your progress and shut down when the GBA’s low-battery light goes on; but what’s life without a little excitement?

While not nearly extreme as some of the other GBA modifications we’ve seen over the years, this project is yet another example of the seemingly unlimited hacking potential of Nintendo’s iconic Game Boy line.

LoRa Messenger Does Its Best BlackBerry Impression

While the de facto smartphone design ultimately went in a different direction, there’s no denying the classic BlackBerry layout offered some compelling advantages. It was a gadget primarily designed to send and receive emails and text messages, and it showed. So is it really any wonder [MSG] would build his pocket-sized LoRa messengers in its image?

Of course, he did have some help. The communicators use the Keyboard FeatherWing by [arturo182], which puts a surplus BlackBerry Q10 keyboard on a custom PCB designed to accept a board from Adafruit’s Feather collection. [MSG] ended up pairing his with a Feather M4 because he wanted to work with CircuitPython, with a 900 MHz LoRa FeatherWing along for the ride. He notes that switching his code over to Arduino-flavored C would allow him to use the Feather M0 that features integrated LoRa; a change that would allow him to make the gadget a bit thinner.

Inside the 3D printed enclosure, He’s made room for a 3.7 V 1800 mAh pouch battery that should provide plenty of runtime. There’s also an external antenna with a uFL pigtail for connecting to the radio. The case is held together with heat-set inserts, which should make it more than robust enough to handle a few adventures.

[MSG] says slight variations in hardware versions means his STLs might need a little tweaking to fit your components, and warns that his code is basically just a mashup of examples he found online, but he’s still sharing the goods for anyone who wants to reach out and touch someone without all that pesky infrastructure in the way.

Continue reading “LoRa Messenger Does Its Best BlackBerry Impression”

Raspberry Pi Takes Over Volvo’s Integrated LCD

As [Luuk Esselbrugge] explains in a recent blog post, his 2002 Volvo S60 had an optional GPS navigation system and backup camera that used a motorized display that would rise out of the dashboard when needed. His particular car didn’t come with the hardware installed, but after getting his hands on a display module and doing some research, he figured out how he could drive it with the Raspberry Pi and a couple of microcontrollers.

Given the age of the display, you probably won’t be surprised to hear that it uses composite video. Not exactly high resolution, but in the demonstration after the break, we have to admit it looks more than up to the task. [Luuk] is running Android Auto on the Raspberry Pi 3 through the openauto project, which gives him a nice big display and access to all the navigation and media applications you’d expect. The display doesn’t support touch, but thanks to an ESP32 plugged into the CAN bus, he’s able to control the software by reading the buttons built into the Volvo’s steering wheel.

Composite video sources are switched with a simple relay.

To actually raise and lower the display, [Luuk] found you just need to fire a few bytes down the 1,200 baud serial bus that’s built into the display’s wiring harness. The ESP32 handles this duty as well, at least partly because it’s already plugged into the CAN bus and can tell when the vehicle is in reverse. This lets it bring up the screen to show the video feed from the newly installed backup camera in the event that the Pi hadn’t already asked to raise the display. Incidentally plugging in the phone normally triggers the system to wake up and raise the screen, and disconnecting it will command the screen to lower back into the stowed position.

The attentive reader or Volvo aficionado may be wondering how [Luuk] got the audio working. Since his car’s sound system doesn’t feature an auxiliary input, he’s using an Arduino to spoof the existence of a CD changer, which allows him to inject an audio signal into one of the pins on the back of the radio. Eventually he wants to move this task over to the ESP32, but he says a big change like that will have to wait until warmer weather.

This isn’t the first time we’ve seen the Raspberry Pi used to add enhanced features to a somewhat older vehicle. While some bemoan the increased complexity of modern vehicles, it seems some hackers can’t get enough of it.

Continue reading “Raspberry Pi Takes Over Volvo’s Integrated LCD”

Arduboy Gets Even Smaller With New Nano Edition

One of the selling points of the Arduboy is how slim [Kevin Bates] was able to get the Arduino-compatible game system, which is perhaps less surprising when you realize that it originally started out as a design for an electronic business card. But compared to the recently unveiled Nano version, it might as well be the old school “brick” Game Boy.

Now to be clear, [Kevin] isn’t looking to put these into official production. Though it does sound like the bare PCBs might be going up for sale in the near future. This was simply an experiment to see how far he could shrink the core Arduboy hardware while still keeping it not only playable but also code-compatible with the full-size version. While “playable” might be a tad subjective in this case, the video after the break clearly demonstrates that it’s fully functional.

Inside the 3D printed case is the same ATmega32U4 that powers the Arduboy, a 64×32 0.49″ OLED display, and a tiny 25 mAh pouch battery. There’s even a miniature piezo speaker for the bleeps and bloops. All of the pinouts have remained the same so existing code can be moved right over, though the screen is now connected over I2C. [Kevin] has released the schematics for the board in keeping with the general open nature of the Arduboy project, though for now he’s decided to hold onto the board files until it’s clear whether or not there’s a commercial future for the Nano.

We’ve seen attempts to shrink the Arduboy down before, most notably down to the point it could fit inside of a Dreamcast Visual Memory Unit, but the Nano certainly raises (or is that lowers?) the bar considerably.

Continue reading “Arduboy Gets Even Smaller With New Nano Edition”

Motor Controller Reverse Engineering Releases Smoke

It may have been designed for a sewing machine, but [Haris Andrianakis] found his imported DC brushed motor was more than up to the challenge of powering his mini lathe. Of course there’s always room for improvement, so he set out to reverse engineer the motor’s controller to implement a few tweaks he had in mind. Unfortunately, things took an unexpected turn when plugging his AVR programmer into the board’s ISP socket not only released the dreaded Magic Smoke, but actually tripped the breaker and plunged his bench into darkness.

Studying how the Hall-effect sensors in the motor are wired.

Upon closer inspection, it turned out the board has no isolation between the high voltage side and its digital logic. When [Haris] connected his computer to it via the programmer, the 330 VDC coming from the controller’s rectifier shorted through the USB bus and tripped the Earth-leakage circuit breaker (ELCB). The good news is that his computer survived the ordeal, and even the board itself seemed intact. But the shock must have been too much for the microcontroller he was attempting to interface with, as the controller no longer functioned.

Now fully committed, [Haris] started mapping out the rest of the controller section by section. In the write-up on his blog, he visually masks off the various areas of the PCB so readers have an easier time following along and understanding how the schematics relate to the physical board. It’s a nice touch, and a trick worth keeping in mind during your own reverse engineering adventures.

In the end, [Haris] seems to have a good handle on what the majority of the components are up to on the board. Which is good, since getting it working again now means replacing the MCU and writing new firmware from scratch. Or perhaps he’ll just take the lessons learned from this controller and spin up his own custom hardware. In either event, we’ll be keeping an eye out for his next post on the subject.

Twisted Tea Launcher Refreshes At 104 MPH

A few weeks ago, a video went viral on social media that depicted a rather unsavory individual receiving what could be described as a “percussive reminder” of social norms courtesy of a bystander armed with a can of Twisted Tea. The video served as inspiration for many a meme, but perhaps none more technically intricate than this air cannon that launches 24 ounces of hard iced tea at better than 100 miles per hour built by [Greg Bejtlich].

It’s all fun and games until somebody brings out the weaponized bead seater.

Technically we’re looking at two different hacks here. The first is the pneumatic launcher put together using a low-cost eBay tire bead seater. These tools are designed to unleash a large volume of air into a tire so it can be properly seated onto the rim, but it doesn’t take much more than a few pieces of PVC pipe from the hardware store to turn it into an impromptu mortar. It’s even got a convenient trigger and a handle to help control the recoil. Though as you can see in the video after the break, it still ends up being a bit too energetic for [Greg] to keep a grip on.

For the projectiles, [Greg] has 3D printed a nose cone and tail fin that snap onto the 24 oz cans in hopes of making them more aerodynamically stable. The slow motion video seems to indicate they aren’t terribly effective, but they certainly look impressive. Spring-loaded control surfaces that deploy after the can leaves the muzzle could be the answer, though at some point you have to ask yourself how far you’re willing to go for an Internet meme.

It probably goes without saying that you definitely shouldn’t try firing cans of alcoholic iced tea off in your backyard. But the launcher itself might be useful for lofting antennas or hurling the occasional potato.

Continue reading “Twisted Tea Launcher Refreshes At 104 MPH”

Orphaned Gimbal Gets Second Chance To Fly

A reality of flying RC aircraft is that at some point, one of your birds is going to fall in the line of duty. It could get lost in the clouds never to be seen again, or perhaps it will become suddenly reacquainted with terra firma. Whatever the reason, your overall enjoyment of the hobby depends greatly on how well you can adapt to the occasional loss.

Based on what we’ve seen so far, we’d say [Rural Flyer] has the right temperament for the job. After losing one of his quadcopters in an unfortunate FPV incident, he decided to repurpose the proprietary gimbal it left behind. If he still had the drone he could have slipped a logic analyzer in between its connection with the motorized camera to sniff out the communication protocol, but since that was no longer an option, he had to get a little creative.

Figuring out the power side of things was easy enough thanks to the silkscreen on the camera’s board, and a common 5 V battery eliminator circuit (BEC) connected to the drone’s 7.4 V battery pack got it online. A cobbled together adapter allowed him to mount it to one of his other quads, but unfortunately the angle wasn’t quite right.

[Rural Flyer] wanted the camera tilted down about 15 degrees, but since he didn’t know how to talk to it, he employed a clever brute force solution. After identifying the accelerometer board responsible for determining the camera’s position, he use a glob of hot glue to push the sensor off of the horizontal. Providing this physical offset to the sensor data caused the camera to automatically move itself to exactly where he wanted it.

Continue reading “Orphaned Gimbal Gets Second Chance To Fly”