Get Quarantine Fit With This Smart Pull-up Bar

Most gyms are closed right now due to social distancing rules, which is what we’re using as our latest excuse to justify our sloth-like lifestyle. But apparently some people miss working out enough that they’re putting together impromptu home gyms. [Michael Pick] has even outfitted his DIY pull-up station with an Arduino to keep track of his exercise while on lockdown. You may not like it, but this is what peak performance looks like.

Can you beat the HaD high score?

In the video after the break, [Michael] explains the design and construction of the bar itself which technically could be thought of as its own project. Obviously the Arduino counter isn’t strictly necessary, so if you just wanted to know how to put some scraps of wood and suitably beefy rod together in such a way that it won’t rip off the wall when you put your weight on it, this video is for you.

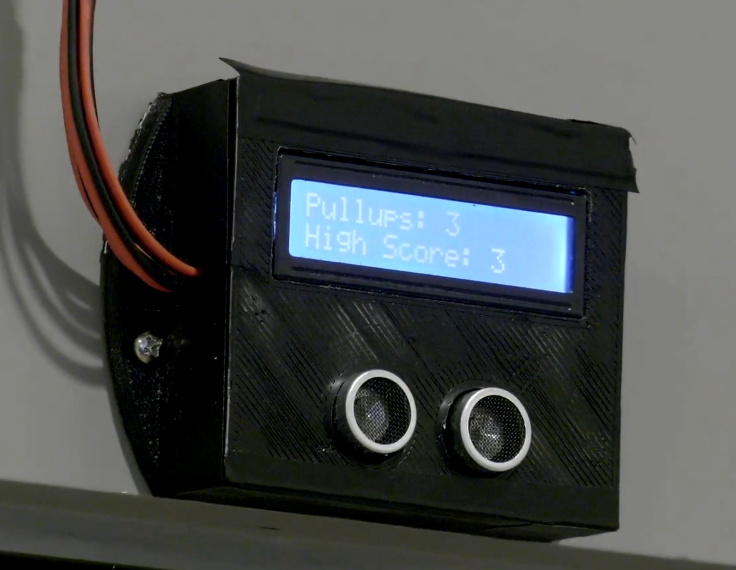
Towards the end of the video, he gets into an explanation of the electronic side of the project. Inside the 3D printed enclosure is an Arduino Pro Mini, a HC-SR04 ultrasonic sensor, and a 1602 serial LCD. Once the gadget has been mounted in the proper position and activated, it will count how many pull-ups [Michael] has done on the screen.

While we historically haven’t seen a whole lot in the way of homebrew exercise equipment, the current COVID-19 situation does seem to be getting the adrenaline flowing for some of you. We recently covered some DIY dumbbells made from hardware store finds that would be an excellent first project for any hackers who’ve recently been ejected from the Matrix and are trying to use their muscles for the first time.

Continue reading “Get Quarantine Fit With This Smart Pull-up Bar”

Take This Cylindrical Coupler Design For A Spin

We’re not exactly sure what kind of shenanigans [Conrad Brindle] gets himself into, but apparently it often requires cylindrical couplings to attach 3D printed parts to each other. He found himself designing and redesigning this type of connector so often that he decided to just make a parametric version of it that could be scaled to whatever dimensions are necessary for that particular application.

In the video after the break, [Concrad] explains the concept behind the coupler and how he designed it. Put simply, the tabs inside of the coupler are designed to grab onto each other once the coupler is spun. When he demonstrates the action, you can see that both sides of the coupler are pulled together tightly with a satisfying little snap, but then can be easily removed just by rotating them back in the opposite direction.

The nature of desktop 3D printing means that the female side of the connection requires support when printing, and depending on your printer, that might mean a relatively rough mating surface. [Conrad] notes that you’ll need to experiment a bit to find how small your particular machine can print out the design before things get too gummed up.

We can see how this would be useful for some applications, but if you need a printed joint that can handle a decent amount of torque before giving up the ghost, you might want to look into (mis)using one half of a spider coupling.

Continue reading “Take This Cylindrical Coupler Design For A Spin”

Viewing Countrywide Weather At A Glance

For his latest project, weather display aficionado [Richard] has put together a handsome little device that shows the temperatures recorded at nine different airports located all over the British Isles. Of course the concept could be adapted to wherever it is that you call home, assuming there are enough Internet-connected weather stations in the area to fill out the map.

The electronics are fairly minimal, consisting of a NodeMCU ESP8266 development board, a few seven segment LED display modules, and a simple power supply knocked together on a scrap of perfboard. As you might expect, the code is rather straightforward as well. It just needs to pull down the temperatures from an online API and light up the displays. What makes this project special is the presentation.

As [Richard] shows in the video after the break, the key is a sheet of acrylic that’s been sanded so it diffuses the light of 42 LEDs that have been painstakingly installed in holes drilled around the edge of the sheet. Combined with a printed overlay sheet, this illuminates the map and its legend in low-light conditions. It’s a simple technique that not only looks fantastic, but makes the display easy to read day or night. Definitely a tip worth mentally filing away, as it has plenty of possible applications outside of this particular build.

With his projects, [Richard] has shown himself to be a master of unique and data-rich weather displays, and a great lover of the iconic seven segment LED display. While his particular brand of climate data overload might not be for everyone, you’ve got to admire his knack for visualizing data.

Continue reading “Viewing Countrywide Weather At A Glance”

Slide Your Switch Into A Gamecube Controller

The Gamecube was certainly a divisive design when it was released back in 2001, but the fact that people are still happily hacking away at its controller nearly 20 years later proves that Nintendo must have gotten something right. The latest project from Nintendo wizard [Bill Paxton] turns the unique Gamecube controller into an even more unique mobile dock for the Switch.

To build this “Gamecube Grip”, [Bill] literally cut an original controller and its PCB in half so they could be relocated on either end of the 3D printed central frame. Internally, the controller PCB is wired up to a GC+ board, which is an open hardware project that uses a PIC18F25K22 microcontroller to bring enhanced features to the classic peripheral such as adjustable stick dead zones and rumble intensity. From there, it’s connected to the switch with a GBros adapter from 8bitdo.

The grip also includes an Anker PowerCore 20,100 mAh battery that should keep the system going for hours, and some components liberated from a third party Switch dock. Everything has been finished off with the attention to detail that we’ve come to expect from [Bill] and his projects, including the seemingly flawless glossy paint job that’s something of hallmark for his custom gaming creations.

Continue reading “Slide Your Switch Into A Gamecube Controller”

Putting An Arcade Cabinet Inside Of An NES Controller

The arcade game shoehorned into an original Nintendo Entertainment System controller from [Taylor Burley] is certainly made slightly easier by its starting with one of those miniature cabinets that are all the rage now, but since he’s still achieved the feat of an entire arcade game in a controller we still stand by the assessment in our title.

In fact, he’s put not one but four arcade games into the controller. The board that [Taylor] liberated from the miniature game system can actually be switched between the onboard games by shorting out different pads on the PCB. Normally this would be done during manufacture with a zero-ohm resistor, but in this case, he’s wired the pads out to a strip of membrane keypad liberated from an LED remote control. By holding a different button while powering on the system, the user can select which of the games they want to boot into.

The original buttons and directional pad have been preserved, and in the video after the break, [Taylor] shows how he wires them into the arcade PCB. The Start and Select buttons had to go since that’s where the tiny color LCD goes now, but they wouldn’t have been used in any of these games anyway. With the addition of a small battery pack and charge controller, this build is a clever way to take several classic arcade titles with you on the go.

With the growing popularity of these tiny arcade cabinets, we’ve seen a number of hackers tearing into them. The work that [wrongbaud] has done in modifying them to run other ROMs is not to be missed if you’re looking at building a project using one of these little bundles of nostalgia.

Continue reading “Putting An Arcade Cabinet Inside Of An NES Controller”

Scratch Built Magnetic Vise Stays Where You Need It

For those who might not have run into one before, a magnetic vise is used when you want to quickly anchor something to a metal surface at an arbitrary position. They’re often used to hold the workpiece down when machining, and can be a real time saver if a lot of repositioning is involved.

[Workshop From Scratch] recently wanted to put together one of these handy pieces of gear, and as we’ve come to expect from his channel, the finished product is an absolute beast. Starting with little more than scraps of metal, the video after the break takes the viewer on a fascinating journey that ends with some demonstrations of the vise in action.

Conceptually, this build is relatively simple. Start with a vise, put a hollow base on it, and fit it with powerful electromagnets that will anchor it down once you flip the switch. Technically you could just build a magnetic base and bolt a commercially available vise onto it, but that’s not how [Workshop From Scratch] does things.

Every element of the build is done by hand, from the pattern cut into the jaws to the t-handle nut driver that gets adapted into a very slick crank. Of particular interest is how much effort is put into grinding down the surface of the electromagnets so they are perfectly flush with the base of the vise. Incidentally, these beefy electromagnets were salvaged from automotive air conditioning compressors, so you might want to add that to your junkyard shopping list.

Eagle-eyed readers might recognize the surface [Workshop From Scratch] uses the vise on as the custom drill press table he built a few months ago. These videos are not only reminders of what you can accomplish when you’ve mastered the use of a few common tools, but just how much design and thought goes into the hardware many of us take for granted.

Continue reading “Scratch Built Magnetic Vise Stays Where You Need It”

Old Laptop Gets New Lease On Life With Raspberry Pi

It seems not a day goes by that we don’t see somebody cramming a Raspberry Pi into some unwilling piece of consumer electronics. But despite being a pretty obvious application for the diminutive ARM board, we don’t often see it installed in an actual computer. Which makes this very clean Raspberry Pi laptop conversion by [Sherbethead2010] all the more interesting.

The first step involved taking a Dremel to the Dell’s chassis and essentially leveling out the entire internal volume. The only component that got reused was the fan, and even that appears to be relocated, so all the mounting posts were just standing in the way of progress.

[Sherbethead2010] mounted the Raspberry Pi towards the rear of the case so its USB and Ethernet ports would be available from the outside, and installed a driver board for the original Phillips LP171 LCD panel in the old drive bay. Power is provided by two custom 18650 battery packs connected to dedicated buck converters, along with an onboard charge controller to safely top them off.

Rather than trying to adapt the original input devices, [Sherbethead2010] decided to take the easy route and installed a Rii K22 wireless keyboard with integrated track pad into the top of the laptop. It turned out to be an almost perfect fit, and beyond the keys being slightly off-center, at first glance it looks like it could be stock.

The last time we saw a Raspberry Pi so well integrated into a real laptop, it was to create a functioning version of one of the props from Hackers. While that build was a joy for its own reasons, it’s hard not to be impressed with how unassuming this computer looks after all the work that’s been done to it.