A Miniature Radio Telescope In Every Backyard

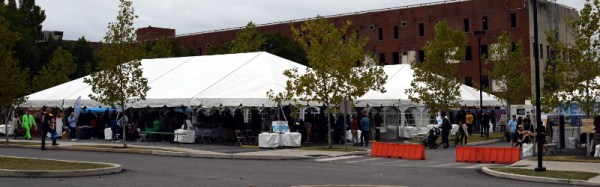
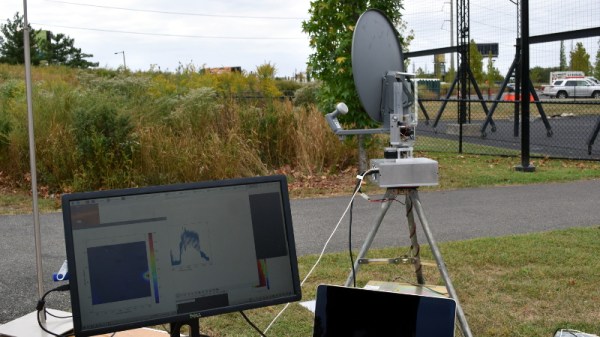
You probably wouldn’t expect to see somebody making astronomical observations during a cloudy day in the center of a dense urban area, but that’s exactly what was happening at the recent 2019 Philadelphia Mini Maker Faire. Professor James Aguirre of the University of Pennsylvania was there demonstrating the particularly compact Mini Radio Telescope (MRT) project built around an old DirecTV satellite dish and a smattering of low-cost components, giving visitors a view of the sky in a way most had never seen before.

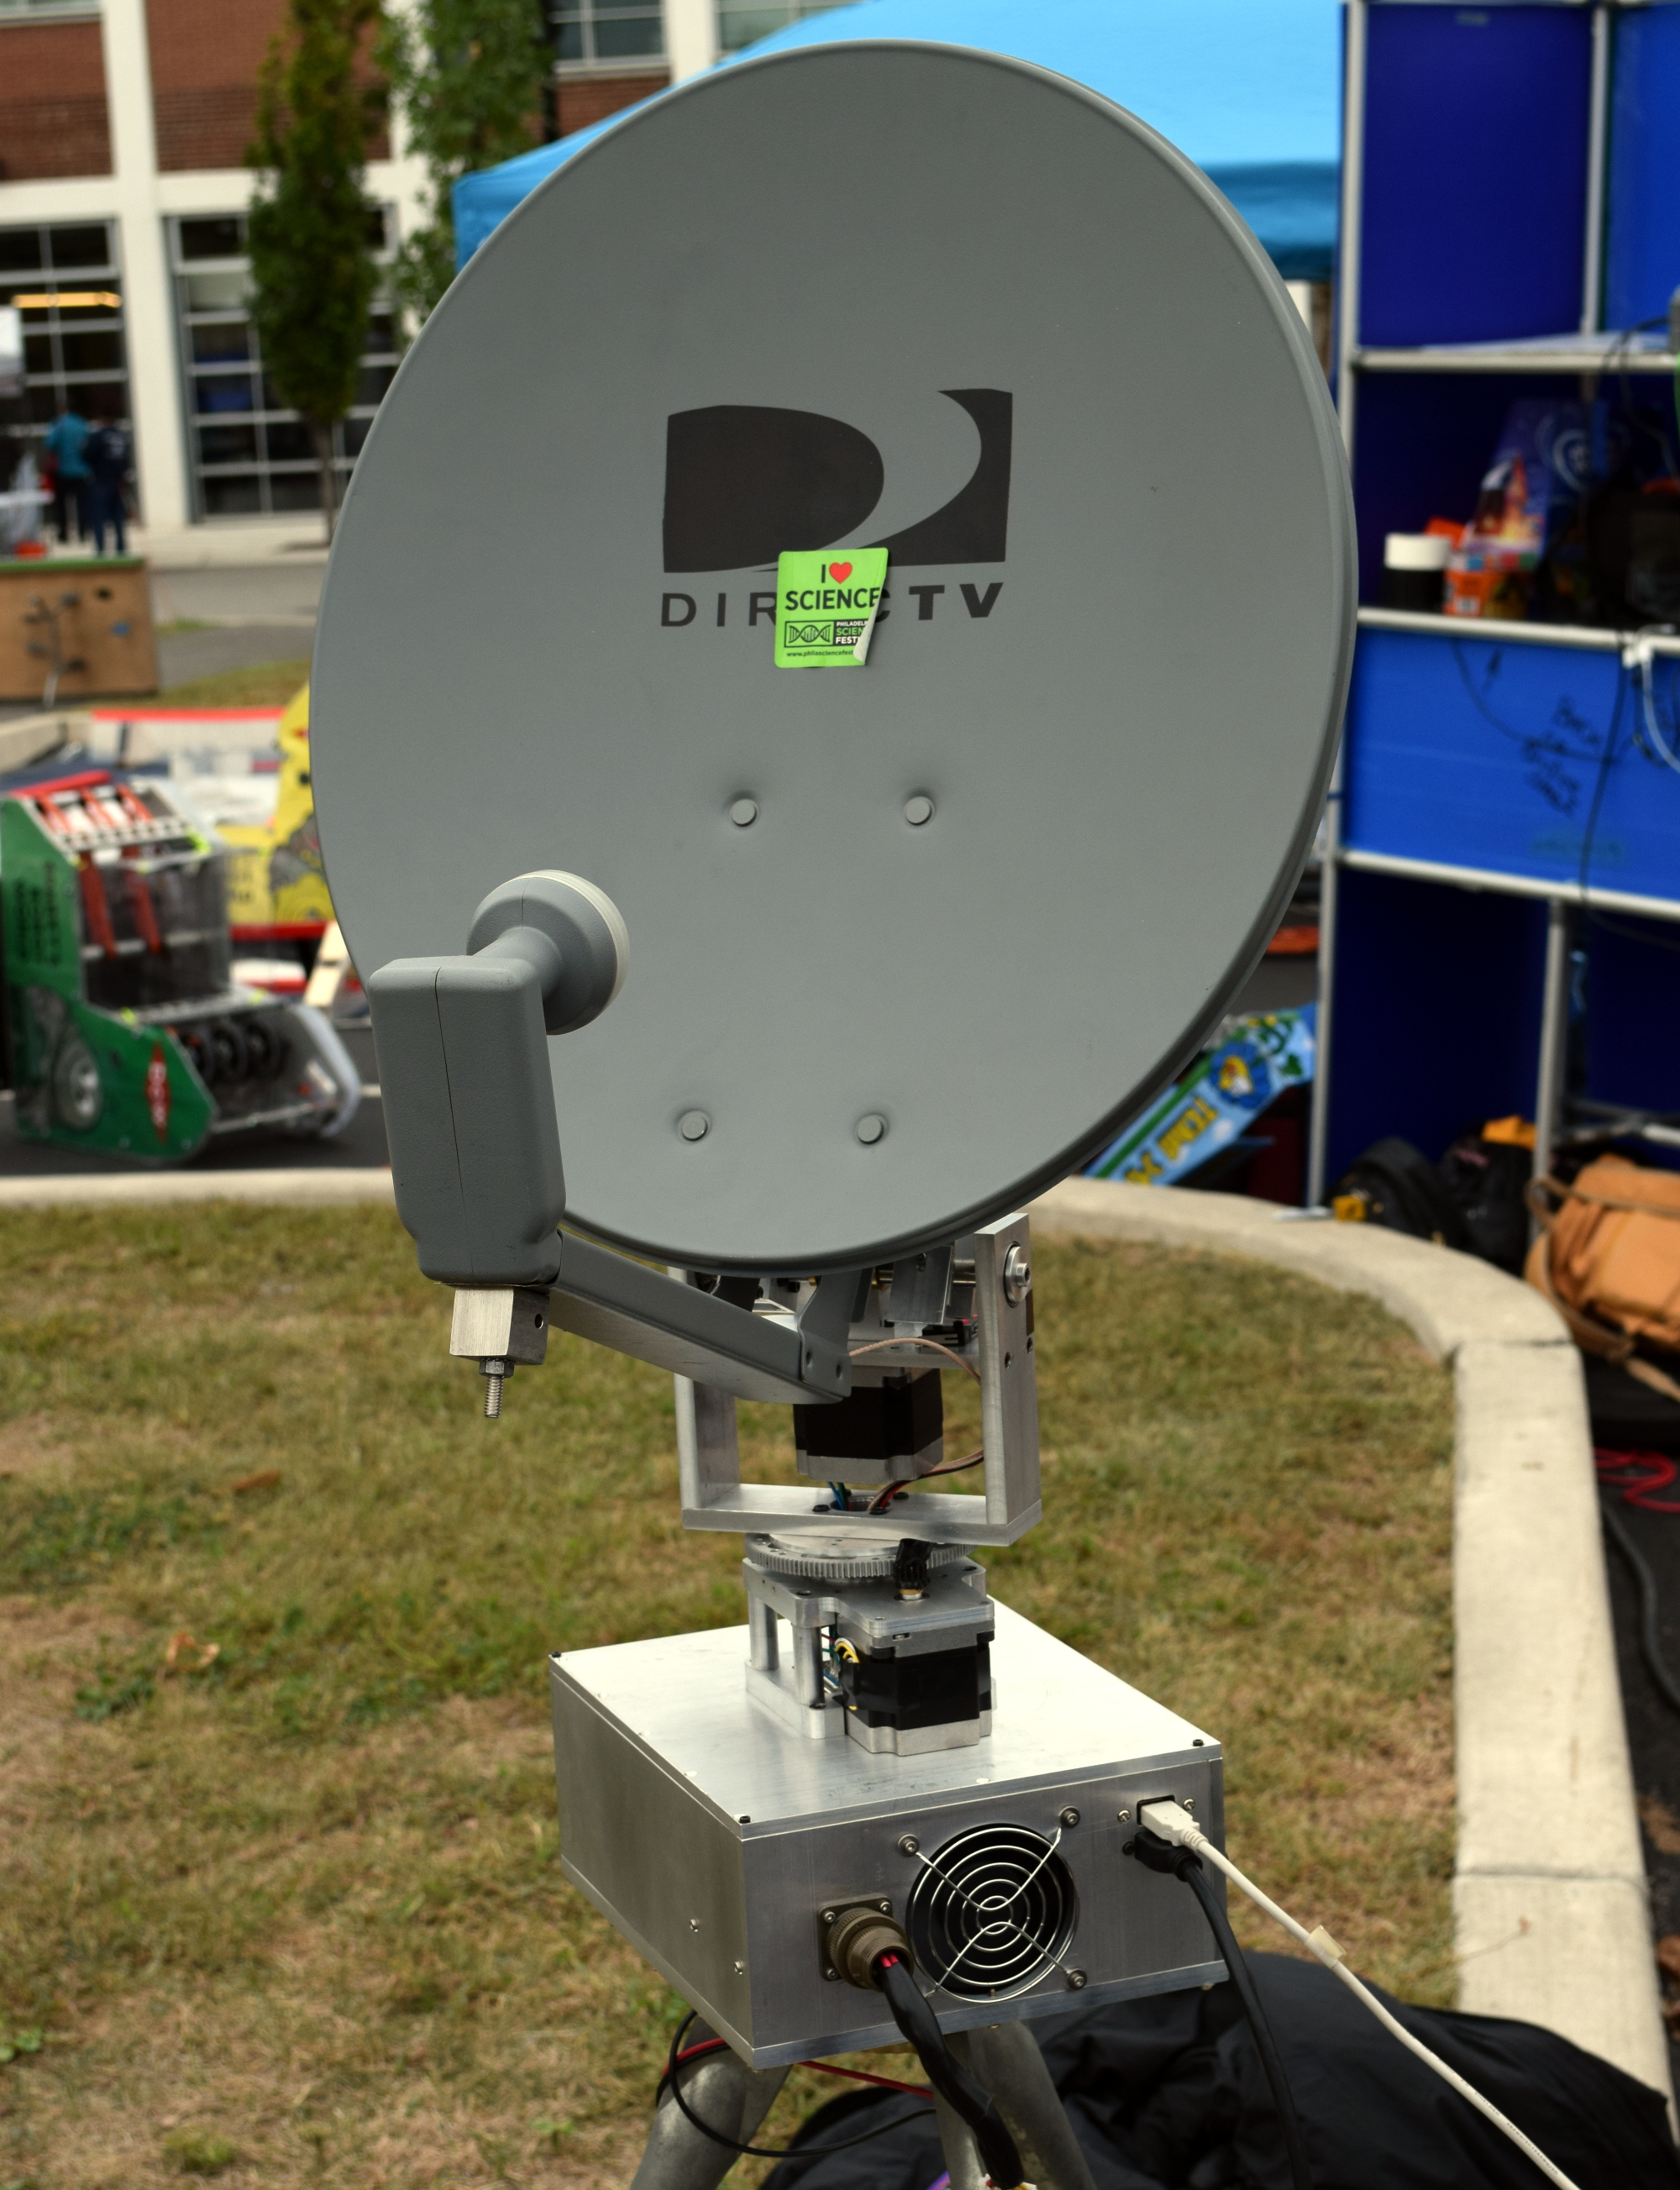
Thanks to the project’s extensive online documentation, anyone with a spare satellite dish and a couple hundred dollars in support hardware can build their very own personal radio telescope that’s capable of observing objects in the sky no matter what the time of day or weather conditions are. Even if you’re not interested in peering into deep space from the comfort of your own home, the MRT offers a framework for building an automatic pan-and-tilt directional antenna platform that could be used for picking up signals from orbiting satellites.

With the slow collapse of satellite television in the United States these dishes are often free for the taking, and a fairly common sight on the sidewalk come garbage day. Perhaps there’s even one (or three) sitting on your own roof as you read this, waiting for a new lease on life in the Netflix Era.

Whether it’s to satisfy your own curiosity or because you want to follow in Professor Aguirre’s footsteps and use it as a tool for STEM outreach, projects like MRT make it easier than ever to build a functional DIY radio telescope.

Continue reading “A Miniature Radio Telescope In Every Backyard”

Developing Guidelines For Sustainable Spaceflight

In the early days of spaceflight, when only the governments of the United States and the Soviet Union had the ability to put an object into orbit, even the most fanciful of futurists would have had a hard time believing that commercial entities would one day be launching sixty satellites at a time. What once seemed like an infinite expanse above our heads is now starting to look quite a bit smaller, and it’s only going to get more crowded as time goes on. SpaceX is gearing up to launch nearly 12,000 individual satellites for their Starlink network by the mid-2020s, and that’s just one of the “mega constellations” currently in the works.

Just some of the objects in orbit around the Earth

It might seem like overcrowding of Earth orbit is a concern for the distant future, but one needs only look at recent events to see the first hints of trouble. On September 2nd, the European Space Agency announced that one of its research spacecraft had to perform an evasive maneuver due to a higher than acceptable risk of colliding with one of the first-generation Starlink satellites. Just two weeks later, Bigelow Aerospace were informed by the United States Air Force that there was a 1 in 20 chance that a defunct Russian Cosmos 1300 satellite would strike their Genesis II space station prototype.

A collision between two satellites in orbit is almost certain to be catastrophic, ending with both spacecraft either completely destroyed or severely damaged. But in the worst case, the relative velocity between the vehicles can be so great that the impact generates thousands of individual fragments. The resulting cloud of shrapnel can circle the Earth for years or even decades, threatening to tear apart any spacecraft unlucky enough to pass by.

Fortunately avoiding these collisions shouldn’t be difficult, assuming everyone can get on the same page before it’s too late. The recently formed Space Safety Coalition (SSC) is made up of more than twenty aerospace companies that realize the importance of taking proactive steps to ensure humanity retains the unfettered access to outer space by establishing some common “Rules of the Road” for future spacecraft.

Continue reading “Developing Guidelines For Sustainable Spaceflight”

A Spectrum Analyzer For The Smart Response XE

Remember the Girl Tech IM-me? It was a hot-pink clearance rack toy that suddenly became one of the hottest commodities in the hacking world when it was discovered they could be used for all sorts of radio frequency shenanigans. Now they go for triple digits on eBay, if you can even find one. Well, we’re probably about to see the same thing happen to the Smart Response XE.

Thanks to the work of a hacker named [ea], this cheap educational gadget is finally starting to live up to the potential we saw in it back when a teardown revealed it was powered by an Arduino-compatible ATmega128RF chip. With a big screen, a decent QWERTY keyboard, and integrated wireless hardware, it seemed obvious that the Smart Response XE was poised to be the next must-have repurposed piece of kit.

Though as it turns out, [ea] isn’t using the device’s built-in wireless hardware. Step one in this exceptionally well documented and photographed project is to tack a CC1101 transceiver module to the SPI pins on the ATmega128RF. Then with the appropriate firmware loaded up, that nice big screen will show you what’s happening on the 300 MHz, 400 Mhz and 900 MHz bands.

But the fun doesn’t stop there. With the CC1101-modified Smart Response XE, there’s a whole new world of radio hacks you can pull off. As a proof of concept, [ea] has also included a POCSAG pager decoder. Granted the RTL-SDR has already made pulling pager messages out of the air pretty easy, but there’s something to be said for being able to do it on something so small and unassuming.

If you can’t tell, we’re exceptionally interested in seeing what the community can do with the Smart Response XE. At the time of this writing, the going rate on eBay for a good condition unit looks to be about $10 USD, plus the $3 or so for the CC1101 module. But the prices went through the roof when we first posted about it, so get them cheap while you still can.

[Thanks to bburky for the tip.]

An Optocoupler Doorbell Notifier

Over the years we’ve seen several attempts at adding Internet connectivity to the lowly wired doorbell. Generally, these projects aim to piggyback on the existing wiring, bells, and buttons rather than replace them entirely. Which invariably means at some point the AC wiring is going to need to interface with a DC microcontroller. This is often where things get interesting, as it seems everyone has a different idea on how best to bridge these two systems.

That’s the point where [Ben Brooks] found himself not so long ago. While researching the best way to tap into the 20 VAC pumping through his doorbells, he found a forum post where somebody was experimenting with optocouplers. As is unfortunately so often the case, the forum thread never really had a conclusion, and it wasn’t clear if the original poster ever figured it out.

DIY optocouplers wrapped in electrical tape

[Ben] liked the idea though, so he thought he would give it a shot. But before investing in real optocouplers, he created his own DIY versions to use as a proof of concept. He put a standard LED and photoresistor together with a bit of black tape, and connected the LED to the doorbell line with a resistor. Running the LED on 60 Hz AC meant it was flickering rapidly, but for the purposes of detecting if there was voltage on the line, it worked perfectly.

Wanting something slightly more professional for the final product, [Ben] eventually evolved his proof of concept to include a pair of 4N35s, a custom PCB, and a 3D printed enclosure. Powered by a Particle Xenon, the device uses IFTTT to fire off smartphone notifications and blink the lights in the house whenever somebody pushes the bell.

If you’re still wondering why it’s so tricky to connect a microcontroller up to your door bell, a quick look at some of the similar projects we’ve covered should give you a pretty good idea of how annoying these systems can be to modernize.

Maker Spirit Alive And Well At The Philly Maker Faire

For many of us, it’s difficult to imagine a world without Maker Faire. The flagship events in California and New York have served as a celebration of the creative spirit for a decade, giving hackers and makers a rare chance to show off their creations to a live audience numbering into the hundreds of thousands. It’s hard to overstate the energy and excitement of these events; for anyone who had the opportunity to attend one in person, it’s an experience not soon forgotten.

Unfortunately, a future without Maker Faire seemed a very real possibility just a few months ago. In May we first heard the events were struggling financially, and by June, we were saddened to learn that organizer Maker Media would officially be halting operations. It wasn’t immediately clear what would happen to the flagship Maker Faires, and when Maker Media reluctantly admitted that production of the New York Faire was officially “paused”, it seemed we finally had our answer.

But as the recent Philadelphia Maker Faire proved, the maker movement won’t give up without a fight. While technically an independent “Mini” Faire, it exemplifies everything that made the flagship events so special and attracted an impressive number of visitors. With the New York event left in limbo, the Philadelphia Faire is now arguably the largest event of its type on the East Coast, and has the potential for explosive growth over the next few years. There’s now a viable option for makers of the Northeast who might have thought their days of exhibiting at a proper Maker Faire were over.

We’ll be bringing you detailed coverage of some of the incredible projects that were on display at the Philadelphia Maker Faire over the coming days, but in the meantime, let’s take a quick look at some of the highlights from this very promising event.

Continue reading “Maker Spirit Alive And Well At The Philly Maker Faire”

USB Power Delivery For All The Things

The promise of USB Power Delivery (USB-PD) is that we’ll eventually be able to power all our gadgets, at least the ones that draw less than 100 watts anyway, with just one adapter. Considering most of us are the proud owners of a box filled with assorted AC/DC adapters in all shapes and sizes, it’s certainly a very appealing prospect. But [Mansour Behabadi] hasn’t exactly been thrilled with the rate at which his sundry electronic devices have been jumping on the USB-PD bandwagon, so he decided to do something about it.

[Mansour] wanted a simple way to charge his laptop (and anything else he could think of) with USB-PD over USB-C, but none of the existing options on the market was quite what he wanted. He looked around and eventually discovered the STUSB4500, a a USB power delivery controller chip that can be configured over I2C.

With a bit of nonvolatile memory onboard, it can retain its settings so he didn’t have to include a microcontroller in his design: just program it once and it can be used stand-alone to negotiate the appropriate voltage and current requirements when its plugged in.

The board that [Mansour] came up with is a handy way of powering your projects via USB-C without having to reinvent the wheel. Using the PC configuration tool and an Arduino to talk to the STUSB4500 over I2C, the board can be configured to deliver from 5 to 20 VDC to whatever device you connect to it. The chip is even capable of storing three seperate Power Delivery Output (PDO) configurations at once, so you can give it multiple voltage and current ranges to try and negotiate for.

In the past we’ve seen a somewhat similar project that used USB-PD to charge lithium polymer batteries. It certainly isn’t happening overnight, but it looks like we’re finally starting to see some real movement towards making USB-C the standard.

Lessons Learned Building A DIY Rebreather

While the homebrew rebreather the [AyLo] describes on his blog looks exceptionally well engineered and is documented to a level we don’t often see, he still makes it very clear that he’s not suggesting you actually build one yourself. He’s very upfront about the fact that he has no formal training, and notes that he’s already identified several critical mistakes. That being said, he’s taken his rebreather out for a few dives and has (quite literally) lived to tell the tale, so he figured others might be interested in reading about his experiments.

For the landlubbers in the audience, a rebreather removes the CO2 from exhaled air and recirculates the remaining O2 for another pass through the lungs. Compared to open circuit systems, a rebreather can substantially increase the amount of time a diver can remain submerged for a given volume of gas. Rebreathers aren’t just for diving either, the same basic concept was used in the Apollo PLSS to increase the amount of time the astronauts could spend on the surface of the Moon.

The science behind it seemed simple enough, so [AyLo] did his research and starting designing a bare-minimum rebreather system in CAD. Rather than completely hack something together with zip ties, he wanted to take the time to make sure that he could at least mate his hardware with legitimate commercial scuba components wherever possible to minimize his points of failure. It meant more time designing and machining his parts, but the higher safety factor seems well worth the effort.

[AyLo] has limited the durations of his dives to ten minutes or less out of caution, but so far reports no problems with the setup. As with our coverage of the 3D printed pressure regulator or the Arduino nitrox analyser, we acknowledge there’s a higher than usual danger factor in these projects. But with a scientific approach and more conventional gear reserved for backups, these projects prove that hardware hacking is possible in even the most inhospitable conditions.