The much-maligned Caps Lock key has been causing problems for decades, and its continued existence is controversial enough that Google decided to drop it all together in their Chromebooks. Until the rest of the industry decides to follow their lead, they’ll likely be no shortage of awkward emails or overly aggressive comments that are the direct result of this treacherous key.
But [Glen Akins] thinks he has the solution. His creation is a tiny little USB notification device that has only one purpose: to make a terrible noise as long as the Caps Lock key is engaged. Think of it like the little indicator LED on your keyboard, but one that makes a terrible screeching noise that you simply can’t ignore. This is made possible by the fact that the Caps Lock status is handled at the OS level rather than the local input device.
The notifier is built around the PIC16F1459, as it allowed him to implement USB 2.0 while keeping the part count low. Beyond the PIC, the board uses a handful of passives and a transistor to drive the buzzer from a PWM signal. To avoid duplicated effort, everything was designed to fit inside the enclosure he already developed for his single-key keyboard that we covered last year. [Glen] and a fellow coworker from Keysight put together an excellent video on the creation and use of the buzzer that you can see after the break.
Fully understanding the planet’s complex ecosystem takes data, and lots of it. Unfortunately, the ability to collect detailed environmental data on a large scale with any sort of accuracy has traditionally been something that only the government or well-funded institutions have been capable of. Building and deploying the sensors necessary to cover large areas or remote locations simply wasn’t something the individual could realistically do.
But by leveraging modular hardware and open source software, the FieldKit from [Conservify] hopes to even the scales a bit. With an array of standardized sensors and easy to use software tools for collating and visualizing collected data, the project aims to empower independent environmental monitoring systems that can scale from a handful of nodes up to several hundred.
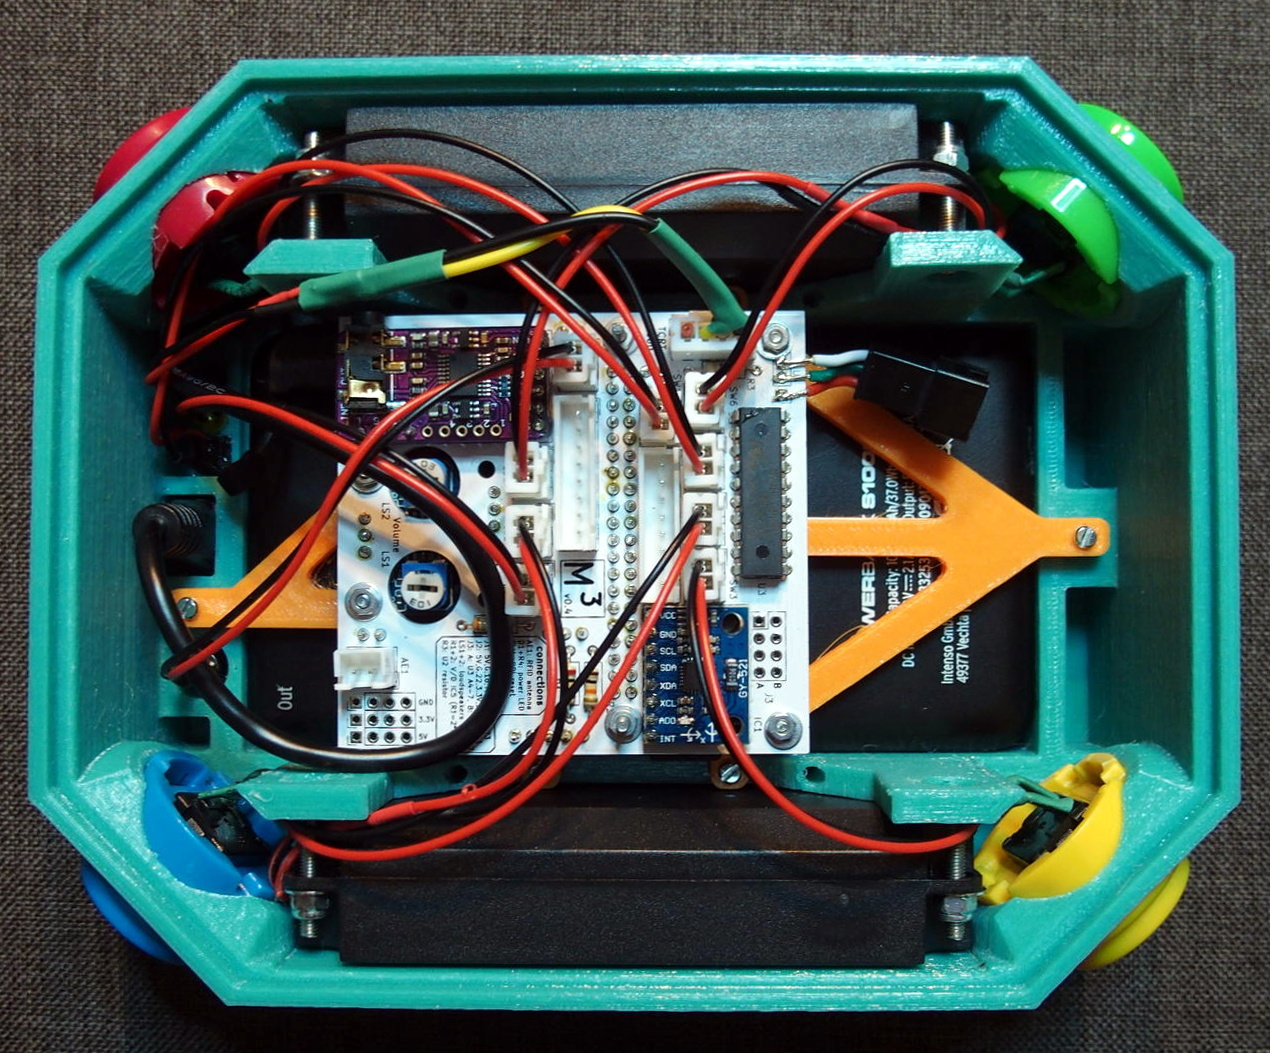
We’ve all seen more than enough DIY environmental monitoring projects to know there’s nothing particularly new or exciting about stuffing a few cheap sensors into a plastic container. But putting high quality, reliable hardware into large scale production is another thing entirely. Especially when your target user may have limited technical knowledge.
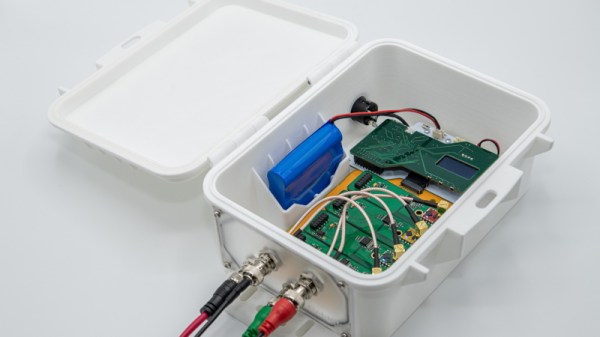
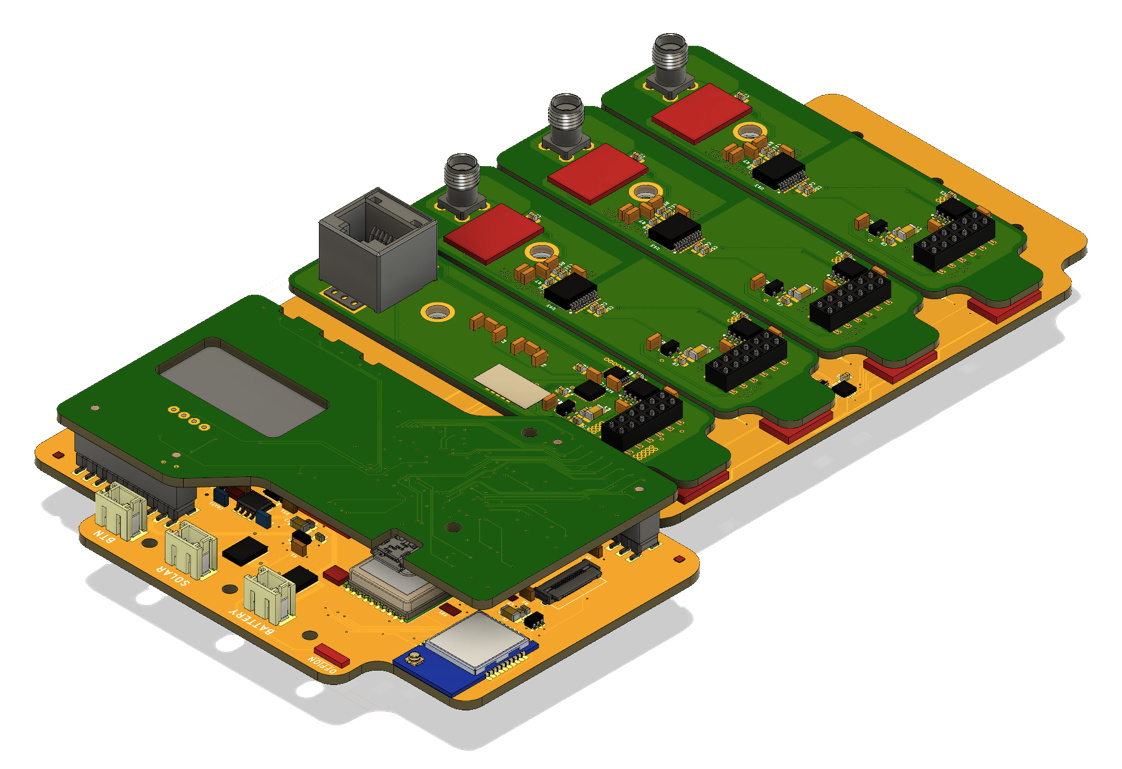
That’s why FieldKit is designed around a common backplane with modular sensors and add-on boards that can be plugged in and easily configured with a smartphone application. Whether the node is going to be mounted to a pole and powered by a solar panel, or attached to a buoy, most of the hardware stays the same.
While the electronics and the software interface are naturally the stars of the show here, we can’t help but also be impressed with the enclosure for the FieldKit. It seems a minor thing, but as we’ve seen from the projects that have come our way over the years, finding a box to put your hardware in that’s affordable, adaptable, and weatherproof is often a considerable challenge in itself. Rather than using something commercially available, [Conservify] has designed their own enclosure that’s inspired by the heavy duty (but prohibitively expensive) cases from Pelican. It features a replaceable panel on one side where the user can pop whatever holes will be necessary to wire up their particular project without compromising the case itself; just get a new panel when you want to reconfigure the FieldKit for some other task. Prototypes have already been 3D printed, and the team will be moving to injection molded versions in the near future.
As a finalist in the 2019 Hackaday Prize, FieldKit exemplifies everything we’re looking for this year: a clear forward progression from prototype to final hardware, an obvious need for mass production, and the documentation necessary to show why this project is deserving of the $125,000 grand prize up for grabs.
It’s taken longer than some might have thought, but we’re finally at the point where you can pick up an SLA 3D printer for a few hundred bucks. These machines, which use light to cure a resin, are capable of far higher resolution than their more common FDM counterparts, though they do bring along their own unique issues and annoyances. Especially on the lower end of the price spectrum.
[FlorianH] recently picked up the $380 SparkMaker FHD, and while he’s happy with the printer overall, he’s identified a rather annoying design flaw. It seems that the upgraded UV backlight in the FHD version of the SparkMaker produces somewhat irregular light, which in turn manifests itself as artifacts on the final print. Due to hot spots on the panel, large objects printed on the SparkMaker show fairly obvious scarring.
Now you might expect the fix for this problem to be in the hardware, but he’s taken it in a different direction. These printers use an LCD panel to block off areas of the UV backlight, thereby controlling how much of the resin is exposed. This is technique is officially known as “masked SLA”, and is the technology used in most of these new entry level resin printers.
As luck would have it, the SparkMaker FHD allows showing various levels of grayscale on the LCD rather than a simple binary value for each pixel. At least in theory, this allows [FlorianH] to compensate for the irregular backlight by adjusting how much the UV is attenuated by the LCD panel. He’s focusing on the printer he personally owns, but the idea should work on any masked SLA printer that accepts grayscale values.
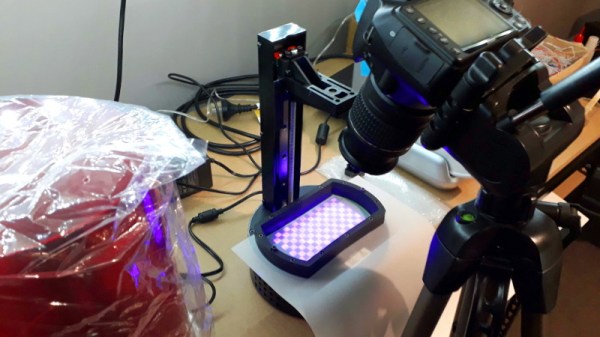
The first step was to map the backlight, which [FlorianH] did by soaking thin pieces of paper in a UV reactant chemical, and draping them over the backlight. He then photographed the illumination pattern, and came up with some OpenCV code that takes this images and uses the light intensity data to compensate for the local UV brightness underneath the sliced model.
So far, this method has allowed [FlorianH] to noticeably reduce the scarring, but he thinks it’s still possible to do better. He’s released the code for this backlight compensation script, and welcomes anyone who might wish to take a look at see how it could be improved.
An uneven backlight is just one of the potential new headaches these low-cost “masked” SLA printers give you. While they’re certainly very compelling, you should understand what you’re getting into before you pull the trigger on one.
Considering that it’s only existed for around a decade, the commercial desktop 3D printing market has seen an exceptional amount of turnover. But then, who could resist investing in an industry that just might change the world? It certainly didn’t hurt that the MakerBot Cupcake, arguably the first “mass market” desktop 3D printer, was released the same month that Kickstarter went live. We’ve long since lost count of the failed 3D printer companies that have popped up in the intervening years. This is an industry with only a handful of remaining veterans.
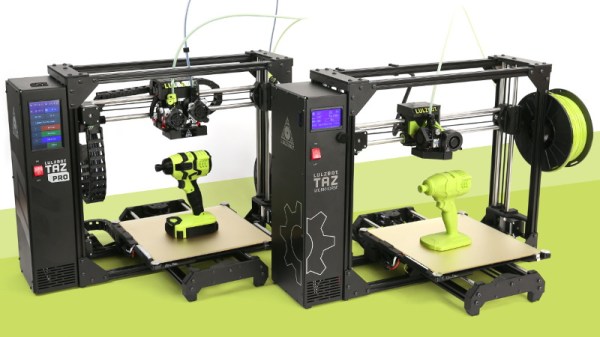
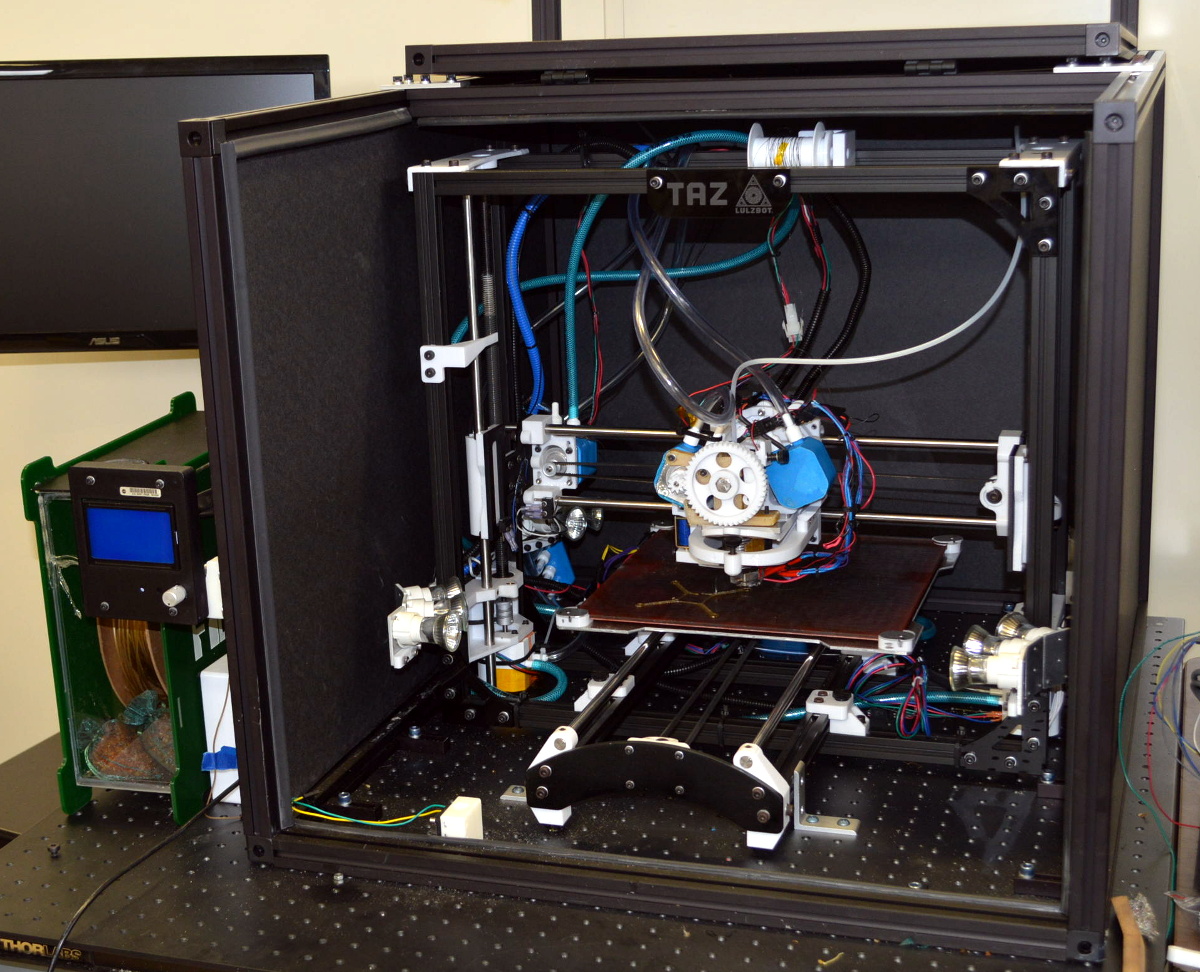
One of the few that have been with us since those heady early days is LulzBot, founded in 2011 by parent company Aleph Objects. Their fully open source workhorses are renowned for their robust design and reliability, though their high prices have largely kept them off the individual hacker’s bench. LulzBot was never interested in the race to the bottom that gave birth to the current generation of sub-$200 printers. Their hardware was always positioned as a competitor to the likes of Ultimaker and MakerBot, products where quality and support are paramount above all else.
NASA’s modified LulzBot
While LulzBot printers never made an impact on the entry-level market, there are institutions willing to purchase a highly dependable American-made 3D printer regardless of cost. The United States Marines used LulzBot printers to produce replacement Humvee door handles in the field, and some of the modifications that were necessary to meet their stringent requirements eventually resulted in updates to the consumer version of the printer. NASA used a highly modified LulzBot TAZ 4 to print PEI at temperatures as high as 500°C, producing parts far stronger than anything that had previously been made on a desktop 3D printer.
Yet despite such auspicious customers, LulzBot has fallen on difficult times. Consumers have made it abundantly clear they aren’t willing to pay more than $1,000 for a desktop printer, and competition above that price point is particularly fierce. Last month we started hearing rumblings in the Tip Line that the vast majority of LulzBot staff were slated to be let go, and we soon got confirmation and hard numbers from local media. Of the company’s 113 employees, only 22 would remain onboard to maintain day-to-day operations. Production on their flagship models would continue, albeit at a reduced pace, and all existing warranties would be honored. But the reduction in staff and limited cash flow meant that the development of future products, such as the LulzBot Bio tissue printer, would be put on hold.
LulzBot wasn’t quite dead, but it was hard to see this as anything but a step on the road to insolvency. A number of insiders we spoke to said they had heard a buyout was expected, and today we can report that the sale of Aleph Objects to Fargo Additive Manufacturing Equipment 3D (FAME 3D) is official. Production of the current LulzBot models is expected to continue, and some of the 91 laid off employees are likely to be hired back, but continuing Aleph Objects CEO Grant Flaharty says the details are still being finalized.
This new financial backing, provided by a venture capitalist, is certainly good news. But it would be naive to think this is the end of LulzBot’s troubles. The market has spoken, and unless the company is willing to introduce a vastly cheaper version of their printer to entice the entry-level customer as Prusa Research has recently done, it’s unclear how an infusion of cash will do anything but delay the inevitable.
For what it’s worth, we hope LulzBot finds some way to thrive. The ideal of building fully open source printers is something near and dear to the heart of Hackaday, but after the loss of PrintrBot, we’re all keenly aware of how difficult it is for small American companies to compete in the modern 3D printing market.
If civilization goes sideways and you need to survive, what are the bare essentials that should go in your bunker? Food and fresh water, sure. Maybe something to barter with in case things go full on The Postman. That’s all sensible enough, but how’s that stuff going to help you get a LAN party going? If you’re anything like [Jay Doscher], you’ll make sure there’s a ruggedized Raspberry Pi system with a self-contained network with you when the bombs drop.
Or at least, it certainly looks the part. He’s managed to design the entire project so it doesn’t require drilling holes through the Pelican case that serves as the enclosure, meaning it’s about as well sealed up as a piece of electronics can possibly be. The whole system could be fully submerged in water and come out bone dry on the inside, and with no internal moving parts, it should be largely immune to drops and shocks.
But we imagine [Jay] won’t actually need to wait for nuclear winter before he gets some use out of this gorgeous mobile setup. With the Pi’s GPIO broken out to dual military-style panel mount connectors on the front, a real mechanical keyboard, and an integrated five port Ethernet switch, you won’t have any trouble getting legitimate work done with this machine; even if the closest you ever get to a post-apocalyptic hellscape is the garage with the heat off. We especially like the 3D printed front panel with integrated labels, which is a great tip that frankly we don’t see nearly enough of.
This is actually an evolved version of the Raspberry Pi Field Unit (RPFU) that [Jay] built back in 2015. He tells us that he wanted to update the design to demonstrate his personal growth as a hacker and maker over the last few years, and judging by the final product, we think it’s safe to say he’s on the right path.
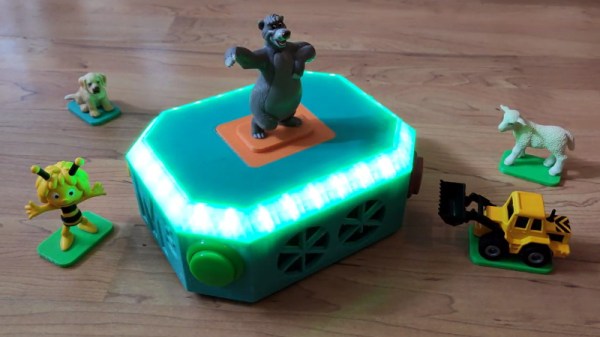
Like many creative individuals who suddenly find themselves parents, [Marta] wanted to make something special for his children to play with. Anybody can just purchase an off-the-shelf electronic toy, but if you’ve got the ability to design one on your own terms, why not do it? But even compared to the fairly high standards set by hacker parents, we have to admit that the amount of time, thought, and effort that was put into the “Marta Musik Maschine” is absolutely phenomenal.
[Marta] was inspired by the various commercial offerings which use RFID and other technologies to identify which characters the child is playing with and respond accordingly. But since he didn’t want to get locked into one particular company’s ecosystem and tinkering with the toys seemed frowned upon by their creators, he decided to just come up with his own version.
Over the course of many posts on the Musik Maschine’s dedicated website, [Marta] explains his thought process for every design consideration of the toy in absolutely exquisite detail. Each of the writeups, which have helpfully been broken down for each sub-system of the final toy, are arguably detailed and complete enough to stand as their own individual projects. Even if you’re not looking to get into the world of DIY electronic toys, there’s almost certainly an individual post here which you’ll find fascinating. From the finer points of interfacing your Python code with arcade buttons to tips for designing 3D printed enclosures, there’s really something for everyone here.
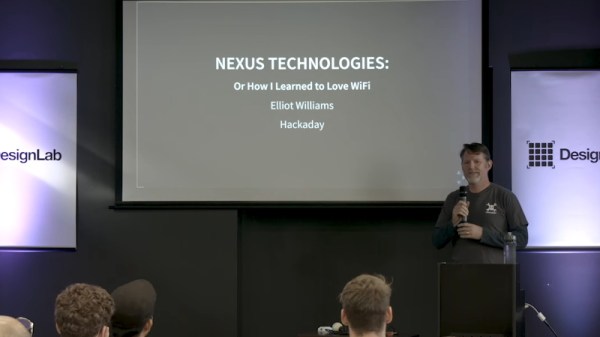
Back at the 2017 Superconference, Hackaday Managing Editor Elliot Williams started his talk about the so-called “Internet of Things” by explaining the only part he doesn’t like about the idea is the Internet… and the things. It’s a statement that most of us would still agree with today. If anything, the situation has gotten worse in the intervening years. Commercial smart gadgets are now cheaper and more plentiful than they’ve ever been, but it seems like precious little has been done to improve their inherent privacy and security issues.
But his talk doesn’t serve to bash the companies producing these devices or even the services that ultimately folded and left their customers with neigh useless gadgets. That’s not his style. The central theme of “Nexus Technologies: Or How I Learned to Love WiFi”is that a smart home can be wonderful thing, assuming it works the way you want it to. Elliot argues that between low-cost modular hardware and open source software, the average hacker has everything they need to build their own self-contained home automation ecosystem. One that’s not only cheaper than what they’re selling at the Big Box electronics store, but also doesn’t invite any of the corporate giants to the party.
Of course, it wasn’t always so. A decade ago it would have been all but impossible, and five years ago it would have been too expensive to be practical. As Elliot details his journey towards a truly personal smart home, he explains the advances in hardware and software that have made it not just possible on the DIY level, but approachable. The real takeaway is that once more people realize how cheap and easy it is to roll your own smart home gadgets, they may end up more than willing to kick Big Brother to the curb and do IoT on their own terms.
This previously unpublished recording somehow slipped between the cracks of the editing room floor but upon recent discovery, it’s still just as relevant today. Take a look at Elliot’s view on Nexus Technologies, then join us after the break for a deeper dive. Make sure to subscribe to Hackaday’s YouTube channel to get in on the 2019 Hackaday Superconference live stream starting Saturday, November 16th.