Virgin Orbit Readies First Launch

Ever since the Pan Am “Space Clipper” first slid into frame in 1968’s “2001: A Space Odyssey”, the world has been waiting for the day that privately funded spaceflight would become as routine as air travel. Unfortunately, it’s a dream that’s taken a bit longer to become reality than many would have hoped. The loss of Challenger and Columbia were heartbreaking reminders that travel amongst the stars is not for the faint of heart or the ill-equipped, and pushed commercial investment in space back by decades.

Although Pan Am has since folded, we now have a number of companies working hard towards making the dream of commercial spaceflight a reality. SpaceX and Rocket Lab have shown private companies developing and operating their own orbital class vehicles is a concept no longer limited to science fiction. Now that private industry has a foot in the door, more companies are coming forward with their own plans for putting their hardware into orbit. In many ways we’re seeing the dawn of a second Space Race.

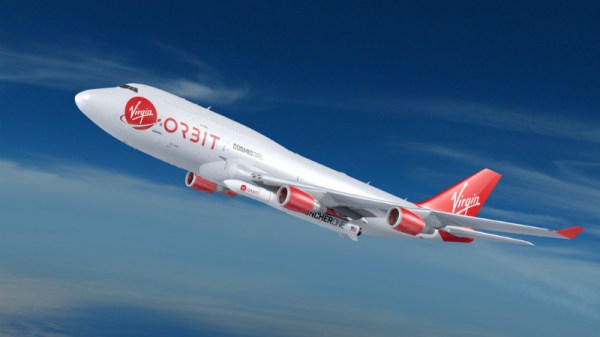
If all goes according to plan, a new challenger should be entering the ring in the very near future. Scheduled to perform their first test launch before the end of the year, Virgin Orbit (a spin-off of the passenger carrying Virgin Galactic) promises to deliver small payloads to Earth orbit faster and cheaper than their competitors. But while most other commercial space companies are using fairly traditional booster rockets to do their heavy lifting, Virgin Orbit is opting for a the less common air launched approach. Before Virgin joins the ranks of commercial companies exploring the final frontier, lets take a look at their plan for getting into space and the advantages it offers compared to the competition.

Continue reading “Virgin Orbit Readies First Launch”

Run A Linux Terminal On Cheap E-Ink Displays

If you haven’t kept up with the world of e-ink displays, here’s some good news: they are pretty cheap now. For as little as $15 you can get a small e-ink display that has good enough performance and contrast to actually do something useful. There’s only one problem: figuring out how to drive them in your project.

Tired of seeing nothing but wiring diagrams and sample code when it came to actually putting these e-ink modules to use, [Jouko Strömmer] decided to try his hand at creating a turn-key application for these gorgeous little displays. The result is PaperTTY, a Python program that allows the user to open up a fully functional Linux virtual terminal on an e-ink display.

Of course, there are some caveats. For one, this all assumes you’re using a Waveshare display (specifically their 2.13 inch HAT) connected to a Raspberry Pi over SPI. Not to say that’s the only hardware combination that will work, but it’s the only one that [Jouko] has done any testing on at this point. If you want to try to shake things up in terms of hardware, you might need to get your hands dirty.

The advantage of being able to open a Linux VT on one of these e-ink displays is pretty simple: you can run basically any piece of software you want on it. Rather than having to come up with software that specifically features support for the display, you can just use (or write) standard Linux console programs. [Jouko] mentions a number of popular programs such as vim and irssi, but you could just as easily write a Bash script to dump whatever data you like to the screen.

In the video after the break [Jouko] shows PaperTTY in action for the doubters who think these sorts of displays are no good for interactive use. The display is very crisp and readable, with no signs of flickering. Overall he says the experience is not unlike using a slow SSH connection. It might not be how we’d like to use a computer full time, but we can definitely see the potential.

With the recent progress with Kindle hacking, it seems that interest in e-ink is as high as ever. Despite what the haters might claim, it’s a useful niche tech that still holds plenty of promise.

Continue reading “Run A Linux Terminal On Cheap E-Ink Displays”

Raspberry Pi Foosball Scoreboard

Foosball, also known as table football, is a classic game from the 1920s that is completely devoid of the bells and whistles of modern gaming. Players control stoic little figures with the most simplistic of input devices in order to move a tiny ball to and fro on the playing field. So naturally, somebody thought they should add a Raspberry Pi to it and drag the whole thing kicking and screaming into the 21st century.

The team at [Matmi] spend a good portion of their down time huddled over a foosball table, but they found the experience was significantly less exciting for the spectators than the players. To add a little more pomp to their sessions they added a flashy display that not only shows the current score, but makes individual scores a bit more exciting by showing some celebratory confetti.

Micro switches mounted in the ball return tubes of the table allow the Raspberry Pi to know who scored and when. This information is picked up by the web-based scoreboard written in Vue.js and served out by nginx. The actual scoreboard is being displayed by a laptop that’s connected to the Pi over Wi-Fi.

If the software setup seems a bit convoluted, it’s because the project itself was something of a learning experience for HTML5 and web programming in general. Further updates are planned to streamline the system a bit to make it more self-contained, as well as adding more features to the scoreboard such as tournaments and randomized matches.

Interestingly, we’ve seen quite a few foosball hacks over the years. It seems these tables are somewhat ubiquitous in offices and hackerspaces. From turning it into an online-enabled experience to building an AI table you can play against, there’s plenty of ways to inject some new life into this nearly 100-year-old game.

Continue reading “Raspberry Pi Foosball Scoreboard”

Modern PC Crammed Into An Original Xbox

When the original Microsoft Xbox was released in 2001, one of the most notable features of its design was that it used a number of off-the-shelf computer components. Inside contemporary offerings from Nintendo and Sony you’ll see almost nothing but proprietary components, whereas cracking open the Xbox reveals an IDE hard drive, a customized PC DVD-ROM drive, and an Intel Pentium III CPU. Depending on which team you were on, the Xbox’s close relation to PC hardware of the day was either a point of honor or ridicule in the early 2000’s console wars; but regardless of politics, it ended up being instrumental in all of the hacks and mods the console got over its lifetime.

In that light, [P8ntBal1551] managing to jam a modern computer into the shell of an Xbox is like having the last laugh in this nearly two-decade-old debate. Wanting to build an HTPC that wouldn’t look out of place in his entertainment center, he figured the Xbox would make a suitable home for his Intel 4460 powered build. Not to say it was easy: getting all of the hardware and associated wiring inside the case took a bit of cheating, but the end result looks good enough that we’ll give him a pass.

The key to this project is the 3D printed structure inside the Xbox’s case that holds everything together. Painstakingly designed to align all of his components and cooling fans, it took over 58 hours to print just the base plate alone on his CR-10.

Even with all of his primary components installed, [P8ntBal1551] still had to wrestle with an absolute rat’s nest of wiring. He couldn’t find smaller versions of a number of the cables he needed, so he had to resort to some creative wire management to get everything packed in there. In the end, there was simply too much gear for the Xbox’s case to legitimately fit, so he ended up printing a spacer to fit between the bottom and top halves. Though in the end even this worked out in his favor, as it gave him a place to mount the integrated FLIRC IR receiver without having to cut a hole in the original front panel. The end product looks close enough to stock to be almost unnoticeable to the casual observer.

Its been a while since we’ve seen a hack for Microsoft’s original black and green monster, most of the Xbox projects we see are in relation to its significantly more popular successor. It’s always nice to see people keeping the classics alive in their own way.

[via /r/pcmasterrace]

Underwater VR Offers Zero Gravity On A Budget

Someday Elon Musk might manage to pack enough of us lowly serfs into one of his super rockets that we can actually afford a ticket to space, but until then our options for experiencing weightlessness are pretty limited. Even if you’ll settle for a ride on one of the so-called “Vomit Comet” reduced-gravity planes, you’ll have to surrender a decent chunk of change, and as the name implies, potentially your lunch as well. Is there no recourse for the hacker that wants to get a taste of the astronaut experience without a NASA-sized budget?

Well, if you’re willing to get wet, [spiritplumber] might have the answer for you. Using a few 3D printed components he’s designed, it’s possible to use Google Cardboard compatible virtual reality software from the comfort of your own pool. With Cardboard providing the visuals and the water keeping you buoyant, the end result is something not entirely unlike weightlessly flying around virtual environments.

To construct his underwater VR headset, [spiritplumber] uses a number of off-the-shelf products. The main “Cardboard” headset itself is the common plastic style that you can probably find in the clearance section of whatever Big Box retailer is convenient for you, and the waterproof bag that holds the phone can be obtained cheaply online. You’ll also need a pair of swimmers goggles to keep water from rudely interrupting your wide-eyed wonderment. As for the custom printed parts, a frame keeps the waterproof bag from pressing against the screen while submerged, and a large spacer is required to get the phone at the appropriate distance from the operator’s eyes.

To put his creation to the test, [spiritplumber] loads up a VR rendition of NASA’s Neutral Buoyancy Laboratory, where astronauts experience a near-weightless environment underwater. All that’s left to complete the experience is a DIY scuba regulator so you can stay submerged. Though at that point we wouldn’t be surprised if a passerby confuses your DIY space simulator for an elaborate suicide attempt.

Continue reading “Underwater VR Offers Zero Gravity On A Budget”

Get Nostalgic With These GameCube Themed Joy-Cons

There are a lot of good reasons to think fondly of the Nintendo GameCube. Metroid Prime and Rogue Leader knocked it out of the park. The Game Boy Player was cool. There’s even something to be said for having a convenient carrying handle on a system designed for couch multiplayer. But if you ask anyone who played Nintendo’s sixth generation console what part they missed the least, it would probably be the controller. With all the visual flair of a Little Tikes playset and ergonomics designed for an octopus, it’s a controller that works well for first-party Nintendo titles and little else.

So it’s probably for the best that these Switch Joy-Cons created by [Madmorda] focus on recreating the aesthetics of the GameCube controller for Nintendo’s latest money-printing machine rather than its feel. With a surprising amount of work required to create them, these definitely count as a labor of love by someone who yearns for the days when gaming was more…cubic.

To start with, nobody makes Joy-Con cases in that signature GameCube purple so [Madmorda] had to paint them herself. The longevity of a painted controller is somewhat debatable, but the finish certainly looks fantastic right now.

For the left analog stick [Madmorda] was able to use the cap from a real GameCube controller, which fit perfectly. Apparently, Nintendo has been pretty happy with their analog stick sizing decisions for the last two decades or so. The right analog stick was another story, however, and she had to cut the shaft down to size with a Dremel to get the cap to fit.

Finally, molds were made of the original face buttons, which were then used to cast new buttons with colored resin to match the GameCube color scheme. Since the original Switch buttons don’t have indented lettering to get picked up by the mold, she had to laser etch them. This little detail goes a long way to selling the overall look.

The final result looks great, and compared to previous attempts we’ve seen to bring some of that early 2000’s Nintendo style to the Switch, this one is certainly less destructive. Check them out in action after the break!

Continue reading “Get Nostalgic With These GameCube Themed Joy-Cons”

Updating A 1999 Saab With An Arduino

Unless your car is fresh off the lot, you’ve probably had the experience of riding in a newer car and seeing some feature or function that triggered a little pang of jealousy. It probably wasn’t enough for you to run out and sign yourself up for a new car loan (which is what the manufacturer was hoping for), but it was definitely something you wished your older model vehicle had. But why get jealous when you can get even?

[Saabman] wished his 1999 Saab 9-5 had the feature where a quick tap of the turn signal lever would trigger three blinks of the indicator. Realizing this was an electronic issue, he came up with a way to retrofit this function into his Saab by adding an Arduino Pro Micro to the vehicle’s DICE module.

The DICE (which stands for Dashboard Integrated Central Electronics) module controls many of the accessories in the vehicle, such as the lighting and wipers. In the case of the blinkers, it reads the state of the signal lever switches and turns the blinkers on and off as necessary. After poking around the DICE board, [Saabman] found that the 74HC151 multiplexer chip he was after: the state of the blinker switches could be read from pins 1 and 2, and he’d even be able to pull 5 V for the Arduino off of pin 16.

After prototyping the circuit on a breadboard, [Saabman] attached the Pro Micro to the top of the 74HC151 with some double sided tape and got to work on refining the software side of the project. The Arduino reads the state of the turn signal switches, and if they flick on momentarily it changes the pin from an input to an output and brings it high for three seconds. This makes the DICE module believe the driver is holding the turn lever, and will keep the blinkers going. A very elegant and unobtrusive way of solving the problem.

Hackers aren’t complete strangers to the garage; from printing hard to find parts to grafting in their favorite features from other car manufacturers, this slick Saab modification is in good company.

Continue reading “Updating A 1999 Saab With An Arduino”