DIY Nintendo Switch May Be Better Than Real Thing

Nintendo’s latest Zelda-playing device, the Switch, is having no problems essentially printing money for the Japanese gaming juggernaut. Its novel design that bridges the gap between portable and home console by essentially being both at the same time has clearly struck a chord with the modern gamer, and even 8 months after its release, stores are still reporting issues getting enough of the machines to meet demand.

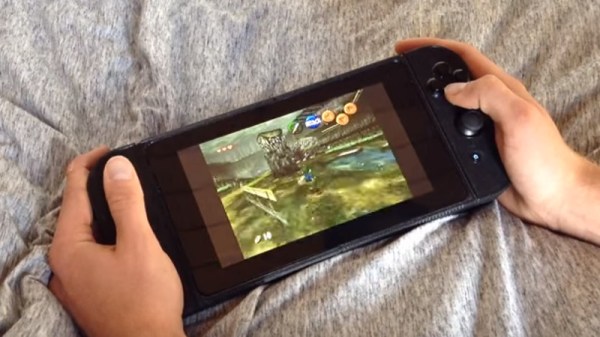
But for our money, we’d rather have the Raspberry Pi powered version that [Tim Lindquist] slaved over for his summer project. Every part of the finished device (which he refers to as the “NinTIMdo RP”) looks professional, from the incredible job he did designing and printing the case down to the small details like the 5 LED display on the top edge that displays volume and battery level. For those of you wondering, his version even allows you to connect it to a TV; mimicking the handheld to console conversion of the real thing.

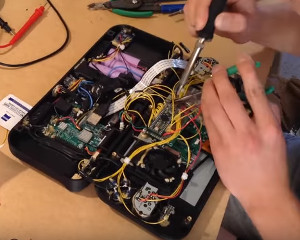
[Tim] has posted a fascinating time-lapse video of building the NinTIMdo RP on YouTube that covers every step of the process. It starts with a look at the 3D model he created in Autodesk Inventor, and then goes right into the post-printing prep work where he cleans up the printed holes with a Dremel and installs brass threaded inserts for strength. The bulk of the video shows the insane amount of hardware he managed to pack inside the case, a true testament to how much thought was put into the design.

For the software side, the Raspberry Pi is running the ever popular RetroPie along with the very slick EmulationStation front-end. There’s also a Teensy microcontroller on board that handles the low-level functions such as controlling volume, updating the LED display, and mapping the physical buttons to a USB HID device the Raspberry Pi can understand.

The Teensy source code as well as the 3D models of the case have been put up on GitHub, but for a project like this that’s just the tip of the iceberg. [Tim] does mention that he’s currently working on creating a full build tutorial though; so if Santa doesn’t leave a Switch under the tree for you this year, maybe he can at least give you a roll of filament and enough electronics to build your own.

While this isn’t the first time a Raspberry Pi has dressed up as a Nintendo console, it may represent the first time somebody has tried to replicate a current-generation gaming device with one.

Continue reading “DIY Nintendo Switch May Be Better Than Real Thing”

Scratch Built Watch Case Is A Work Of Art

The wristwatch was once an absolute necessity, as much fashion statement as it was a practical piece of equipment. Phones in our pockets (and more often than not, in our faces) replaced the necessity of the wristwatch for the majority of people, and the fashion half of the equation really only interests a relatively small  subset of the population. The end result is that, aside from the recent emergence of smartwatches and fitness trackers, walking down the street it’s fairly unlikely you’ll see many people wearing a traditional watch.

But we think the scratch built wristwatch case recently shown off by [Colin Merkel] adds a new justification for wearing a watch: pride. From a chunk of steel rod stock, [Colin] walks through every step of the process to creating a professional looking watch case. This is actually his second attempt at the project; while his first one certainly didn’t look bad, he felt that he learned enough from his earlier mistakes that it was worth starting over from scratch. A man after our own heart, to be sure. Continue reading “Scratch Built Watch Case Is A Work Of Art”

Cheap RC Truck Mod Is Slightly Risky Fun

The world of RC can be neatly split into two separate groups: models and toys. The RC models are generally big, complex, and as you’d imagine, more expensive. On the other hand, the RC toys are cheap and readily available. While not as powerful or capable as their more expensive siblings, they can often be a lot of fun; especially since the lower costs means a crash doesn’t put too big of a ding into to your wallet.

With his latest mod, [PoppaFixIt] has attempted to bridge the gap between toy and model by sticking a considerably overpowered battery into a $10 RC truck from Amazon. He reports greatly improved performance from his hacked together truck, but anyone looking to replicate his work should understand the risks before attempting to hack up their own version.

The principle is pretty simple; the truck is designed to run on two AA batteries, providing 3 volts. But by swapping the AAs out for a 3.7 volt 1S LiPo of the type that’s used in small airplanes and quadcopters, you can get an instant boost in power. As a happy side effect, the LiPo batteries are also rechargeable and fairly cheap, so you won’t have to keep burning through alkaline AAs.


The mod itself is a basic job that only requires a few bucks in parts, and for which [PoppaFixIt] has helpfully provided Amazon links. Essentially you just crack open the truck, solder a JST connector pigtail to the positive and negative traces on the PCB, and then pop a hole in the roof to run the new battery wires out.

Right about now the RC purists are probably screaming obscenities at their displays, and not without reason. As fun as these supercharged little trucks are to drive, there are a number of real issues here which need to be mentioned.

First, while the motor will probably be alright with a bit higher voltage running through them, the gears won’t be liking it one bit. In fact, [PoppaFixIt] even mentions they shredded a few gears when they tried to take one off-road. The second issue is that since these vehicles were not designed with LiPo batteries in mind, there’s no low voltage cutoff to prevent over discharge. If you aren’t careful, a setup like this will cook those cute little batteries in short order. But hey, at least it’s all cheap.

If you are more interested in control than power, you may want to check out the previous hacks we’ve featured. Seems like these little RC trucks are the platform of choice for hackers who want to get stuff moving on the cheap.

Stripping 3D Printed Gears For Science

While 3D printing is now well on its way to becoming “boring” in the same way that a table saw or lathe is, there was a time when the media and even some early adopters would have told you that the average desktop 3D printer was perhaps only a few decades behind the kind of replicator technology we saw on the Enterprise. But as the availability of these machines increased and more people got to see one up close, reality sunk in pretty quickly.

Many have dismissed the technology as little more than a novelty, and even within the 3D printing community itself there’s a feeling that most printers are used for little more than producing “dust collectors”. Some would see this attitude as disheartening, but the hackers over at [Gear Down For What?] see it as a challenge. They’ve made it their mission to push printed parts to increasingly ridiculous heights to show just what the technology is capable of, and in their latest entry, set out to push a pair of 3D printed gearboxes to failure.

The video starts out with a head to head challenge between two of their self-designed gearboxes. As they were spun up with battery powered drills, the smaller of the two quickly gave up the ghost, stripping out at 228 lbs. The victor of the first round then went on to pull a static load, only to eventually max out the scale at an impressive 680 lbs.

The gearbox may have defeated the scale, but the goal of the experiment was to run it to failure. By rigging up a compound pulley arrangement, they were able to double the amount of force their scale could detect. With this increased capacity the gearbox was then run up to an astonishing 1,000 lbs before it started to slip.

But perhaps the most impressive: after they got the gearbox disassembled, it was discovered that only a single planet gear out of the ten had broken. Even then, judging by how the gear sheared, the issue was more likely due to poor layer adhesion during printing than from stress alone. No gears were stripped, and in fact no visible damage was seen anywhere in the mechanism. The team is currently unable to explain the failure, other than to say that the stresses may have been so great that the plastic deformed enough that the gears were no longer meshed tightly.

This isn’t the first time we’ve checked in with the team at [Gear Down For What?], just a few months ago they impressed us by lifting an anvil with one of their printed mechanisms. They’re also not the only ones curious to find out just how far 3D printed plastic can go.

Continue reading “Stripping 3D Printed Gears For Science”

Echo Dot Finds Swanky New Home In Art Deco Speaker

The phrase “They don’t make them like they used to” is perhaps best exemplified by two types of products: cars and consumer electronics. Sure, the vehicles and gadgets we have now are so advanced that they may as well be classified as science-fiction when compared to their predecessors, but what about that style. Our modern hardware can rarely hold a candle to the kind of gear you used to be able to buy out of the “Sears, Roebuck and Company” catalog.

So when [Democracity] came into possession of a wickedly retro art deco speaker, it’s no surprise he saw it as a perfect opportunity to bring some of that old school style into the 21st century by rebuilding it with an Amazon Echo Dot at its core. The fact that the original device was a speaker and not a full radio made the conversion much easier, and will have everyone trolling yard sales for months trying to find a donor speaker to build their own.

To start the process, [Democracity] popped the panels off and ripped out what was left of the speaker’s paper cone and coil. In a stroke of luck, the opening where the driver used to go was nearly the perfect size to nestle in the Echo Dot. With a 3D printed cradle he found on Thingiverse and a liberal application of epoxy, the Dot could get snapped into the speaker like it was always meant to be there.

[Democracity] then picked up some absolutely gorgeous speaker cloth on eBay and hot glued it to the inside of the panels. What was presumably the volume knob was pulled out of the bottom and turned out to be a perfect place to run the Dot’s USB cable out of.

A lesser man would have called this project completed, but [Democracity] knows that no hack is truly complete without the addition of multicolored blinking LEDs. With the RGB LED strips installed inside, the light is diffused through the cloth panels and creates a pleasing subtle effect. You can almost imagine a couple of vacuum tubes glowing away inside there. Judging by the final product, it’s no surprise [Democracity] has a fair bit of experience dragging audio equipment kicking and screaming into the modern era.

This isn’t the first time we’ve seen an old piece of audio equipment get a high-tech transfusion, and isn’t even the first time we’ve seen the Dot used to do it. But it’s certainly the one we’d most like to see sitting on our shelf.

The Fine Art Of Heating And Cooling Your Beans

They say that if something is worth doing, it’s worth doing right. Those are good words to live by, but here at Hackaday we occasionally like to adhere to a slight variation of that saying: “If it’s worth doing, it’s worth overdoing”. So when we saw the incredible amount of work and careful research [Rob Linnaeus] was doing just to roast coffee beans, we knew he was onto something.

The heart of his coffee roaster is a vortex chamber with an opening on the side for a standard heat gun, and an aperture in the top where an eight cup flour sifter is to be placed. [Rob] modeled the chamber in Fusion 360 and verified its characteristics using RealFlow’s fluid simulation. He then created a negative of the chamber and printed it out on his Monoprice Maker Select 3D printer.

He filled the mold with a 1:1 mix of refractory cement and perlite, and used the back of a reciprocating saw to vibrate the mold as it set so any air bubbles would rise up to the surface. After curing for a day, [Rob] then removed the mold by heating it and peeling it away. Over the next several hours, the cast piece was fired in the oven at increasingly higher temperatures, from 200 °F all the way up to 500 °F. This part is critical, as trapped water could otherwise turn to steam and cause an explosion if the part was immediately subjected to high temperatures. If this sounds a lot like the process for making a small forge, that’s because it basically is. Continue reading “The Fine Art Of Heating And Cooling Your Beans”

LEGO Row Boat Is The Poolside Companion You Didn’t Know You Needed

Maybe it’s the upbeat music, or the views of a placid lake at sunset, or perhaps it’s just seeing those little plastic rods pumping away with all their might. Whatever the reason may be, the video [Vimal Patel] posted of his little remote controlled LEGO row boat cruising around on the open water is sure to put a smile on the face of even the most jaded hacker.

[Vimal] tells us that his creation is made up of over 140 unmodified LEGO parts, and is controlled over Bluetooth which connects to an app on his phone. While we would like to see some more detail on the reciprocating module he came up with to drive the boat’s paddles, we have to admit that the images he provided in his flickr album for the project are impeccable overall. If the toy boat game doesn’t work out for [Vimal], we think he definitely has what it takes to get into the advertising department for a car manufacturer.

[Vimal] was even kind enough to provide a LEGO Digital Designer file for the project, which in the world of little rainbow colored blocks is akin to releasing the source code, so you can build up your own fleet before next summer.

It’s worth noting that [Vimal] is something of a virtuoso in the world of modular building blocks, and no stranger here at Hackaday. His self lacing shoe impressed earlier this year, and this isn’t even his first LEGO watercraft.

All he has to do now to reach the true pinnacle of LEGO construction is to start building with giant versions of everyone’s favorite block.

Continue reading “LEGO Row Boat Is The Poolside Companion You Didn’t Know You Needed”