Honda Key Fob Turned CNC Work Of Art

Now that nearly every car on the road comes with an electronic key fob, people are desperate to find ways to repair these indispensable little gadgets without coughing up potentially hundreds of dollars at the dealership. There’s a whole market for replacement shells which you can transplant your (hopefully) still functional electronics into, but if you’re going to go through the trouble of putting the electronics into a new case, why not make it special?

That’s what [Michicanery] was thinking when he decided to build his own custom key fob. The end result is an utterly magnificent feat of engineering that’s sure to be a conversation for the life of the vehicle, if not beyond. Made of wood and aluminum cut on his OpenBuilds Lead CNC 1010, this build just might inspire you to “accidentally” drop your existing fob from a great height. Oh no, what a shame.

[Michicanery] starts by disassembling his original fob, which is the type that has a key integrated directly into the device. This meant his replacement would need a bit more thought put into it than a separate stand-alone fob, but at least it wasn’t one of the ones where you have to stick the whole thing into the dashboard. To make sure the build was strong enough to survive a lifetime of being turned in the ignition and generally fiddled with, he cut the central frame and buttons out of 1/4″ thick aluminum.

The top and bottom of the fob were then cut from Chechen wood and then chamfered on a table router so it felt a bit better in the hand. He applied oil to the pieces to bring out the natural color and grain of the wood, but not before engraving his own logo onto the back of the case for that extra touch of personalization. Not that we think [Michicanery] is going to have trouble identifying his keys from this point on.

Like the incredible watch cases we’ve seen recently, this is a perfect example of an everyday object getting a new lease on life as a bespoke creation thanks to a custom built enclosure. Granted we’re not sure Honda key fobs have quite the heirloom potential of a good watch, but we’d still prefer it over the black plastic original.

[via /r/DIY]

Juicing Up The Chevy Volt With Raspberry Pi

While Chevrolet’s innovative electric hybrid might officially be headed to that great big junkyard in the sky, the Volt will still live on in the hearts and minds of hackers who’d rather compare amp hour than horsepower. For a relatively low cost, a used Volt offers the automotive hacker a fascinating platform for upgrades and experimentation. One such Volt owner is [Katie Stafford], who’s recently made some considerable headway on hacking her hybrid ride.

In an ongoing series on her blog, [Katie] is documenting her efforts to add new features and functions to her Volt. While she loves the car itself, her main complaint (though this is certainly not limited to the Volt) was the lack of tactile controls. Too many functions had to be done through the touch screen for her tastes, and she yearned for the days when you could actually turn a knob to control the air conditioning. So her first goal was to outfit her thoroughly modern car with a decidedly old school user interface.

Like most new cars, whether they run on lithium or liquefied dinosaurs, the Volt makes extensive use of CAN bus to do…well, pretty much everything. Back in the day it only took a pair of wire cutters and a handful of butt splice connectors to jack into a car’s accessory systems, but today it’s done in software by sniffing the CAN system and injecting your own data. Depending on whether you’re a grease or a code monkey, this is either a nightmare or a dream come true.

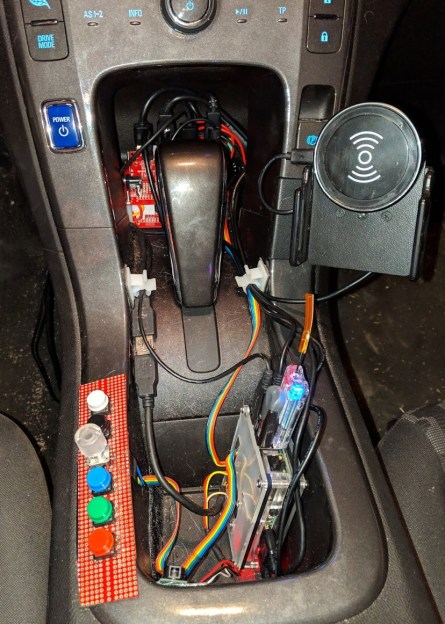
Luckily [Katie] is more of the latter, so with the help of her Macchina M2, she was able to watch the data on the CAN bus as she fiddled with the car’s environmental controls. Once she knew what data needed to be on the line to do things like turn on the fan or set the desired cabin temperature, she just needed a way to trigger it on her terms. To that end, she wired a couple of buttons and a rotary encoder to the GPIO pins of a Raspberry Pi, and wrote some code that associates the physical controls with their digital counterparts.

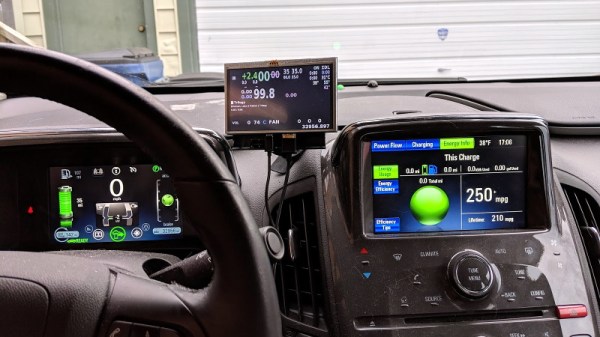
That’s all well and good when you need to mess around with the AC, but what’s the Pi supposed to do the rest of the time? [Katie] decided a small HDMI display mounted to the dash would be a perfect way for the Raspberry Pi to do double duty as information system showing everything from battery charge to coolant temperature. It also offers up a rudimentary menu system for vehicle modifications, and includes functions which she wanted quick access to but didn’t think were necessarily worth their own physical button.

In the video after the break, [Katie] walks the viewer through these modifications, as well as some of the other neat new features of her battery powered bow tie. What she’s already managed to accomplish without having to do much more than plug some electronics into the OBD-II port is very impressive, and we can’t wait to see where it goes from here.

Today there are simply too many good electric cars for hybrids like the Chevy Volt and its swankier cousin the Cadillac ELR to remain competitive. But thanks to hackers like [Katie], we’re confident this isn’t the last we’ve seen of this important milestone in automotive history.

Continue reading “Juicing Up The Chevy Volt With Raspberry Pi”

Hack Your Gmail: A Quick Start For Google App Scripting

For many people, Gmail is synonymous with e-mail. Some people like having cloud access to everything and some people hate having any personal data in the cloud. However you feel about it, one thing that was nice about having desktop software is that you could hack it relatively easily. If you didn’t like how your desktop mail client worked, you had a lot of options: use a different program, write your own, hack the executable of your current program, or in the case of open source just fork it and make any changes you are smart enough to make.

Google provides a lot of features with all of its products, but however you slice it, all the code runs on their servers out of your reach. Sort of. If you know JavaScript, you can use Google Apps Script to add features to many Google products including Gmail. If you’ve used Office scripting, the idea is the same, although obviously the implementation is very different.

With scripting you can make sophisticated filters that would be very hard to do otherwise. For example,  monitor for suspicious messages like those with more than 4 attachments, or that appear to come from a contact between the hours of 2AM and 5AM.

For our example today, I’m going to show you something that is easy but also highly useful.

Continue reading “Hack Your Gmail: A Quick Start For Google App Scripting”

DIY Puff-Suck Interface Aims For Faster Text Input

Puff and Suck (or Sip and Puff) systems allow people with little to no arm mobility to more easily interact with computers by using a straw-like unit as an input device. [Ana] tells us that the usual way these devices are used to input text involves a screen-based keyboard; a cursor is moved to a letter using some method (joystick, mouse emulator, buttons, or eye tracking) and that letter is selected with a sip or puff into a tube.

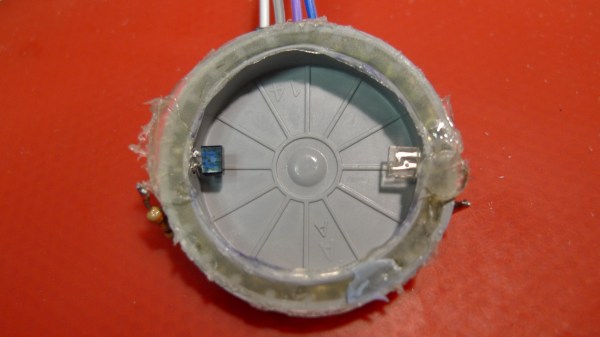
[Ana] saw such systems as effective and intuitive to use, but also limited in speed because there’s only so fast that one can select letters one at a time. That led to trying a new method; one that requires a bit more work on the user’s part, but the reward is faster text entry. The Puff-Suck Interface for Fast Text Input turns a hollow plastic disk and a rubber diaphragm into bipolar pressure switch, able to detect three states: suck, puff, and idle. The unit works by having an IR emitter and receiver pair on each side of a diaphragm (one half of which is shown in the image above). When air is blown into or sucked out of the unit, the diaphragm moves and physically blocks one or the other emitter-receiver pair. The resulting signals are interpreted by an attached Arduino.

How does this enable faster text input? By throwing out the usual “screen keyboard” interface and using Morse code, with puffs as dots and sucks as dashes. The project then acts as a kind of Morse code keyboard. It does require skill on the user’s part, but the reward is much faster text entry. The idea got selected as a finalist in the Human-Computer Interface Challenge portion of the 2018 Hackaday Prize!

Morse code may seem like a strange throwback to some, but not only does the bipolar nature of [Ana]’s puff-suck switch closely resemble that of Morse code input paddles, it’s also easy to learn. Morse code is far from dead; we have pages of projects and news showing its involvement in everything from whimsical projects to solving serious communication needs.

How To Mash Up BLE, NodeJS, And MQTT To Get Internet Of Things

We’re living in the world of connected devices. It has never been easier to roll your own and implement the functionality you actually want, rather than live with the lowest common denominator that the manufacture chose.

In a previous article I walked though a small python script to talk to a BLE light and used it to cycle through some colors. Now I want to delve deeper into the world of Internet Connected BLE devices and how to set up a simple Internet-Of-Things light. With this example in hand the sky’s the limit on what you can build and what it will be able to do.

Join me after the break as I demonstrate how to use NodeJS to bridge the digital world with the physical world.

Continue reading “How To Mash Up BLE, NodeJS, And MQTT To Get Internet Of Things”

Controlling Robotics Visually

The world — and the Hackaday Prize — is filled with educational robots. These are small, wheeled robots loaded up with sensors, actuators, a few motor drivers, and some sort of system that is easy to program. The idea behind these educational robots is to give students an easy-to-use platform to test out code, learn inverse kinematics, and realize odometry is a lot harder than you think it is. Give these kids some time and patience, and you’ll have a fleet of Battlebots at the end of the semester, if the teacher is cool.

But there’s a problem with all educational robots. The programming. For someone just starting out in robotics club, being able to code isn’t a guarantee. You need an easy to use programming interface. This project for the Hackaday Prize gives all students a great visual programming interface. It’s basically like the first generation of Lego Mindstorms, only you don’t need a weird IR tower attached to a serial port.

Of course you can’t program a robot without a board, and this project brings it in spades. The brain for this platform is built on an ARM microcontroller, has Bluetooth, supports up to six DC motors, twelve analog inputs, PWM and serial ports, and all the ports are color-coded for kids who can’t read so good.

This is a visual programming environment, though, and with that, you get a fancy IDE filled with loops that wrap around commands, IO access that’s in easy to read blocks, and control software that gives students a dashboard filled with buttons and odometers and the video feed from the camera. It’s a great Hackaday Prize entry, and an excellent way to introduce kids to robotics.

Turning That Old Hoverboard Into A Learning Platform

[Isabelle Simova] is building Hoverbot, a flexible robotics platform using Ikea plastic trays, JavaScript running on a Raspberry Pi and parts scavenged from commonly available hoverboards.

Self-balancing scooters a.k.a. Hoverboards are a great source of parts for such a project. Their high torque, direct drive brushless motors can drive loads of 100 kg or more. In addition, you also get a matching motor controller board, a rechargeable battery and its charging circuit. Most hoverboard controllers use the STM32F103, so flashing them with your own firmware becomes easy using a ST-link V2 programmer.

The next set of parts you need to build your robot is sensors. Some are cheap and easily available, such as microphones, contact switches or LDRs, while others such as ultrasonic distance sensors or LiDAR’s may cost a lot more. One source of cheap sensors are car parking assist transducers. An aftermarket parking sensor kit usually consists of four transducers, a control box, cables and display. Using a logic analyzer, [Isabelle] shows how you can poke around the output port of the control box to reverse engineer the data stream and decipher the sensor data. Once the data structure is decoded, you can then use some SPI bit-banging and voltage translation to interface it with the Raspberry Pi. Using the Pi makes it easy to add a cheap web camera, microphone and speakers to the Hoverbot.

Ikea is a hackers favourite, and offers a wide variety of hacker friendly devices and supplies. Their catalog offers a wide selection of fine, Swedish engineered products which can be used as enclosures for building robots. [Isabelle] zeroed in on a deep, circular plastic tray from a storage table set, stiffened with some plywood reinforcement. The tray offers ample space to mount the two motors, two castor wheels, battery and the rest of the electronics. Most of the original hardware from the hoverboard comes handy while putting it all together.

The software glue that holds all this together is JavaScript. The event-driven architecture of Node.js makes it a very suitable framework to use for Hoverbot. [Isabelle] has built a basic application allowing remote control of the robot. It includes a dashboard which shows live video and audio streams from the robot, buttons for movement control, an input box for converting text to speech, ultrasonic sensor visualization, LED lighting control, message log and status display for the motors. This makes the dashboard a useful debugging tool and a starting point for building more interesting applications. Check the build log for all the juicy details. Which other products from the Ikea catalog can be used to build the Hoverbot? How about a robotic Chair?

Continue reading “Turning That Old Hoverboard Into A Learning Platform”