Teardown: Alcatel Telic 1 Minitel Terminal

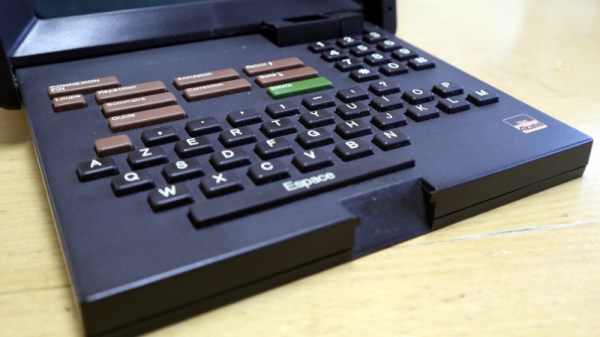
For British teenagers in the 1980s, the delights of 8-bit computers such as the Sinclair Spectrum, Commodore 64, or BBC Micro were firmly restricted to the offline arena. We would read about the BBS scene on the other side of the Atlantic, but without cheap local calls and with a modem costing a small fortune, the chances of us ever experiencing one was zero. When we took the British school rite of passage of a trip to France though, we were astounded to see that every French person was not merely online, but that they were doing so with a neat little all-in-one terminal. We’d just been introduced to the French Minitel system, and in that minute shared a glimpse of the future.

Un Réseau Trés Français

The Minitel terminal is a small CRT monitor with a fold-down alphanumeric keyboard.
My Alcatel Minitel terminal

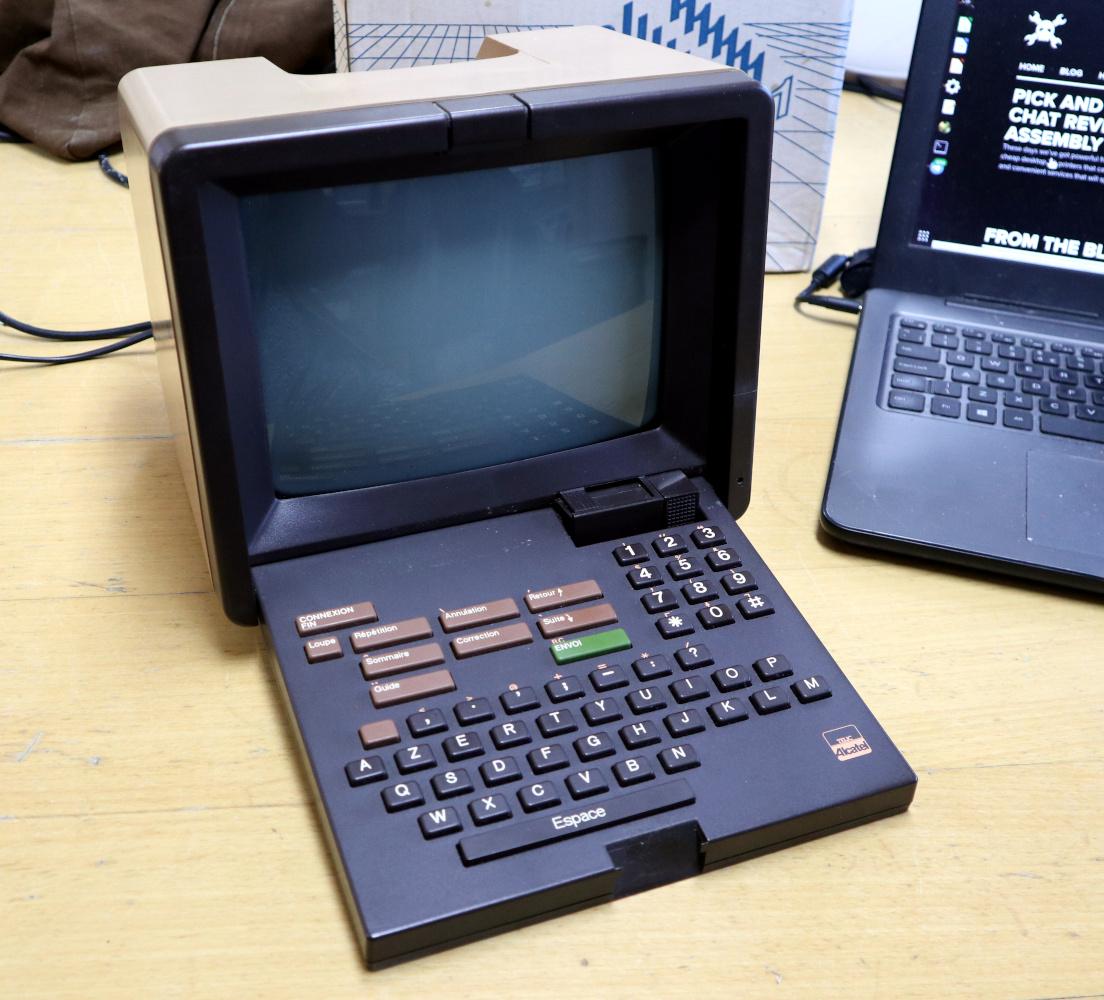
In the 1970s and 1980s, so-called videotext systems, terminal-based phoneline access to information services on central computers, were seen as an obvious next step for telephone network operators with an interest in profitable new products. In most countries this resulted in services such as the UK’s Prestel, a subscription service relying on costly hardware, but France Télécom instead pursued the bold path of making the terminals free to subscribers with free access to phone listings and yellow pages, but a business model based on pay-to-use premium services.

Thus, through the 1980s all French households had a Minitel terminal beside the phone, and the service became a runaway success. Ever since seeing Minitel terminals as a tourist I’d been fascinated by the service, so here in the 2020s when a friend was visiting their family in France I asked whether he could pick up an old Minitel terminal for me. Thus I found myself parting with around $25 and being rewarded with a slightly battered Minitel cardboard box containing one of the familiar brown Alcatel terminals. I certainly wasn’t expecting one in its original packaging. Continue reading “Teardown: Alcatel Telic 1 Minitel Terminal”

Classic IPods Are Super Upgradeable In 2022

The classic iPod was the MP3 player to beat back in the day, loaded with storage and with its characteristic click-wheel interface. [Ellie] had an iPod Video laying around, one of the more capable models that came out near the end of the product’s run, and set out upgrading it for duty in the pandemic-wracked badlands of 2022. 

The iPod in question was a 5.5th generation model, prized for being the last to feature the Wolfson DAC with its good audio quality. [Ellie] used the ever-helpful iFixit guide to learn how to disassemble the device safely. Careful hands and a spudger are key to avoid marring the pressed-together metal case.

Once opened, an iFlash Quad board was installed inside that lets the iPod use up to four micro SD cards for storage instead of the original hard disk drive. With two 512 GB cards installed, [Ellie] won’t be short of storage. A new battery was then subbed in, along with a fancy clear front casing for the aesthetic charm of it all.

After the hardware modifications were complete, the iPod needed to be restored with iTunes to start working again. She then installed the open source Rockbox firmware, which opens up the capabilities of the hardware immensely. Perhaps best of all, it can play DOOM! Alternatively, you can use the clickwheel to control the volume on your MacBook if you so desire.

[Ellie’s] project goes to show that modifying an iPod these days can be a fun weekend build thanks to the great software and hardware now available. It’s wonderful to see that the platform still has such great support years after it has been discontinued. If you really want to look back though, take a gander at the early prototype of Apple’s breakout MP3 player.

AR Display Shows CNC Lathe Operations In Real Time

[Kent VanderVelden] has come up with an interesting AR system to assist operators who are monitoring CNC lathes. (video, embedded, below) The idea is to first produce a ‘frozen’ video stream of the workpiece. This was achieved by placing a high-speed camera above the lathe, and triggering an image capture, synchronized to the rotational position of the workpiece. A high-speed rotary encoder, attached to the tailstock via a belt drive, feeds the current position into an Altera Terasic DE-Nano FPGA eval board. This is then compared to the position from another encoder, doing duty as an angular set point control. The resulting signal is used as the camera trigger to generate a video stream of just the frames where the angle is as selected by the operator, thus giving the impression of a frozen position. The video stream is sent over to a client device based on a Raspberry Pi 4 with a UPS hat, allowing it to be portable.

High speed rotary encoder driven via a belt

This video stream is overlaid with details of the current machine position, as well as the LinuxCNC G-code being executed and a graphical representation of the operation being performed by the machine. This combined video is then fed to a Vufine VUF-110 wearable, which is minimally invasive, allowing the operator to clearly see the machine of interest. As [Kent] suggests, there are many possible usage scenarios for such a setup, including remote monitoring of multiple operating machines by a single operator.

We’ve seen a few neat machine hacks over the years, here’s a nice project adding a programmable power feed to an old lathe, and since wood lathes are often missing out some DRO love, here’s a nice way to tell them that you care.

Continue reading “AR Display Shows CNC Lathe Operations In Real Time”

You Can Send MIDI Over I2C If You Really Need To

The Musical Instrument Digital Interface has a great acronym that is both nice to say and cleanly descriptive. The standard for talking to musical instruments relies on a serial signal at 31250 bps, which makes it easy to transmit using any old microcontroller UART with a settable baud rate. However, [Kevin] has dived into explore the utility of sending MIDI signals over I2C instead.

With a bit of hacking at the Arduino MIDI library, [Kevin] was able to get the microcontroller outputting MIDI data over the I2C interface, and developed a useful generic I2C MIDI transport for the platform. His first tests involved using this technique in concert with Gravity dual UART modules. After he successfully got one running, [Kevin] realised that four could be hooked up to a single Arduino, giving it 8 serial UARTS, or, in another way of thinking, 8 MIDI outputs.

At its greatest level of development, [Kevin] shows off his I2C MIDI chops by getting a single Raspberry Pi Pico delivering MIDI signals to 8 Arduinos, all over I2C. All the Arduinos are daisy-chained with their 5V and I2C lines wired together, and the system basically swaps out traditional MIDI channels for I2C addresses instead.

There’s not a whole lot of obvious killer applications for this, but if you want to send MIDI data to a bunch of microcontrollers, you might find it easier daisy-chaining I2C rather than hopping around with a serial line in the classic MIDI-IN/MIDI-THRU fashion.

We’ve seen [Kevin]’s work before too, like the wonderful Lo-Fi Orchestra. Video after the break.

Continue reading “You Can Send MIDI Over I2C If You Really Need To”

Martian Wheel Control Algorithms Gain Traction

Imagine the scene: You’re puttering along in your vehicle when, at least an hour from the nearest help, one of your tires starts losing air. Not to worry! You’ve got a spare tire along with the tools and knowhow to change it. And if that fails, you can call roadside assistance. But what if your car isn’t a car, has metal wheels for which no spares are available, and the nearest help is 200 million miles away? You just might be a Jet Propulsion Laboratory Engineer on the Curiosity Mars Rover mission, who in 2017 was charged with creating a new driving algorithm designed to extend the life of the wheels.

High Performance Rock Crawler, Courtesy Spidertrax.com License: CC BY 3.0

You could say that the Curiosity Mars rover is the ultimate off-road vehicle, and as such it has to deal with conditions that are in some ways not that different from some locations here on Earth. Earth bound rock crawlers use long travel suspensions, specialized drivetrains, and locking differentials to keep the tires on the ground and prevent a loss of traction.

On Mars, sand and rocks dominate the landscape, and a rover must navigate around the worst of it. It’s inevitable that, just like a terrestrial off-roader, the Mars rovers will spin a tire now and then when a wheel loses traction. The Mars rovers also have a specialized drivetrain and long travel suspensions. They don’t employ differentials, though, so how are they to prevent a loss of traction and the damaging wheel spin that ensues? This where the aforementioned traction control algorithm comes in.

By controlling the rotation of the wheels with less traction, they can still contribute to the motion of the vehicle while avoiding rock rash. Be sure to check out the excellent article at JPL’s website for a full explanation of their methodology and the added benefits of uploading new traction control algorithms from 200 million miles away! No doubt the Perseverance Mars rover has also benefited from this research.

But why should NASA get to have all the fun? You can join them by 3d printing your own Mars rover and just maybe some Power Wheels derived traction control. What fun!

Anti-Curl Sandpaper Storage Is Impressive

Maybe it’s the humidity, maybe it’s the cold weather. Something is making [Laura Kampf]’s nice fabric-backed sandpaper curl up into scrolls the second it comes out of the package. So you can understand why she urgently wanted to make a storage system that would be easy to flip through like a record bin, but also provide enough pressure to keep the papers flat.

Although [Laura] didn’t know what exactly the end result would be, she got started on it anyway — that’s a great way to get more projects off the drawing board and past the finish line. It worked out, because she got a great idea while building the box and using nice cam clamps to hold the finger joints together as the glue dried. Since she already had a bunch of these cam clamps in different lengths lying around, why not use a couple of them for this?

[Laura] has two major classifications of sandpaper — paper-backed and fabric-backed — and built them separate boxen using two clamps for each box. She joined the pins with a DIY handle in order to move the cams in unison, so all she has to do is pull out to flip through the papers, and push the handle back and down to re-pressurize the stack for storage. Be sure to check out the build and demo video after the break.

While DIY clamps are often wood and metal affairs, it’s good to have 3D printing in your corner.

Continue reading “Anti-Curl Sandpaper Storage Is Impressive”

PS2 Memory Card ISO Loader Offers Classic Gaming Bliss

It used to be that to play a console game, you just had to plug in a cartridge or put a CD/DVD in the optical drive. But these days, with modern titles ballooning up to as much as 100 GB, you’ve got no choice but to store them on the system’s internal hard disk drive. While that can lead to some uncomfortable data management decisions, at least it means you don’t have to get up off the couch to switch games anymore.

Which is precisely why the MC2SIO project for the PlayStation 2 is so exciting. As [Tito] explains in his latest
Macho Nacho Productions video, this simple adapter lets you connect an SD card up to the console’s Memory Card slots and use that to hold ISOs of your favorite games. With the appropriate homebrew software loaded up, your PS2 becomes a veritable jukebox of classic games.

Continue reading “PS2 Memory Card ISO Loader Offers Classic Gaming Bliss”