Tiny Sideways Tetris On A Business Card

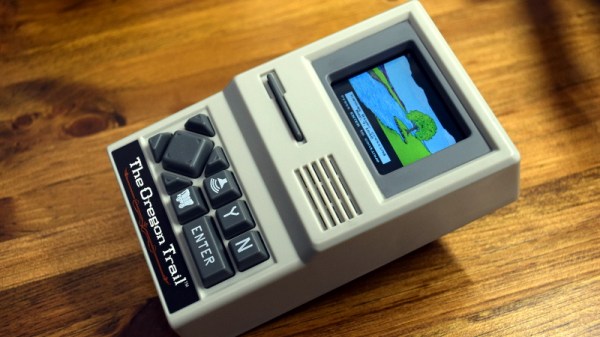
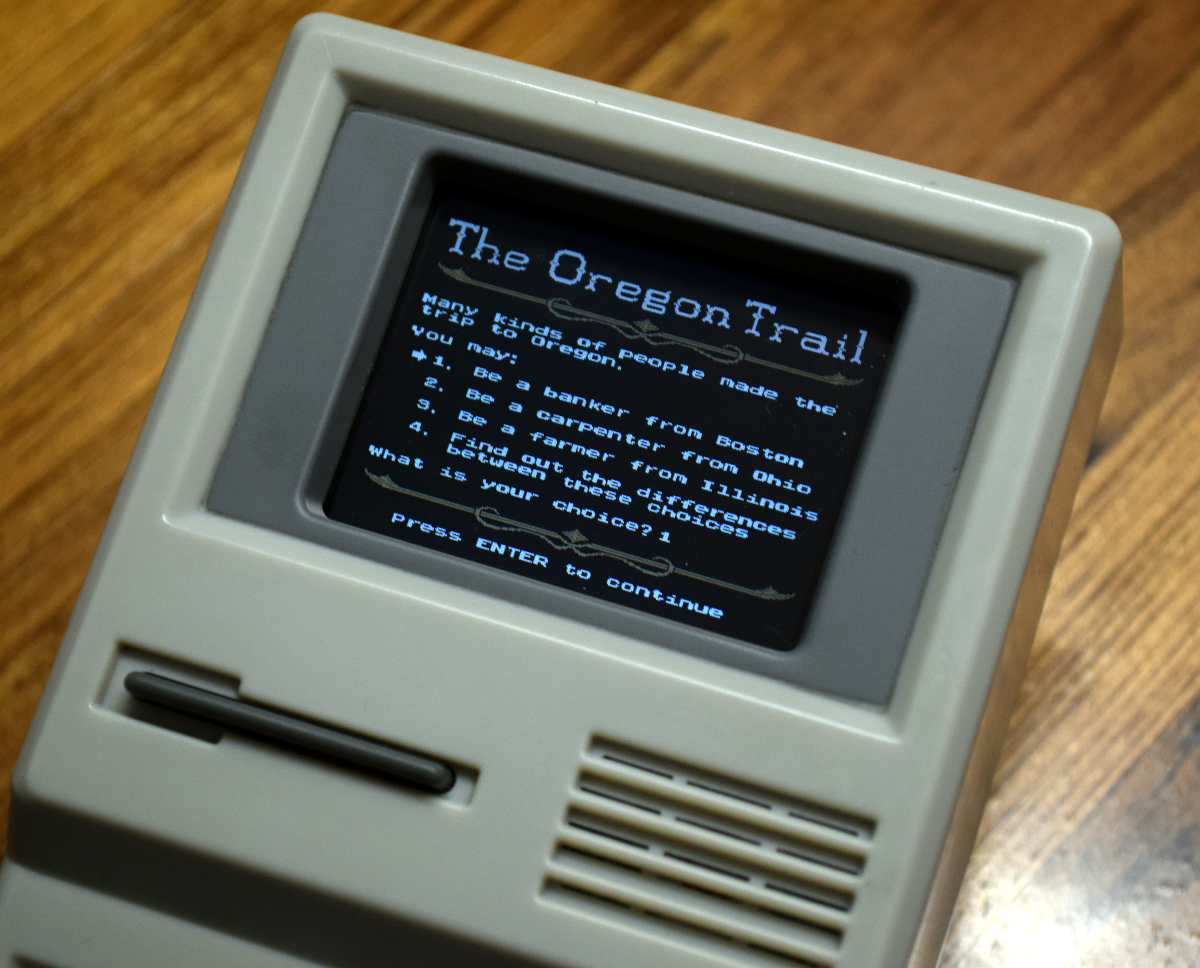
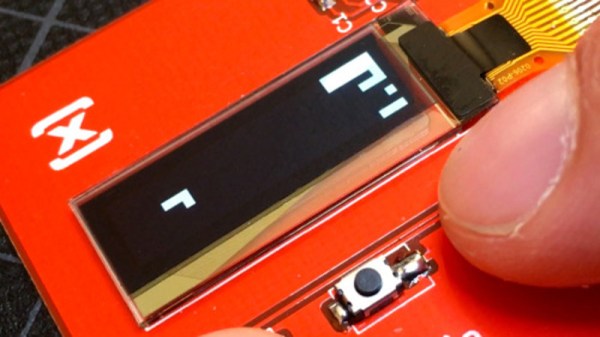
Everyone recognizes Tetris, even when it’s tiny Tetris played sideways on a business card. [Michael Teeuw] designed these PCBs and they sport small OLED screens to display contact info. The Tetris game is actually a hidden easter egg; a long press on one of the buttons starts it up.

It turns out that getting a playable Tetris onto the ATtiny85 microcontroller was a challenge. Drawing lines and shapes is easy with resources like TinyOLED or Adafruit’s SSD1306 library, but to draw those realtime graphics onto the 128×32 OLED using that method requires a buffer size that wouldn’t fit the ATtiny85’s available RAM.

To solve this problem, [Michael] avoids the need for a screen buffer by calculating the data to be written to the OLED on the fly. In addition, the fact that the smallest possible element is a 4×4 pixel square reduces the overall memory needed to track the screen contents. As a result, the usual required chunk of memory to use as a screen buffer is avoided. [Michael] also detailed the PCB design and board assembly phases for those of you interested in the process of putting together the cards using a combination of hot air reflow and hand soldering.

PCB business cards showcase all kinds of cleverness. The Magic 8-Ball Business Card is refreshingly concise, and the project that became the Arduboy had milled cutouts to better fit components, keeping everything super slim.

This Thermal Printer Has Serious Game

[Dhole], like the fox, isn’t the first to connect his computer to a Game Boy printer but he has done a remarkable job of documenting the process so well that anyone can follow. The operation is described well enough that it isn’t necessary to scrutinize his code, so don’t be put off if C and Rust are not your first choices. The whole thing is written like a story in three chapters.

The first chapter is about hacking a link cable between two Game Boys. First, he explains the necessity and process of setting the speed of his microcontroller, a NUCLEO-F411RE development board by STMicroelectronics. Once the rate is set, he builds a sniffer by observing the traffic on the cable and listens in on two Game Boys playing Tetris in competition mode. We can’t help but think that some 8-bit cheating would be possible if Tetris thought your opponent instantly had a screen overflowing with tetrominoes. Spying on a couple of Game Boys meant that no undue stress was put on the printer.

Chapter two built on the first chapter by using the protocol to understand how the printer expects to be spoken to. There is plenty of documentation about this already, and it is thoughtfully referenced. It becomes possible to convince a Game Boy that the connected microcontroller is a printer so it will oblige by sending an image. Since there isn’t a reason to wait for printing hardware, the transfer is nearly instantaneous. In the image above, you can see a picture of [Dhole] taken by a Game Boy camera.

The final chapter, now that all the protocols are understood, is also the climax where the computer and microcontroller convince the printer they are a Game Boy that wants to print an image. In the finale, we get another lesson about measuring controller frequency without an oscilloscope. If you are looking for the hack, there it is. There is a handful of success in the form of old receipts with superimposed grayscale images since virgin thermal printer paper by Nintendo costs as much as a used printer.

This story had a happy ending but grab your reading glasses for the smallest Game Boy and here’s someone who wrote their own Game Boy color game.

Portable DVD Player Gets Raspberry Pi Zero Upgrade

You might remember a time when people thought portable DVD players were a pretty neat idea. In the days before netbooks, cheap tablets, and arguably even the widespread adoption of smartphones, it seemed perfectly reasonable to lug around a device that did nothing but play movies. Today we look back at them as we would flip phones: a quaint precursor to the technology overload we find ourselves in currently. But the fact remains that millions of these comical little devices were pumped into the greedy maw of the consumer electronics market. They’re ripe for the hacking, all you need is some inspiration.

So if this grafting of a portable DVD player and the Raspberry Pi Zero W created by [nutsacrilege] doesn’t get you sniffing around your local second-hand store for a donor device, nothing will. By integrating a Pi running Kodi, the player gets a multi-media kick in the pants that arguably makes up for the rather archaic form factor. Not only can it play a wide array of local and online content, but it could even be used as portable game system if you were so inclined.

Rest assured, this isn’t some lazy five-minute mod. All of the original physical controls have been made functional by way of a MCP3008 ADC connected to the Pi’s GPIO and some clever Python scripting. Even the headphone jack was made functional by wiring it up to a USB sound card, and by integrating a tiny stripped down hub he was also able to add an external USB port. Who needs discs when you can plug in a flash drive full of content?

Speaking of which, [nutsacrilege] reports that the original functions of the device are still intact after all his modifications. So if you can get the museum to loan you one, you can even play a DVD on the thing as its creators intended.

With luck, this project will help spur on some more portable DVD player hacking, which we’ve seen precious little of so far. Frankly, it would be nice to see people cramming Raspberry Pi’s into something other than Game Boys for once.

[via /r/raspberry_pi]

Circuit-Sword Delivers Retro Justice

You can’t search for “retro gaming” without hitting a plethora of single board computers attached to all manner of controls, batteries, etc. Often these projects have an emphasis on functionality above all else but [Kite]’s Circuit-Sword is different. The Circuit-Sword is the heart of a RaspberryPi-based retro gaming machine with an enviable level of fit and finish.

Fundamentally the Circuit-Sword is a single board computer built around a Raspberry Pi Compute Module 3. We don’t see many projects which use a Compute Module instead of the full Pi, but here it is a perfect choice allowing [Kite] to useful peripherals without carrying the baggage of those that don’t make sense for a portable handheld (we’re looking at you, Ethernet). The Circuit-Sword adds USB-C to quickly charge an onboard LiPo (rates up to 1.5A available) and the appropriate headers to connect a specific LCD. The Compute Module omits wireless connectivity so [Kite] added an SDIO WiFi/Bluetooth module. And if you look closely, you may notice an external ATMega mediating a familiar looking set of button and switches.

Optional Drill Holes

We think those buttons and switches are the most interesting thing going on here, because the whole board is designed to fit into an original GameBoy enclosure. It turns out replacement enclosures are available from China in surprising variety (try searching for “gameboy housing”) as are a variety of parts to facilitate the installation of different screen options and more. One layer deeper in the wiki there are instructions for case mods you may want to perform to make everything work optimally. The number of possible options the user can mod-in are wide. Extra X/Y buttons? Shoulder buttons on the back? Play Station Portable-style slide joysticks? All detailed. For even more examples, try searching the SudoMod forums. For example, here’s a very visual build log by user [DarrylUK].

The case mod instructions are worth a glance even if you have no intent to build a device. There are some clever techniques to facilitate careful alignment of buttons and accurate hole drilling. Predicting their buyers might want a variety of options, [Kite] added reference drill holes in the PCB for the builder to re-drill for mounting buttons or joysticks. To facilitate adding status LEDs externally there is a tiny PCB jig included. There are even instructions for adding a faux game cartridge for the complete look.

If you want to buy one (we certainly do!) [Kite] does group buys periodically. Check out the wiki for links to the right interest form.

Thanks [Speednut Dave] for the tip!

Reverse Engineer An X-Ray Image Sensor

If you think of a medical x-ray, it is likely that you are imagining a photographic plate as its imaging device. Clipped to your tooth by your dentist perhaps, or one of the infamous pictures of the hands of [Thomas Edison]’s assistant [Clarence Madison Dally].

As with the rest of photography, the science of x-ray imaging has benefited from digital technology, and it is now well established that your hospital x-ray is likely to be captured by an electronic imaging device. Indeed these have now been in use for so long that their first generation can even be bought by an experimenter for an affordable sum, and that is what the ever-resourceful [Lucy Fauth] with the assistance of [Jana Marie Hemsing], has done. Their Trophy DigiPan digital x-ray image sensor was theirs for around a hundred Euros, and though it’s outdated in medical terms it still has huge potential for the x-ray experimenter.

The write-up is a fascinating journey into the mechanics of an x-ray sensor, with the explanation of how earlier devices such as this one are in fact linear CCD sensors which track across the exposed area behind a scintillator layer in a similar fashion to the optical sensor in a flatbed scanner. The interface is revealed as an RS422 serial port, and the device is discovered to be a standalone unit that does not require any commands to start scanning. On power-up it sends a greyscale image, and a bit of Sigrok examination of the non-standard serial stream was able to reveal it as 12-bit data direct from the sensor. From those beginnings they progressed to an FPGA-based data processor and topped it all off with a very tidy power supply in a laser-cut box.

It’s appreciated that x-rays are a particularly hazardous medium to experiment with, and we note from their videos that they are using some form of shielding. The source is a handheld fluoroscope of the type used in sports medicine that produces a narrow beam. If you remember the discovery of an unexpected GameBoy you will be aware that medical electronics seems to be something of a speciality in those quarters, as do autonomous box carriers.

Continue reading “Reverse Engineer An X-Ray Image Sensor”

Teardown: The Oregon Trail Handheld

If you were a school-age child in the 1980’s or 1990’s, you almost certainly played The Oregon Trail. Thanks to its vaguely educational nature, it was a staple of school computers until the early 2000’s, creating generations of fans. Now that those fans are old enough to have disposable incomes, we are naturally seeing a resurgence of The Oregon Trail merchandise to capitalize on one of humanity’s greatest weaknesses: nostalgia.

Enter the Target-exclusive The Oregon Trail handheld game. Priced at $24.99 USD and designed to look like the classic beige-box computers that everyone of a certain age remembers from “Computer Class”, it allows you to experience all the thrills of dying from dysentery on the go. Naturally there have been versions of the game for mobile devices in the past, but how is that going to help you when you want to make your peers at the coffee shop jealous?

But we’re not here to pass judgement on those who hold a special place for The Oregon Trail in their hearts. Surely, there’s worse things you could geek-out on than interactive early American history. No, you’re reading this post because somebody has put out a handheld PC-looking game system, complete with a simplified keyboard and you want to know what’s inside it. If there was ever a cheap game system that was begging to be infused with a Raspberry Pi and some retro PC games, this thing is it. Continue reading “Teardown: The Oregon Trail Handheld”

FPGA Magic Puts Little Embedded Screens Up On The Big Screen

Old-school handheld gaming platforms have a certain charm, but it’s fair to say that their relatively tiny screens don’t lend themselves to wider viewing. This presented a problem to [uXe] who wanted to display Arduboy games on the big screen, so he took a MyStorm BlackIce FPGA board and created a converter that emulates a SSD1306 OLED display and has a VGA output.

Having proved the viability of the idea, it was ported to a dedicated PCB with onboard ancillaries such as a level shifter for a 5 volt input. In an exciting twist, with a few modifications it’s also emulated a GameBoy screen, allowing full-sized playable games from that platform too. But the power of this hack isn’t relegated to gaming. SSD1306 is just one of a few different common standards for embedded displays. The FPGA work in this project is the blueprint for building a VGA adapter for any number of display replacements. We’d love to see an HD44780 mod of this!

The result as you can see in the video below the break is very much more in the spirit of the OLED than an HD immersive experience. But it does have a very pleasing air of an older arcade machine about it.

Several projects starting on a MyStorm BlackIce board have made it here in the past. Pretty memorable is the BBC Micro clone using one.

Continue reading “FPGA Magic Puts Little Embedded Screens Up On The Big Screen”