Hardware Vs Software: Fight!

It’s one of the great cliches in the hacker world: the hardware type and the software type. You can tell which of these two you are quite easily. When a project is actually 20% done, but you think it’s 90% done, and you say to yourself “And the rest is a simple matter of software”, you’re a hardware type. Ask anyone who has read my code, and they’ll tell you, I’m a hardware type.

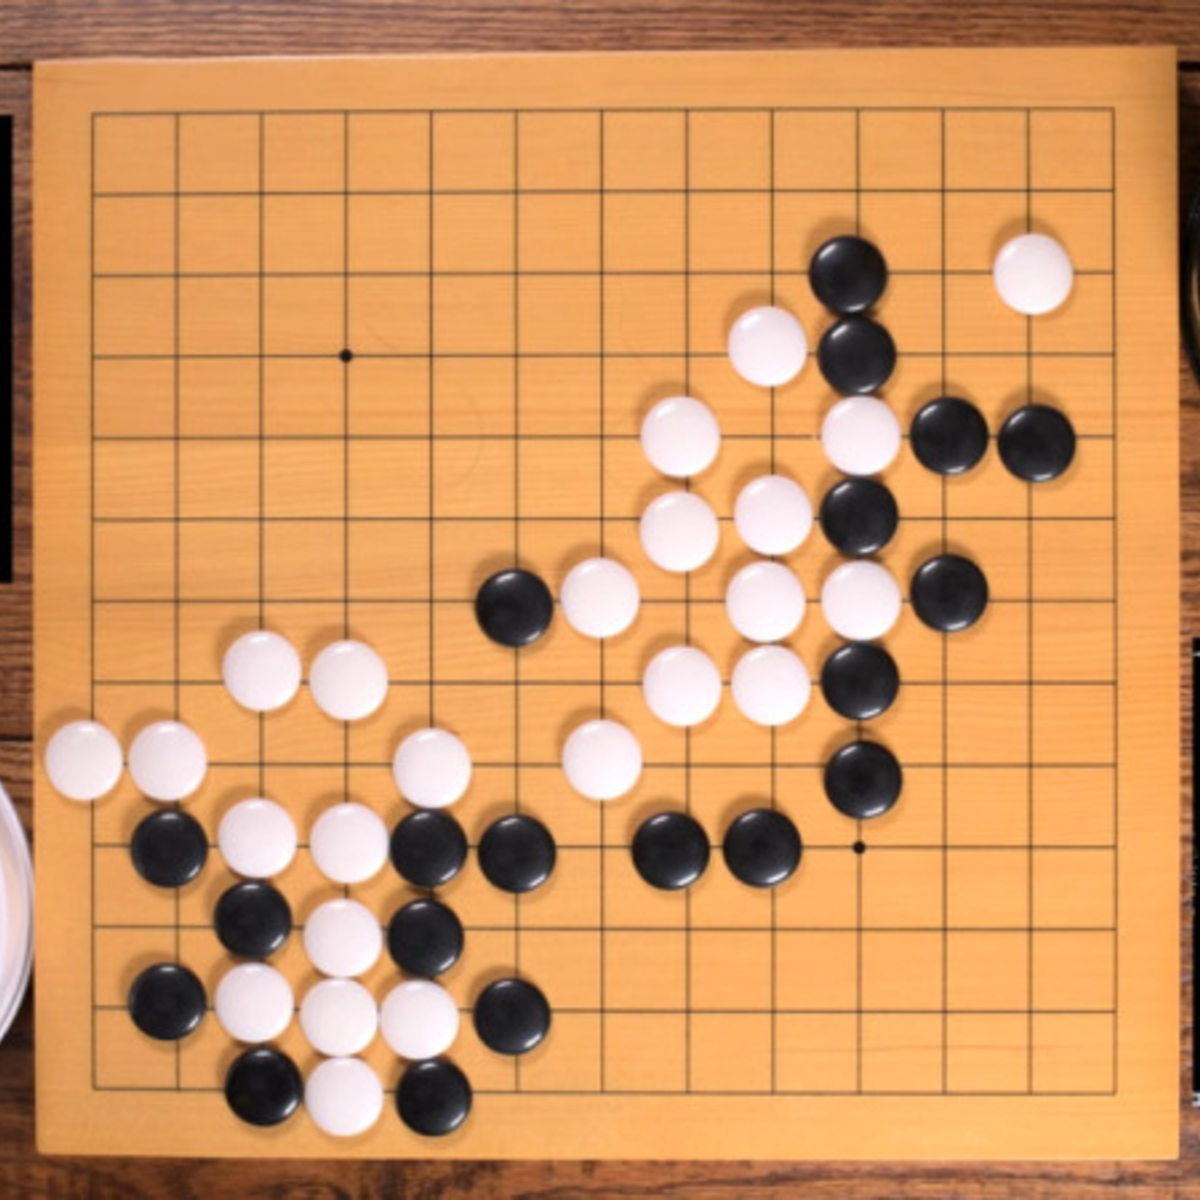
Along with my blindness to the difficulties of getting the code right, I’ve also admittedly got an underappreciation of what powers lie in the dark typing arts. But I am not too proud to tip my hat when I see an awesome application of the soft stuff. Case in point: this Go board sequencer that we ran last week. An overhead webcam parses players’ moves as they put black and white stones down while playing the game of Go, and turns this into music.

The pure software type will be saying “but there’s a webcam and a Go board”. And indeed, that’s true. There are physical elements to this project that anchor it in the shared reality of the two people playing. But a hardware project this isn’t; it’s OpenCV and Max/MSP that make it work.

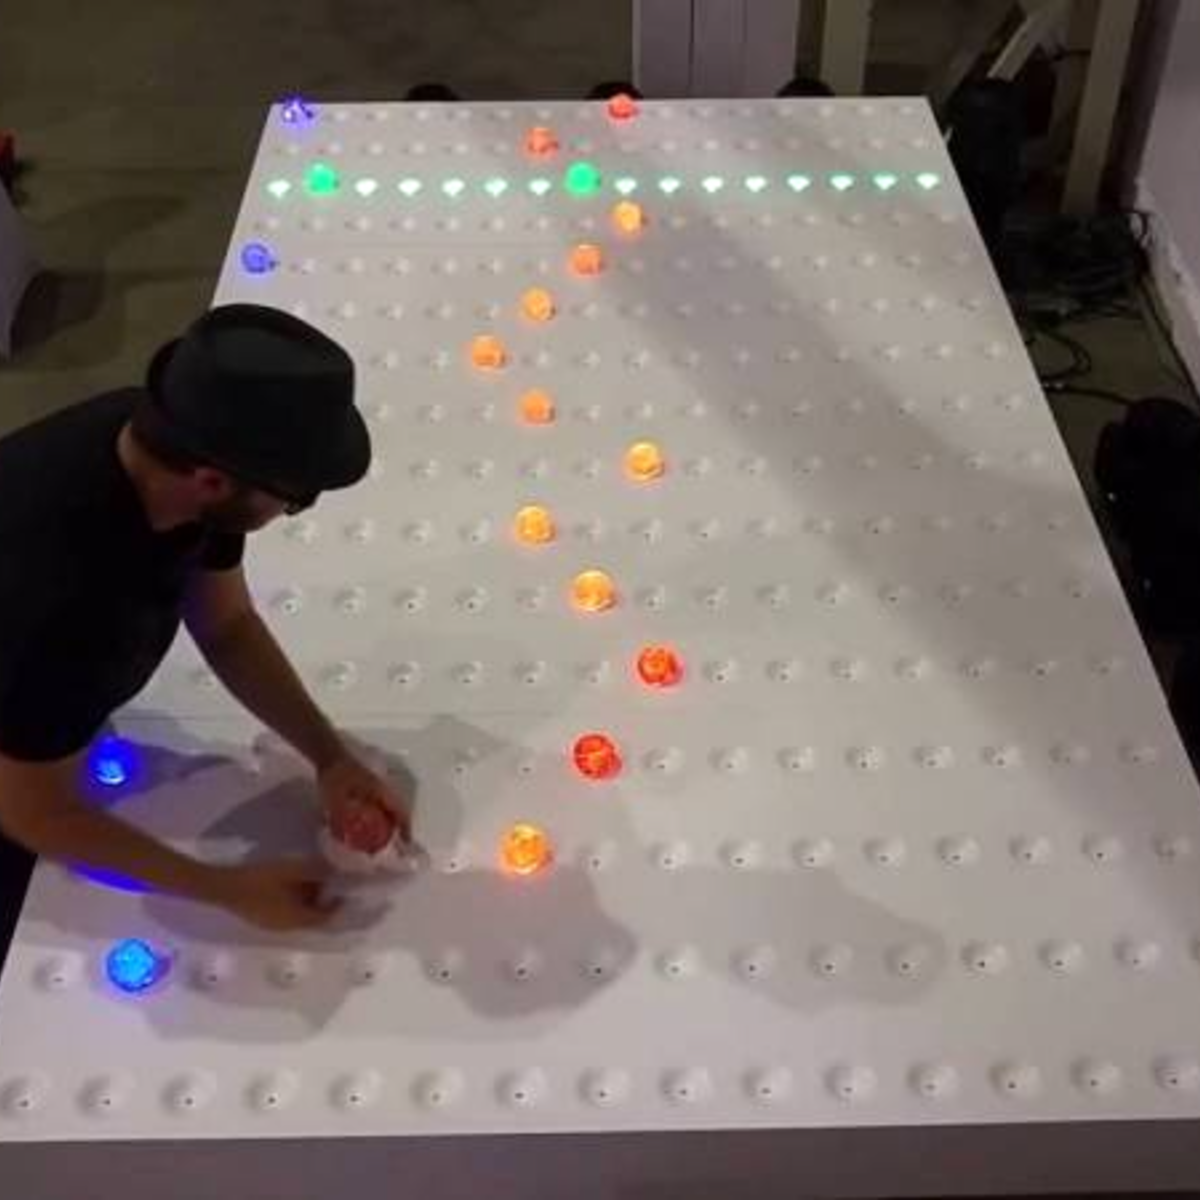
For comparison, look at the complexity of this similar physical sequencer. It’s got a 16 x 16 array of LEDs and switches and a CNC milled, primed, and painted surface that’s the size of a twin bed. Sawdust and hand-soldering: that’s a hardware project.

What I love about the Go sequencer is that it uses software just right. The piece is still physical. It could have just as easily been a VR world, where the two people would interact with each other only inside their goggles. But somehow that’s not quite as human as putting stones on a wooden board, sitting across from, and maybe even looking at, your opponent. The players aren’t forced to think about the software. They don’t feel like they’re playing a video game.

But at the same time, the software side of things makes all of the horrible hardware problems go away. Nobody is soldering a rat’s nest of 169 switches. There’s a webcam plugged into the USB port of a laptop. There’s a deep simplicity there.

Should you always trade out arcade buttons for OpenCV? Absolutely not! But is it worth considering the soft side when doing it in hardware is just too, well, hard? I’m open.

Homemade Gear Cutting Indexer Blends Art With Engineering

Ordinarily, when we need gears, we pop open a McMaster catalog or head to the KHK website. Some of the more adventurous may even laser cut or 3D print them. But what about machining them yourself?

[Uri Tuchman] set out to do just that. Of course, cutting your own gears isn’t any fun if you didn’t also build the machine that does the cutting, right? And let’s be honest, what’s the point of making the machine in the first place if it doesn’t double as a work of art?

[Uri’s] machine, made from brass and wood, is simple in its premise. It is placed adjacent to a gear cutter, a spinning tool that cuts the correct involute profile that constitutes a gear tooth. The gear-to-be is mounted in the center, atop a hole-filled plate called the dividing plate. The dividing plate can be rotated about its center and translated along linear stages, and a pin drops into each hole on the plate as it moves to index the location of each gear tooth and lock the machine for cutting.

The most impressive part [Uri’s] machine is that it was made almost entirely with hand tools. The most advanced piece of equipment he used in the build is a lathe, and even for those operations he hand-held the cutting tool. The result is an elegant mechanism as beautiful as it is functional — one that would look at home on a workbench in the late 19th century.

[Thanks BaldPower]

Continue reading “Homemade Gear Cutting Indexer Blends Art With Engineering”

Long Range WiFi Broadcasts Open-Source Video Conferencing

WiFi is an ubiquitous feature of the modern landscape, but due to power restrictions on most hardware alongside the high-frequency signal it’s typically fairly limited in range. This of course leads to frustration where a WiFi signal can be seen, but the connection is unreliable or slow. While most would reach for a range extender or other hardware bridge, [tak786] was able to roll out a better solution for his workplace by using a high-gain antenna and a single-board computer which gets him an amazing kilometer-wide WiFi network.

The build uses a 10 dBi antenna from TP-Link that’s rated for outdoor use and a single-board computer which acts as a sort of router. The antenna is placed at the top of a building which certainly helps with the extreme range as well. This setup doesn’t actually broadcast an open Internet connection, though. [tak786]’s employer needed a teleconferencing solution for their building, and he also created a fully open-source video conferencing solution called trango that can run on any LAN and doesn’t require an Internet connection. The WiFi setup in this build is effectively just a bonus to make the conferencing system more effective.

[tak786] is planning on releasing a whitepaper about this build shortly, but for now you can access the source code for the video conferencing system at his GitHub page. And, before anyone jumps to conclusions, apparently this is well within FCC rules as well. Some of the comments in the linked Reddit post suggest that with an amateur radio license this system could be pushed much further, too. If you need more range than a kilometer, though, it’s not too much more difficult to do once you have all the right hardware.

Tracking Your Run Over The Long Haul

The rise of smartphone and smartwatch fitness tracking has been an absolute boon for anyone interested in tracking their runs. However, it all falls short when you need a custom feature and start getting into serious long distance running, as most smartphone batteries simply won’t last. While there are devices out there for the ultra-running enthusiast, [Ivor Hewitt] decided he wasn’t willing to pay a monthly subscription for the pricy trackers or deal with the hassle of the generic cheap versions, and decided to roll his own.

The key pieces of this project are the A9G GPS module and the RDA8955 GRS/GPRS module. They’re both incredibly small and power efficient, perfect for a project that needs to be worn on your person with a long battery life. As an added bonus, the RDA8955 also includes a SoC that’s user-programmable. After battling the lackluster documentation and tooling, [Ivor] managed to get some software running on his new system. A power bug on the A9G GPS module was potentially show stopping, but thanks to some help by folks in the community, it was diagnosed and solved.

Further additions included adding a proper charging circuit (TP4056) and a beefy 2600 mAh battery scavenged from a Sony smartphone, giving the compact system around 38 hours of active battery life. An OLED screen was added to show upcoming aid stations and overall system status, driven by a custom display library. A snazzy translucent case makes the whole device slim and easy to carry. Now at the end of a long race or training session, [Ivor] has a wealth of tracked points that has already been uploaded to his own tracking website and a fully charged phone.

Next time you’re looking for a small compact GPS tracker or cellular logger take a look at this project’s code on GitHub or the A9G and RDA8955 modules.

Thanks [Ivor] for sending this one in!

Electronic Treatment For Diabetes?

If you ask power companies and cell phone carriers how much electromagnetic radiation affects the human body, they’ll tell you it doesn’t at any normal levels. If you ask [Calvin Carter] and some other researchers at the University of Iowa, they will tell you that it might treat diabetes. In a recent paper in Cell Metabolism, they’ve reported that exposing patients to static magnetic and electric fields led to improved insulin sensitivity in diabetic mice.

Some of the medical jargon in a paper like this one can be hard to follow, but it seems they feed mice on a bad diet — like that which many of us may eat — and exposed them to magnetic and electrical fields much higher than that of the Earth’s normal fields. After 30 days there was a 33% improvement in fasting blood glucose levels and even more for some mice with a specific cause of diabetes.

Continue reading “Electronic Treatment For Diabetes?”

Classical Poultry Conditioning Is A Bird-Brained Scheme

A while back, [Kutluhan Aktar] was trying to hack their chickens, quails, and ducks for higher egg production and faster hatching times by using a bit of classical conditioning. That is, feeding them at the same time every day while simultaneously exposing them to sound and light. Once [Kutluhan] slipped enough times, they hatched a plan to build an automatic feeder.

This fun rooster-shaped bird feeder runs on an Arduino Nano and gets its time, date, and temperature info from a DS3231 RTC. All [Kutluhan] has to do is set the daily feeding time. When it comes, a pair of servos and a pan-tilt kit work together to invert a Pringles can filled with food pellets. A piezo buzzer and a green LED provide the sound and light to help with conditioning. Scratch your way past the break to see it in action.

If [Kutluhan] gets tired of watching the birds eat at the same time every day, perhaps a trash-for-treats training program could be next on the list.

Continue reading “Classical Poultry Conditioning Is A Bird-Brained Scheme”

Put That New Resin Printer To Work Making PCBs

With all the cool and useful parts you can whip up (relatively) quickly on a 3D printer, it’s a shame you can’t just print a PCB. Sure, ordering a PCB is quick, easy, and cheap, but being able to print one-offs would peg the needle on the instant gratification meter.

[Peter Liwyj] may just have come up with a method to do exactly that. His Instructables post goes into great detail about his method, which uses an Elegoo Mars resin printer and a couple of neat tricks. First, a properly cleaned board is placed copper-side down onto a blob of SLA resin sitting on the print bed. He tricks the printer into thinking the platform is all the way down for the first layer by interrupting the photosensor used to detect home. He lets the printer go through one layer of an STL file that contains his design, which polymerizes a thin layer of plastic onto the copper. The excess resin is wiped gently away and the board goes straight into a ferric chloride etching bath. The video below shows the whole process.

As simple as it sounds, it looks like it works really well. And [Peter] didn’t just stumble onto this method; he approached it systematically and found what works best. His tips incude using electrical tape as a spacer to lift the copper off the print surface slightly, cleaning the board with Scotchbrite rather than sandpaper, and not curing the resin after printing. His toolchain is a bit uncoventional — he used SketchUp to create the traces and exported the STL. But there are ways to convert Gerbers to STLs, so your favorite EDA package can probably fit in to the process too.

Don’t have a resin printer? Don’t worry — FDM printers can work too.

Continue reading “Put That New Resin Printer To Work Making PCBs”