DJ Xiaomi Spins Beats And Brushes At The Same Time

Direct from the “Just Because I Can” department, this blog post by [Eddie Zhang] shows us how easy it is to get the Xiaomi robotic vacuum cleaner working as what might be the world’s most unnecessary Spotify Connect speaker. Will your home be the next to play host to an impromptu performance by DJ Xiaomi? Judging by the audio quality demonstrated in the video after the break, we doubt it. But this trick does give us a fascinating look at the current state of vacuum hacking.

For the first phase of this hack, [Eddie] makes use of Dustcloud, an ongoing project to document and reverse engineer various Xiaomi smart home gadgets. Using the information provided there you can get root-level SSH access to your vacuum cleaner and install your own software. There’s a sentence you never thought you’d read, right?

With the vacuum rooted, [Eddie] then installs a Spotify Connect client intended for the Raspberry Pi. As they’re both ARM devices, the software will run on the Xiaomi bot well enough, but the Linux environment needs a little tweaking. Namely, you need to manually create an Upstart .conf file for the service, as the vacuum doesn’t have systemd installed. There goes another one of those unexpected sentences.

We’re certainly no stranger to robotic vacuum hacking, though historically the iRobot Roomba has been the target platform for such mischief. Other players entering the field can only mean good things for those of us who get a kick out of seeing home appliances pushed outside of their comfort zones.

Continue reading “DJ Xiaomi Spins Beats And Brushes At The Same Time”

Spin Me Right Round, Baby: Generator Building Experiments For Mere Mortals

How many of you plan to build a wind-powered generator in the next year? Okay, both of you can put your hands down. Even if you don’t want to wind your coils manually, learning about the principles in an electric generator might spark your interest. There is a lot of math to engineering a commercial model, but if we approach a simple version by looking at the components one at a time, it’s much easier to understand.

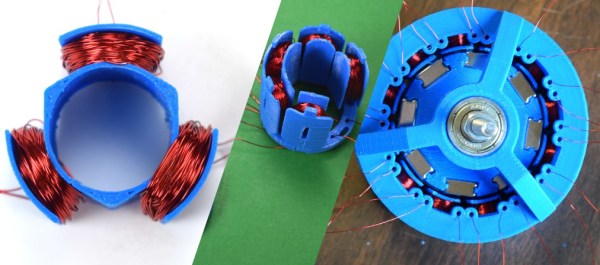
For this adventure, [K&J Magnetics] start by dissect a commercial generator. They picked a simple version that might serve a campsite well, so there is no transmission or blade angle apparatus to complicate things. It’s the parts you’d expect, a rotor and a stator, one with permanent magnets and the other with coils of wire.

The fun of this project is copying the components found in the commercial hardware and varying the windings and coil count to see how it affects performance. If you have ever wound magnet wire around a nail to make an electromagnet, you know it is tedious work so check out their 3D printed coil holder with an embedded magnet to trigger a winding count and a socket to fit on a sewing machine bobbin winder. If you are going to make a bunch of coils, this is going to save headaches and wrist tendons.

They use an iterative process to demonstrate the effect of multiple coils on a generator. The first test run uses just three coils but doesn’t generate much power at all, even when spun by an electric drill. Six windings do better, but a dozen finally does the trick, even when turning the generator by hand. We don’t know about their use of cheap silicone diodes though, that seems like unintentional hobbling, but we digress.

Making turbine blades doesn’t have to be a sore chore either, and PVC may be the ticket there, you may also consider the vertical axis wind turbine which is safer at patio level. Now, you folks building generators, remember to tip us off!

Continue reading “Spin Me Right Round, Baby: Generator Building Experiments For Mere Mortals”

Fail Of The Week: Spinning The Pripyat Ferris Wheel

This multifaceted fail comes to us straight from the Chernobyl Exclusion Zone, where a group of friends apparently decided that a fun weekend project would be trying to turn over the iconic ferris wheel in the Pripyat Amusement Park. The [Kreosan] crew documented their admittedly very creative attempt at suicide in the video after the break, but we can save you some time by telling you right up front that the decades-old ferris wheel never actually rotates more than a few degrees. Though that’s hardly the key failure of this endeavour.

Even if you don’t understand anything they’re saying (we certainly don’t), it’s not too hard to follow along with this harebrained scheme.

Under cover of darkness, the troupe gains access to the mechanisms below the towering Soviet-era ride, and removes the brake unit mounted next to the motor. With the wheel now free spinning, the team is elated to see the mechanical advantage is such that spinning the shaft by hand is enough to cause a very slight rotation of the pulley and cables attached to the wheel.

Realizing they need more speed, the group then spends the rest of the night and apparently a good deal of the following day attempting to spin the mechanism using the rear wheel of one of their electric bicycles. But a rubber wheel held by hand against a rusty shaft, rather unsurprisingly, turns out to be a fairly poor mechanical linkage. They get a couple partial rotations on the pulleys, but still no serious movement.

One of the guys was working on the next phase of the inexplicably misguided plan, removing some heavy counterweights hanging under the ferris wheel, when a young woman shows up with a dosimeter and starts taking some measurements. Eventually, one of these moonlighting ferris wheel engineers uses the meter to observe the elevated radiation levels of the dirt and rust accumulated on his bare hands. This swiftly brings the operation to a close, and they all ride off on their bikes.

This was, without question, a monumentally stupid thing to do. Even if this was just a run-of-the-mill ferris wheel that had been abandoned and exposed to the elements for over thirty years, climbing on the thing and trying to get it to spin would be dangerous. But when you combine that with the fact it’s common knowledge to those who explore the Exclusion Zone that there are parts of the ferris wheel still emitting radiation at hundreds of times the normal background dose, this misadventure is a strong contender for the 2019 Darwin Award.

We’re lucky the remnants of Chernobyl’s number four reactor are locked away inside the Chernobyl New Safe Confinement, or else some up-and-coming Internet celebrity might try to get in there and spin up the turbines for a laugh. We’ve seen some pretty crazy stunts from [Kreosan], and we’d like to see more. So please, stay safe(r) guys!

Continue reading “Fail Of The Week: Spinning The Pripyat Ferris Wheel”

Espionage On Display As GCHQ Hosts A Temporary Exhibit

At the top of the British electronic intelligence agency is the Government Communications Headquarters (GCHQ), a very public entity whose circular building can easily be found by any inquisitive soul prepared to drive just off the A40 in Cheltenham which is about two hours west of London. But due to the nature of its work it is also one of the most secretive of UK agencies, from which very little public information is released. With over a century of history behind it and with some truly groundbreaking inventions under its belt it is rumoured to maintain a clandestine technology museum that would rewrite a few history books and no doubt fascinate the Hackaday readership.

Perhaps the most famous of all its secrets was the wartime Colossus, the first all-electronic stored program digital computer, which took an unauthorised book in the 1970s to bring to public attention. Otherwise its historical artifacts have been tantalisingly out-of-reach, hinted at but never shown.

A temporary exhibition at the Science Museum in London then should be a must-visit for anyone with an interest in clandestine technology. Top Secret: From ciphers to cyber security occupies the basement gallery, and includes among other exhibits a fascinating selection of artifacts from the Government agency. On a trip to London I met up with a friend, and we went along to take a look.

Continue reading “Espionage On Display As GCHQ Hosts A Temporary Exhibit”

Clicky Signspinner Works Just Like A Retractable Pen

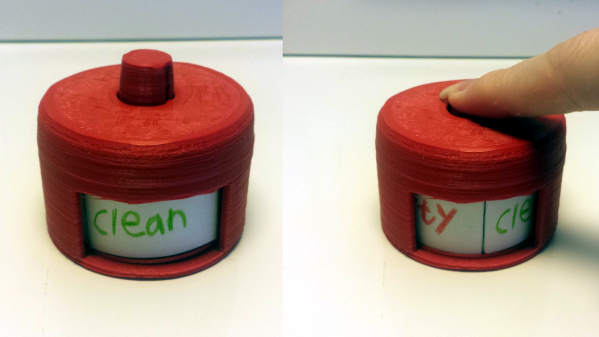
[u407]’s 3D printed Signspinner was created as a clean/dirty indicator for a dishwasher, and at its heart is a mechanism that works a lot like that of a retractable ballpoint pen. Every click of the plunger spins the circular label inside by one-quarter of a rotation. In [u407]’s case it only needs to alternate between showing “clean” and “dirty”, but there are in fact four total label positions.

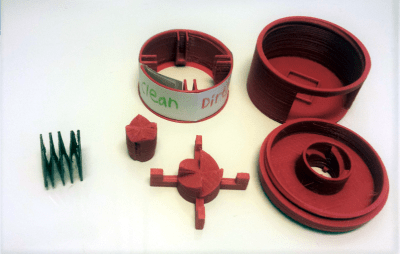
The entire mechanism including the spring is 3D printed, but the spring is PETG and the rest is PLA. [u407] doubts PLA would work for the spring because of how much it gets compressed, but suggests that ABS might work as an alternative.

If you’re having trouble visualizing how this mechanism works, we covered [Bill Hammack] explaining exactly how retractable ballpoint pens work which should make it perfectly clear. It’s fundamentally the same principle.

[via Reddit]

A Multi-Layered Spin On Persistence Of Vision

By taking advantage of persistence in human vision, we can use modest bits of hardware to create an illusion of a far larger display. We’ve featured many POV projects here, but they are almost always an exploration in two dimensions. [Jamal-Ra-Davis] extends that into the third dimension with his Volumetric POV Display.

Having already built a 6x6x6 LED cube, [Jamal] wanted to make it bigger, but was not a fan of the amount of work it would take to grow the size of a three-dimensional array. To sidestep the exponential increase in effort required, he switched to using persistence of vision by spinning the light source and thereby multiplying its effect.

The current version has six arms stacked vertically, each of which presents eight individually addressable APA102 LEDs. When spinning, those 48 LEDs create a 3D display with an effective resolution of 60x8x6.

We saw an earlier iteration of this project a little over a year ago at Bay Area Maker Faire 2018. (A demo video from that evening can be found below.) It was set aside for a while but has now returned to active development as an entry to Hackaday Prize 2019. [Jamal-Ra-Davis] would like to evolve his prototype into something that can be sold as a kit, and all information has been made public so others can build upon this work.

We’ve seen two-dimensional spinning POV LED display in a toy top, and we’ve also seen some POV projects taking steps into the third dimension. We like where this trend is going.

Continue reading “A Multi-Layered Spin On Persistence Of Vision”

Raspberry Pi Cyberdeck Inspired By Rare MSX

When we see these cyberdeck builds, the goal is usually to just make something retro-futuristic enough to do William Gibson proud. There’s really no set formula, but offset screens coupled with large keyboards and a vague adherence to 1980s design language seem to be the most important tenets.

Granted the recent build by [lewisb42] still leans heavily on those common tropes, but at least there’s a clear lineage: his Raspberry Pi retro all-in-one is styled after a particularly rare bright red variant of the MSX that Sony released in Japan. Known as the HIT-BIT HB-101, some aficionados consider the circa-1984 machine to be the peak of MSX styling. Since getting his hands on a real one to retrofit wasn’t really an option, he had no choice but to attempt recreating some of the computer’s unique design elements from scratch.

The faceted sides were 3D printed in pieces, glued together, and then attached to a 1/4″ thick backplate made out of polycarbonate. For the “nose” piece under the keyboard, [lewisb42] actually used a piece of wood cut at the appropriate angles with a table saw. The top surface of the computer, which he calls the FLIPT-BIT, is actually made of individual pieces of foamed PVC sheet.

If all this sounds like a big jigsaw puzzle, that’s because it basically is. To smooth out the incongruous surfaces, he used a combination of wood putty, body filler, spot putty, and more time sanding then we’d care to think about. For the 3D printed surface details such as the screen bezel and faux cartridge slots, he used a coat of Smooth-On’s XTC-3D and yet more sanding. While [lewisb42] says the overall finish isn’t quite as good as he hoped, we think the overall look is fantastic considering the combination of construction techniques hiding under that glossy red paint job.

As for the electronics, there’s really no surprises there. The FLIPT-BIT uses a keyboard and touchpad from Perixx, a seven inch TFT display, and of course the Raspberry Pi 3. The display runs at 12 V so [lewisb42] used a combination of a generic laptop-style power supply and a 5 V step-down converter to keep everyone happy. While it doesn’t currently have a battery, it seems like there’s more than enough room inside the case to add one if he ever wants to go mobile.

If this build doesn’t properly scratch your Neuromancer itch, never fear. Just take a look at this decidedly less friendly-looking build that even includes a VR headset for properly jacking yourself into the matrix.