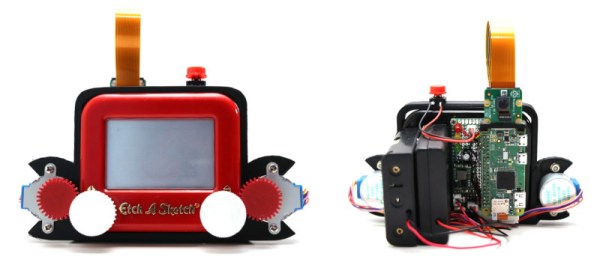
An Amiga 600 With An FPGA Inside

The Amiga is the platform that refuses to die. It must be more than two decades since the debacle surrounding the demise of the original hardware, yet the operating system is still receiving periodic updates, you can still buy Amiga hardware now sporting considerably more powerful silicon than the originals, and its worldwide community is as active as ever.

One of those community projects is the MiSTer FPGA Amiga-on-an-FPGA, and it was this that caught the attention of [Mattsoft]. Impressed with the quality of its recreation of an Amiga, he decided to turn his into a “real” Amiga, so found an Amiga 600 case and keyboard, and set to work. Into the mix went the Terasic DE10-Nano FPGA board, I/O and RAM boards, a Tynemouth Software keyboard interface, a USB hub, and some well-designed 3D-printed parts allow the original Amiga case to be used without modifications.

The Amiga 600 was the base model in the final Amiga range from the early 1990s, and at the time despite its HDD interface and PCMCIA slot it languished in the shadow of its Amiga 1200 sibling. The styling has aged well though, and this upgrade certainly breathes a little life back into the case if not strictly the machine itself. If you want to learn a bit more about MiSTer then a look at the project’s wiki is in order. Perhaps you don’t have an Amiga though and would like to wallow in a bit of nostalgia without splashing out for hardware, in that case, give AROS a look.

Thanks [intric8] for the tip.

Vintage eight transistor stereo amplifier

Eight Transistor Stereo Amplifier From The Days Of Yore

Reading an article about the first transistorized Hi-Fi amplifier, [Netzener] got the itch to make one. But what to use for the starting point? Enter an old Radio Shack P-Box stereo amplifier kit. After a few modernizations and tweaks, the result is an 8-transistor stereo amplifier that’s aesthetically pleasing, sounds great, and is fully documented.

The Radio Shack kit used germanium transistors, but with their high leakage current and low thermal conductivity, he decided to convert it to work with silicon transistors. He also made some improvements to the push-pull bias circuit and limited the high-frequency response. As for the finished product, in true [Netzener] style, he assembled it all to look like the original completed Radio Shack amplifier. He even wrote up a manual which you’d think, as we did at first, was the original one, giving that old, comfortable feeling of reading quality Radio Shack documentation.

Check out the video below where he uses a 9 V battery and half a watt per channel to fill a room with clear, stereo sound.

This isn’t the first Radio Shack kit that [Netzener] has adapted. Check out his single tube radio and classic neon “Goofy Light” box.

Continue reading “Eight Transistor Stereo Amplifier From The Days Of Yore”

The Magic That Goes Into Magnets

Every person who reads these pages is likely to have encountered a neodymium magnet. Most of us interact with them on a daily basis, so it is easy to assume that the process for their manufacture must be simple since they are everywhere. That is not the case, and there is value in knowing how the magnets are manufactured so that the next time you pick one up or put a reminder on the fridge you can appreciate the labor that goes into one.

[Michael Brand] writes the Super Magnet Man blog and he walks us through the high-level steps of neodymium magnet production. It would be a flat-out lie to say it was easy, but you’ll learn what goes into them and why you don’t want to lick a broken hard-drive magnet and why it will turn to powder in your mouth. Neodymium magnets are probably unlikely to be produced at this level in a garage lab, but we would love to be proved wrong.

We see these magnets everywhere, from homemade encoder disks, cartesian coordinate tables, to a super low-power motor.

Vintage Headphones Bluetooth Conversion Goes The Extra Mile

[KaZjjW] wanted to retrofit a pair of nicely styled vintage headphones to be able to play wirelessly over Bluetooth. In principle this is an easy task: simply stick a Bluetooth audio receiver on the line-in, add a battery, and you’re all set. However, [KaZjjW] wanted to keep the aesthetic changes to the headphones at an absolute minimum, retaining the existing casing and volume control, whilst cramming the electronics entirely inside and out of sight.

With the inherent space constraints inside the cups of the headphones, this proved to be quite a challenge. The existing volume potentiometer which hung half outside the case was remounted on an ingenious hinge made of two PCBs, with the pot floating next to a surface mounted switch. This allowed it to not only control the volume, but also act as an on/off switch for the Bluetooth. The only other existing cuts in the casing were a circular hole for the audio cable, and a slit for the cable strain relief. These worked perfectly for an LED status indicator and micro-USB battery charging.

The main chip used for receiving audio over Bluetooth was the BM62 by Microchip. It’s a great all-in-one solution for this kind of project as it has built-in battery charging, an on-board DAC and audio amp, as well as a serial control interface. In part 2 of the project log, the process of programming the BM62 was documented, and it was painful – it’s a shame that the software support lets it down. But a hacker will always find a way, and we’ve seen some pretty neat hacks for reprogramming existing chips in off-the-shelf Bluetooth headphones.

Two PCBs for the pot button hinge, one for the LED and micro-USB connector, as well as one for the Bluetooth receiver and a PIC. That’s four PCBs in a pretty small space, enabled by some commendable design effort both electronically and mechanically. It certainly paid off, as the finished product looks very slick.

Continue reading “Vintage Headphones Bluetooth Conversion Goes The Extra Mile”

Build Your Own Portable Arduino Soldering Iron

At this point you’ve almost certainly seen one of these low-cost portable soldering irons, perhaps best exemplified by the TS100, a pocket-sized temperature controlled iron that can be had for as little as $50 USD from the usual overseas suppliers. Whether or not you’re personally a fan of the portable irons compared to a soldering station, the fact remains that these small irons are becoming increasingly popular with hackers and makers that are operating on a budget or in a small workspace.

Believing that imitation is the most sincere form of flattery, [Electronoobs] has come up with a DIY portable soldering iron that the adventurous hacker can build themselves. Powered by an ATMega328p pulled out of an Arduino Nano, if offers the same software customization options of the TS100 but at a considerably lower price. Depending on where you source your components, you should be able to build one of these irons for as little as $15.

The iron features a custom PCB and MAX6675 thermocouple amplifier to measure tip temperature. A basic user interface is provided by two tactile buttons on the PCB as well as an 128×32 I2C OLED display. In a future version, [Electronoobs] says he will look into adding some kind of sensor to detect when the iron is actually being used and put it to sleep when inactive.

The tip is sourced from a cheap soldering station replacement iron, and according to [Electronoobs], is probably the weakest element of the entire build. He’s looking into using replacement TS100 tips, but says he’ll need to redesign his electronics to make it compatible. The case is a simple 3D printed affair, which looks solid enough, but seems likely to be streamlined in later versions.

We’ve seen a number of attempts at DIY soldering irons over the years, but we have to say, this one is probably the most professional we’ve ever seen. It will be interesting to see how future revisions improve on this already strong initial showing.

Continue reading “Build Your Own Portable Arduino Soldering Iron”

Putting More Tech Into More Hands: The Robin Hoods Of Hackaday Prize

Many different projects started with the same thought: “That’s really expensive… I wonder if I could build my own for less.” Success is rewarded with satisfaction on top of the money saved, but true hacker heroes share their work so that others can build their own as well. We are happy to recognize such generosity with the Hackaday Prize [Robinhood] achievement.

Achievements are a new addition to our Hackaday Prize, running in parallel with our existing judging and rewards process. Achievements are a way for us to shower recognition and fame upon creators who demonstrate what we appreciate from our community.

Fortunately there is no requirement to steal from the rich to unlock our [Robinhood] achievement, it’s enough to give away fruits of price-reduction labor. And unlocking an achievement does not affect a project’s standings in the challenges, so some of these creators will still collect coveted awards. The list of projects that have unlocked the [Robinhood] achievement will continue to grow as the Hackaday Prize progresses, check back regularly to see the latest additions!

In the meantime, let’s look at a few notable examples that have already made the list:

Continue reading “Putting More Tech Into More Hands: The Robin Hoods Of Hackaday Prize”

Rocket Bullets: The Flame And Fizzle Of The Gyrojet

In the 1950’s and 60’s, the world had rocket fever. Humankind was taking its first steps into space and had sights on the moon. Kids could build rockets at the kitchen table and launch them in the schoolyard. On the darker side, the arms race was well underway with the US and USSR trying to close the fictional missile gap.

All around the world, engineers were trying to do new things with rockets. Among these were Robert Mainhardt and Arthur T. Biehl, who thought rockets could be useful as small arms. Together they formed MBA (short for Mainhardt and Biehl Associates), with an eye toward future weapons – – specifically rocket bullets.

Continue reading “Rocket Bullets: The Flame And Fizzle Of The Gyrojet”