Decellularization: Apples To Earlobes

Our bodies are not like LEGO blocks or computers because we cannot swap out our parts in the living room while watching television. Organ transplants and cosmetic surgery are currently our options for upgrades, repairs, and augments, but post-transplant therapy can be a lifelong commitment because of rejection. Elective surgery costs more than a NIB Millenium Falcon LEGO set. Laboratories have been improving the processes and associated treatments for decades but experimental labs and even home laboratories are getting in on the action as some creative minds take the stage. These folks aren’t performing surgeries, but they are expanding what is possible to for people to do and learn without a medical license.

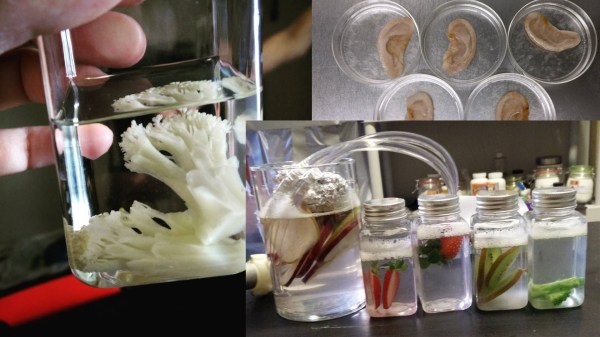
One promising gateway to human building blocks is the decellularization and recellularization of organic material. Commercial scaffolds exist but they are expensive, so the average tinkerer isn’t going to be buying a few to play with over a holiday weekend.

Let’s explore what all this means. When something is decellularized, it means that the cells are removed, but the structure holding the cells in place remains. Recellularizing is the process where new cells are grown in that area. Decellularizing is like stripping a Hilton hotel down to the girders. The remaining structures are the ECM or the Extra Cellular Matrix, usually referred to as scaffolding. The structure has a shape but no functionality, like a stripped hotel. The scaffolding can be repopulated with new cells in the same way that our gutted hotel can be rebuilt as a factory, office building, or a hospital.

Continue reading “Decellularization: Apples To Earlobes”

Tiny Arduino + FPGA = Sno

Alorium rolled out a new product late last year that caught our attention. The Sno (pronounced like “snow”) board is a tiny footprint Arduino board that you can see in the video below. By itself that isn’t that interesting, but the Sno also has an Altera/Intel Max 10 FPGA onboard. If you aren’t an FPGA user, don’t tune out yet, though, because while you can customize the FPGA in several ways, you don’t have to.

Like Alorium’s XLR8 product, the FPGA comes with preprogrammed functions and a matching Arduino API to use them. In particular, there are modules to do analog to digital conversion, servo control, operate NeoPixels, and do floating point math.

Continue reading “Tiny Arduino + FPGA = Sno”

Milspec Teardown: AH-64A Apache Data Entry Panel

It’s time once again to see how those tax dollars are spent, this time in the form of a “Data Entry Keyboard” manufactured by Hughes Helicopters. This device was built circa 1986 or so, and was used in the AH-64A Apache. Specifically, this panel would have been located by the gunner’s left knee, and served as a general purpose input device for the Apache’s Fire Control System. Eventually the Apache was upgraded with a so-called “glass cockpit”; consolidating various vehicle functions into a handful of multi-purpose digital displays. As such, this particular device became obsolete and was pulled from the active Apache fleet.

The military vehicle aficionados out there may know that while the Apache is currently a product of Boeing, it was originally designed by Hughes Helicopter. In 1984, McDonnell Douglas purchased Hughes Helicopter and took over production of the Apache, and then McDonnell Douglas themselves were merged with Boeing in 1997.

So it’s somewhat interesting that this device bears the name of Hughes Helicopter, as of the time it was manufactured, they would have been known as McDonnell Douglas Helicopter Systems. Presumably they had to work through existing stock of components that already had Hughes branding on them, leaving some transitional examples such as this one.

But you didn’t come here for a history lesson on the American military-industrial complex, you want to know about the hardware itself. So let’s crack it open to see what we can learn about this piece of aviation history.

Continue reading “Milspec Teardown: AH-64A Apache Data Entry Panel”

The Quest For The Reuleaux Triangle Bearing

[Angus Deveson] published a video on “solids of constant width” nearly a year ago. Following the release of the video, he had a deluge of requests asking if he could make a bearing from them. Since then, he’s tried a number of different approaches – none of which have worked. Until now…

What is a solid of constant width? A shape whose diameter is the same in all orientations, despite the fact that they aren’t circular. In particular, the Reuleaux Triangle is of interest; if you’ve heard of square drill bits, a Reuleaux Triangle is probably at play. Constructed from three circles, they make a neat geometrical study. When placed between two surfaces and rolled, the surfaces will stay parallel, despite the fact that the center of the triangle does not stay level.

In theory, this means they could be easily substituted for spheres in a classic roller bearing, but this turned out to be problematic – the first attempt determined how hard it was to get the shapes to roll instead of slide.

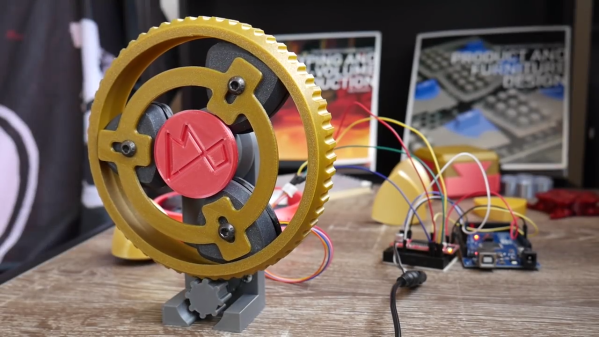
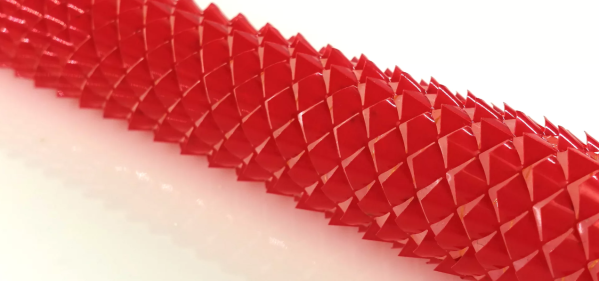
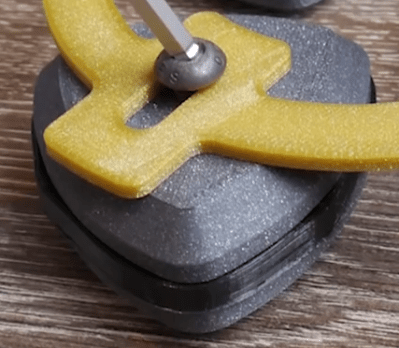
[Angus] finally arrived at a working bearing after a ton of suggestions from the community, and trying a number of attempts until he was able to achieve what he set out to do. The trick was to create a flexible insert (3D printed as well) for the center of the triangle edge, which grips the surfaces the triangle comes into contact with. A frame is also made to hold the bearings in place and allows their centers to move up and down as necessary.

If the thrill seeker within you still isn’t satisfied, maybe you should try the Reuleaux Coaster

Continue reading “The Quest For The Reuleaux Triangle Bearing”

Papercraft-Inspired Snake-bot Slithers Like A Real One

Blend the Japanese folding technique of Kirigami with an elastomer actuator, and what have you got? A locomoting snake robot that can huff around its own girth with no strings attached! That’s exactly what researchers at the Wyss Institute and Harvard School of Applied Sciences did to build their Kirigami Crawler.

Expanding and contracting propel this crawler forward. As the actuator expands, the hatched pattern on the plastic skin flares out; and when it contracts, the skin retracts to a smoother form. The flared hatch pattern acts like a cluster of little hooks, snagging multiple contact points into the ground. When the skin retracts, these hooks fold back inside while giving the body a slight push forward in the process. It’s a clever tactic, and almost identical to the way real-world snakes propel themselves. In fact, after iterating on a few skin patterns, they found that a trapezoidal pattern, which most closely resembles that of snakeskin, can cover ground fastest.

We’re thrilled to see such authentic biomimicry come to us without any extreme tooling or special molds. Still not satisfied with your share of crawling robots for one day? Have a peek into the past, and indulge yourself with a sine-wave locomotion.

Thanks for the tip, [Olivia]!

Continue reading “Papercraft-Inspired Snake-bot Slithers Like A Real One”

Hackaday Belgrade Schedule Announced

Hackaday Belgrade preparations have now passed the flash point and the hacker village that is set to descend on Serbia in a few weeks grows larger and more awesome by the day. Prepare for a massive data dump on what is in store. But before you go any further, make sure you have a ticket.

Continue reading “Hackaday Belgrade Schedule Announced”

Hard Drive Gives Its Life To Cool 3D Prints

[Mark Rehorst] has been on the hunt for the perfect 3D printer cooling fan and his latest take is a really interesting design. He’s printed an impeller and housing, completing the fan using a hard drive motor to make it spin.

We should take a step back to see where this all began. Many 3D printers us a cooling fan right at the tip of the extruder because the faster you faster you cool the extruded filament, the fewer problems you’ll have with drooping and warping. Often this is done with a small brushless fan mounted right on the print head. But that adds mass to the moving head, contributing to problems like overshoot and oscillation, especially on larger format printers that have longer gantries. [Mark] just happens to have an enormous printer we covered back in January and that’s the machine this fan targets.

CPAP fan and duct tubing

Make sure you give [Mark’s] Mother of all print cooling fans article a look. His plan is to move the fan off of the print head and route a flexible tube instead. He tried a couple of fans, settling on one he pulled from a CPAP machine (yes the thing you wear at night to combat sleep apnea) found in the parts bin at Milwaukee Makerspace. It works great, moving quite a bit more air than necessary. The problem is these CPAP parts aren’t necessarily easy to source.

You know what is easy to source? Old hard drives. [Mark] mentions you likely have one sitting around and if not, your friends do. We have to agree with him. Assuming you already have a 3D printer (why else do you want to print this fan?), the only rare part in this mix is the ESC to make the motor spin. Turns out we just saw a BLDC driver build that would do the trick. But in [Mark’s] case he found a rather affordable driver that suits his needs which is used in the video demo below.

Continue reading “Hard Drive Gives Its Life To Cool 3D Prints”