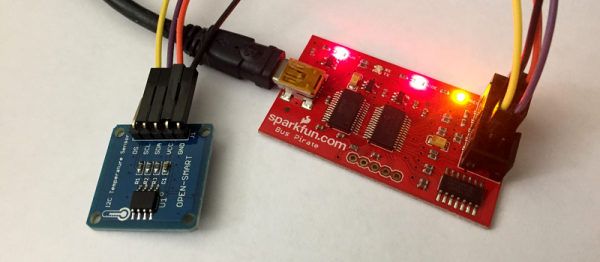
The Bus Pirate is one of our favorite tool for quick-and-dirty debugging in the microcontroller world. Essentially it makes it easy to communicate with a wide variety of different chips via a serial terminal regardless of the type of bus that the microcontroller uses. Although it was intended as a time-saving prototyping device, there are a lot of real-world applications where a Bus Pirate can be employed full-time, as [Scott] shows us with his Bus Pirate data logger.
[Scott] needed to constantly measure temperature, and the parts he had on hand included an LM75A breakout board that has a temperature sensor on board. These boards communicate with I2C, so it was relatively straightforward to gather data from the serial terminal. From there, [Scott] uses a Python script to automate the process of gathering the data. The process he uses to set everything up using a Raspberry Pi is available on the project site, including the code that he used in the project.
[Scott] has already used this device for a variety of different projects around his house and it has already proven incredibly useful. If you don’t already have a Bus Pirate lying around there are a few other ways to gather temperature data, but if you have an extra one around or you were thinking about purchasing one, then [Scott]’s project is a great illustration of the versatility of this device.
Over the last few decades, audio synthesizers have been less and less real hardware and more and more emulations in software. Now that we have tiny powerful computers that merely sip down the watts, what’s the obvious conclusion? A six-voice polyphonic synthesizer built around the Raspberry Pi.
The exquisitely named ‘S³-6R’ synthesizer is a six-voice phase modulation synthesizer that outputs very high resolution (24-bit and 96 kHz) audio. It’s the product of R-MONO Lab, who have displayed interesting musical devices such as a recorder-based pipe organ in the past. This build is a bit more complex, offering up some amazing sounds, all generated on a Raspberry Pi 3.
While talk of oscillators and filters is great, what’s really interesting here is the keyboard itself. The S³-6R is using the Roland K-25m, a tiny MIDI keyboard meant to serve as a ‘dock’ of sorts for Roland’s recent re-releases of the classic Jupiter and Juno synths. Building a MIDI keyboard is not easy by any stretch of the imagination, and using this little keyboard dock is a cheap way to pipe MIDI notes into any project without a lot of fuss.
Below, you can check out the audio demos of the S³-6R. It’s a real synth and sounds great. We can only hope the software will be uploaded somewhere eventually.
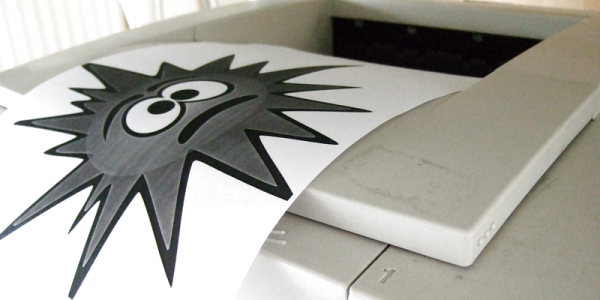
Recently ZDNet and Gizmodo published articles outlining a critical flaw in a large array of personal printers. While the number of printers with this flaw is staggering, the ramifications are even more impressive. Ultimately, any of these printers could have documents sent to them stolen even if the document was only intended to be printed as a hard copy.
Luckily the people responsible for this discovery are white-hat in nature, and the release of this information has been made public so the responsible parties can fix the security flaws. Whether or not the “responsible party” is the manufacturer of the printer, though, is still somewhat unclear because part of the exploit takes advantage of a standard that is part of almost all consumer-grade printers. The standard itself may need to be patched.
Right now, however, it doesn’t seem clear exactly how deep the rabbit hole goes. We all remember the DDoS attack that was caused by Internet of Things devices that were poorly secured, and it seems feasible that networked printers could take some part in a similar botnet if a dedicated user really needed them. At the very least, however, your printed documents might not be secure at all, and you may be seeing a patch for your printer’s firmware in the near future.
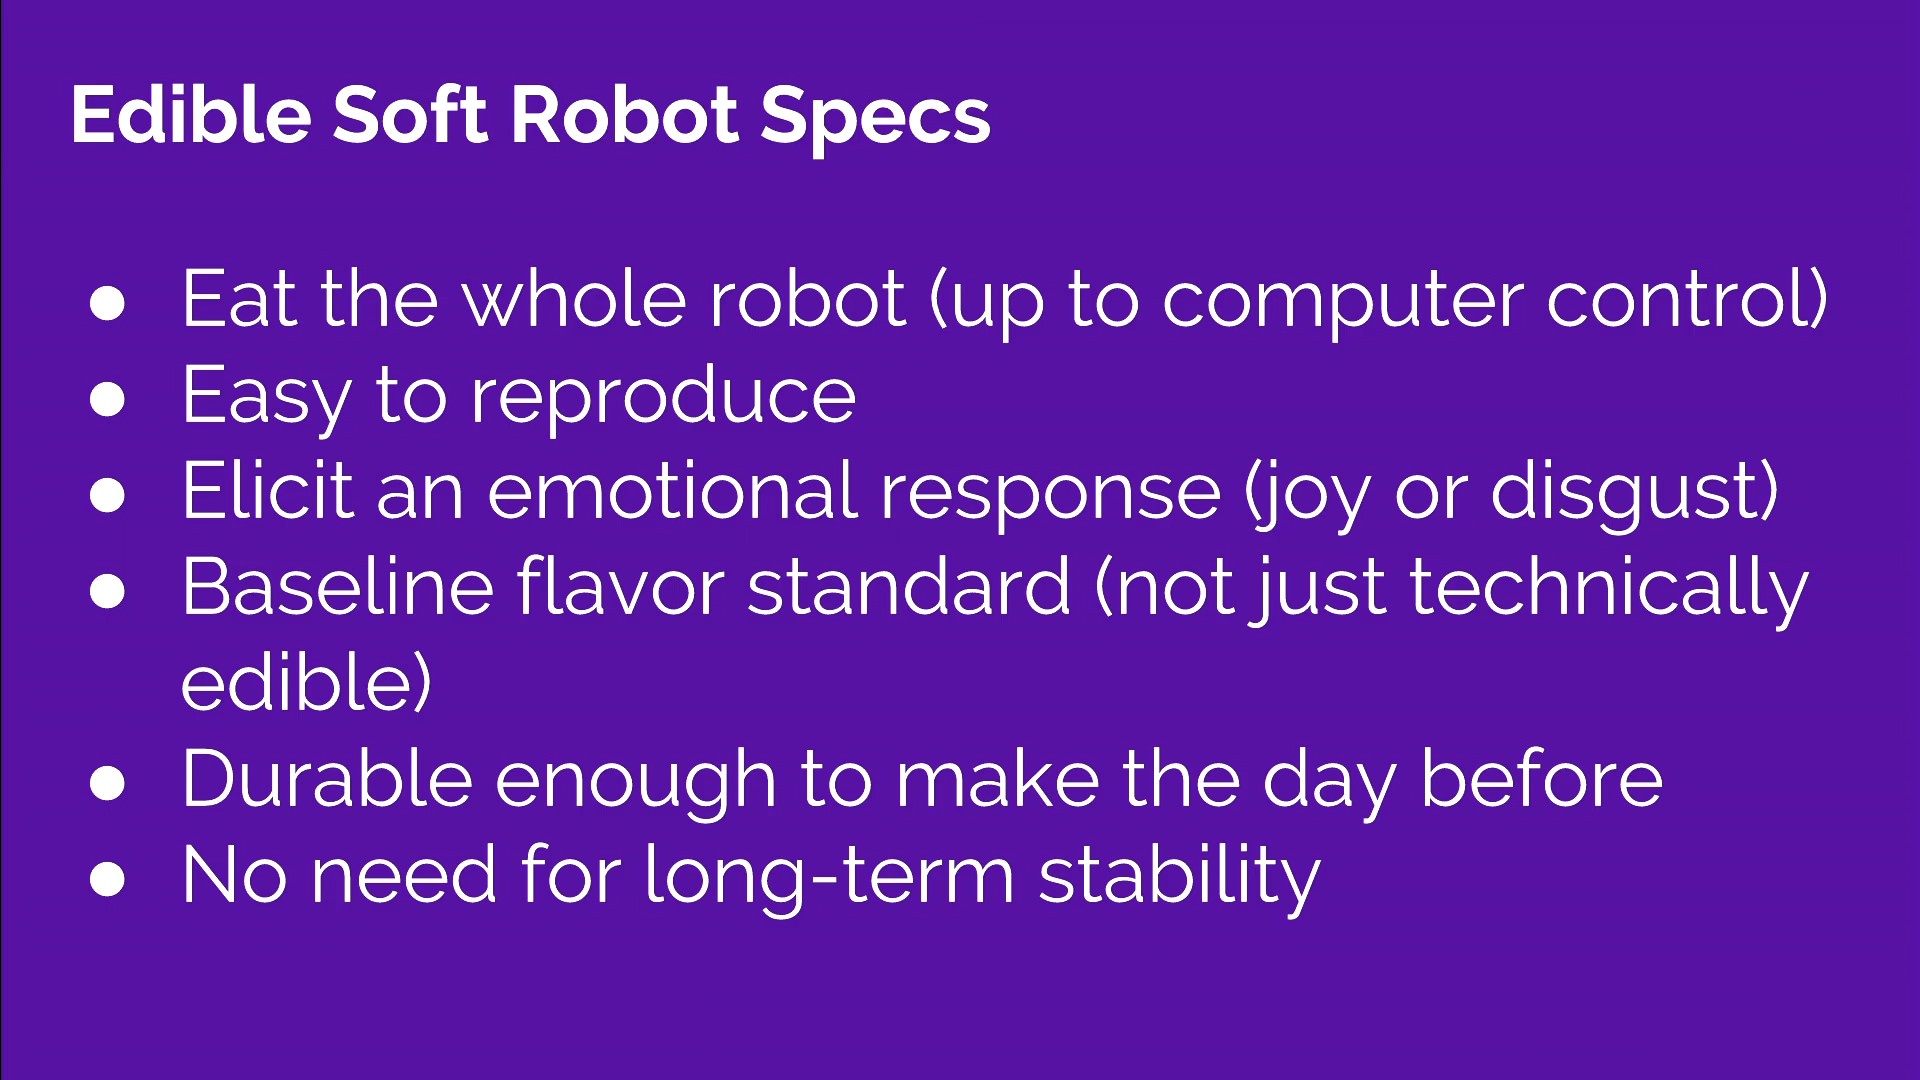
Certainly one of the more entertaining talks of the 33rd Chaos Communications Congress was [Kari Love]’s talk on her experiments in mixing food with function. In [Kari]’s talk at the 2016 Hackaday Supercon, she talked extensively about working on soft robotic for NASA. At the 33C3, her focus was twofold: on a fun side project to make mobile robots out of stuff that you can eat, and to examine the process of creative engineering through the lens of a project like this.
If you look up edible robotics, you get a lot of medical literature about endoscopes that you can swallow, or devices that take samples while they’re inside you. That’s not what [Kari]’s after at all. She’s after a robot that’s made of candy, a yummy machine. And while this is still a work in progress, she demonstrated a video of an all-licorice cable-based actuator.
But more than that, she demonstrated all of the materials she’s looked at so far, and the research she’s done. To some extent, the process is the substance of this project, but there’s nothing wrong with some tasty revelations along the way.
This talk was a potpourri of helpful tips and novel facts. For instance, if you’re working in candy robotics, don’t eat your mistakes. That stomach ache that your mom always said you’d get? You will. Did you know that the gummi in gummibears is re-heatable and re-moldable? In addition, of the gels that she made, it was the most delicious. And finally, Pop Rocks don’t have enough CO2 in them to drive pneumatics. Who knew? [Kari] knows. And now you do too.
How do you test the oscillator circuit you just made that runs between 200MHz and 380MHz if all you have is a 100MHz oscilloscope, a few multimeters and a DC power supply? One answer is to put away the oscilloscope and use the rest along with a length of wire instead. Form the wire into a Lecher line.
That’s just what I did when I wanted to test my oscillator circuit based around the Mini-Circuits POS-400+ voltage controlled oscillator chip (PDF). I wasn’t going for precision, just verification that the chip works and that my circuit can adjust the frequency. And as you’ll see below, I got a fairly linear graph relating the control voltages to different frequencies.
What follows is a bit about Lecher lines, how I did it, and the results.
There have been a few “firsts” in AI-versus-human gaming lately, and the computers are now beating us at trivia, chess and Go. But in some sense, none of these are really interesting; they’re all games of fact. Poker is different. Aside from computing the odds of holding the winning hand, where a computer would obviously have an advantage, the key to winning in poker is bluffing, and figuring out when your opponent is bluffing. Until recently, this has helped man beat the machine. Those days are over.
Chess and Go are what a game theorist would call games of perfect information: everyone knows everything about the state of the game just from looking at the board, and this means that there is, in principle, a best strategy (series of moves) for every possible position. Granted, it’s hard to figure these out because it’s a big brute-force problem, but it’s still a brute-force problem where computers have an innate advantage. Chess and Go are games where the machines should be winning. Continue reading “AI Beats Poker Pros: Skynet Looms”→
Like any Moore’s Law-inspired race, the megapixel race in digital cameras in the late 1990s and into the 2000s was a harsh battleground for every manufacturer. With the development of the smartphone, it became a war on two fronts, with Samsung eventually cramming twenty megapixels into a handheld. Although no clear winner of consumer-grade cameras was ever announced (and Samsung ended up reducing their flagship phone’s cameras to sixteen megapixels for reasons we’ll discuss) it seems as though this race is over, fizzling out into a void where even marketing and advertising groups don’t readily venture. What happened?
The Technology
A brief overview of Moore’s Law predicts that transistor density on a given computer chip should double about every two years. A digital camera’s sensor is remarkably similar, using the same silicon to form charge-coupled devices or CMOS sensors (the same CMOS technology used in some RAM and other digital logic technology) to detect photons that hit it. It’s not too far of a leap to realize how Moore’s Law would apply to the number of photo detectors on a digital camera’s image sensor. Like transistor density, however, there’s also a limit to how many photo detectors will fit in a given area before undesirable effects start to appear.
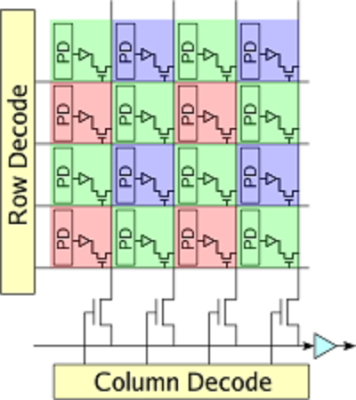
Image sensors have come a long way since video camera tubes. In the ’70s, the charge-coupled device (CCD) replaced the cathode ray tube as the dominant video capturing technology. A CCD works by arranging capacitors into an array and biasing them with a small voltage. When a photon hits one of the capacitors, it is converted into an electrical charge which can then be stored as digital information. While there are still specialty CCD sensors for some niche applications, most image sensors are now of the CMOS variety. CMOS uses photodiodes, rather than capacitors, along with a few other transistors for every pixel. CMOS sensors perform better than CCD sensors because each pixel has an amplifier which results in more accurate capturing of data. They are also faster, scale more readily, use fewer components in general, and use less power than a comparably sized CCD. Despite all of these advantages, however, there are still many limitations to modern sensors when more and more of them get packed onto a single piece of silicon.
While transistor density tends to be limited by quantum effects, image sensor density is limited by what is effectively a “noisy” picture. Noise can be introduced in an image as a result of thermal fluctuations within the material, so if the voltage threshold for a single pixel is so low that it falsely registers a photon when it shouldn’t, the image quality will be greatly reduced. This is more noticeable in CCD sensors (one effect is called “blooming“) but similar defects can happen in CMOS sensors as well. There are a few ways to solve these problems, though.
First, the voltage threshold can be raised so that random thermal fluctuations don’t rise above the threshold to trigger the pixels. In a DSLR, this typically means changing the ISO setting of a camera, where a lower ISO setting means more light is required to trigger a pixel, but that random fluctuations are less likely to happen. From a camera designer’s point-of-view, however, a higher voltage generally implies greater power consumption and some speed considerations, so there are some tradeoffs to make in this area.
Another reason that thermal fluctuations cause noise in image sensors is that the pixels themselves are so close together that they influence their neighbors. The answer here seems obvious: simply increase the area of the sensor, make the pixels of the sensor bigger, or both. This is a good solution if you have unlimited area, but in something like a cell phone this isn’t practical. This gets to the core of the reason that most modern cell phones seem to be practically limited somewhere in the sixteen-to-twenty megapixel range. If the pixels are made too small to increase megapixel count, the noise will start to ruin the images. If the pixels are too big, the picture will have a low resolution.
There are some non-technological ways of increasing megapixel count for an image as well. For example, a panoramic image will have a megapixel count much higher than that of the camera that took the picture simply because each part of the panorama has the full mexapixel count. It’s also possible to reduce noise in a single frame of any picture by using lenses that collect more light (lenses with a lower f-number) which allows the photographer to use a lower ISO setting to reduce the camera’s sensitivity.
Gigapixels!
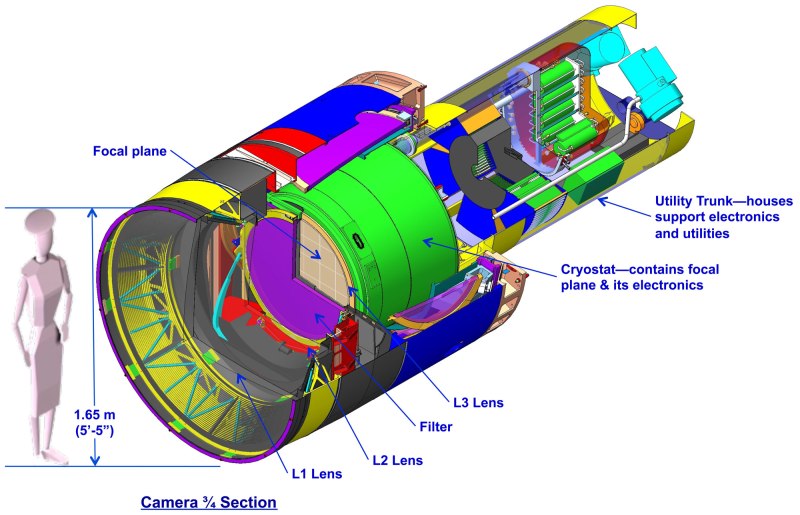
Of course, if you have unlimited area you can make image sensors of virtually any size. There are some extremely large, expensive cameras called gigapixel cameras that can take pictures of unimaginable detail. Their size and cost is a limiting factor for consumer devices, though, and as such are generally used for specialty purposes only. The largest image sensor ever built has a surface of almost five square meters and is the size of a car. The camera will be put to use in 2019 in the Large Synoptic Survey Telescope in South America where it will capture images of the night sky with its 8.4 meter primary mirror. If this was part of the megapixel race in consumer goods, it would certainly be the winner.
With all of this being said, it becomes obvious that there are many more considerations in a digital camera than just the megapixel count. With so many facets of a camera such as physical sensor size, lenses, camera settings, post-processing capabilities, filters, etc., the megapixel number was essentially an easy way for marketers to advertise the claimed superiority of their products until the practical limits of image sensors was reached. Beyond a certain limit, more megapixels doesn’t automatically translate into a better picture. As already mentioned, however, the megapixel count can be important, but there are so many ways to make up for a lower megapixel count if you have to. For example, images with high dynamic range are becoming the norm even in cell phones, which also helps eliminate the need for a flash. Whatever you decide, though, if you want to start taking great pictures don’t worry about specs; just go out and take some photographs!
(Title image: VISTA gigapixel mosaic of the central parts of the Milky Way, produced by European Southern Observatory (ESO) and released under Creative Commons Attribution 4.0 International License. This is a scaled version of the original 108,500 x 81,500, 9-gigapixel image.)


 But more than that, she demonstrated all of the materials she’s looked at so far, and the research she’s done. To some extent, the process is the substance of this project, but there’s nothing wrong with some tasty revelations along the way.