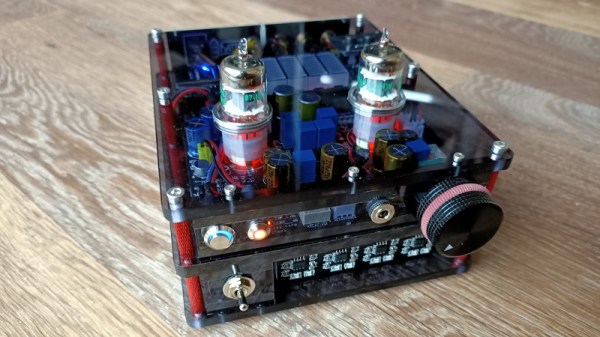
Hack My Wired Heart

Liner notes? Passé. In Berlin, the release of a special edition synth-wave record came with an accompanying experimental synthesizer called Wired Heart.

At the core of this adorable heart-shaped synth, designed by music technology enthusiast [tobi tubbutec], is the classic 74HCT14 chip with six Schmitt trigger oscillators. The bright red PCB has eight gold touch and humidity sensing pads that activate and modulate these oscillators. As well as changing the sounds by playing with pressure and conductive liquids you can use the six sets of header pins on board to plug in your own components for noisy experimentation. Wired Heart ships with LEDs, photoresistors and a potentiometer, but we’ve also plugged our own DIY fabric pressure sensors into this synth to make some excellent electronic sounds.

In the Hackaday.io post linked above, [tobi tubbutec] walks us through a number of the circuit design decisions he made while prototyping his “cardiotronic human-touch hexoscillatric stereo esoteric snythespacer”. We enjoyed his creative and sometimes unconventional designs, from his inclusion of non-functioning traces for aesthetic reasons to his chosen method of hard syncing — injecting a small pulse of one oscillator into the other. If you want to examine his layout in more detail, [tobi tubbutec] has helpfully included the KiCad schematic file in his write up.

This adorable, hackable synth caught our eye at this year’s SuperBooth — an annual indie electronic music conference in Berlin that’s well worth checking out if odd noises and handmade electronics are your thing —  but it’s recently been listed on Tindie too. To listen to the upbeat synth-wave record Wired Heart originally shipped with, visit the artist Hyboid’s bandcamp.

If you’re interested in experimental musical instruments and synthy chip tune you’ll also love [jarek319]’s Sega Genesis synthesiser.

Check out a demo of the Wired Heart synth in the video after the break.

Continue reading “Hack My Wired Heart”

Storm Chasers Score Bullseye On Tornado With Instrument-Packed Rocket

Model rockets are a heck of a lot of fun, and not a few careers in science and engineering were jump-started by the thrilling woosh and rotten-egg stench of an Estes rocket launch. Adding simple instrumentation to the rocket doubles the fun by allowing telemetry to be sent back, or perhaps aiding in recovery of a lost rocket. Sending an instrument-laden rocket into a tornado is quite a few notches past either of those scenarios, and makes them look downright boring by comparison.

A first and hopefully obvious point: just don’t do this. [ChasinSpin] and [ReedTimmer] are experienced storm chasers, and have a small fleet of purpose-built armored vehicles at their disposal. One such vehicle, the Dominator, served as a mobile launch pad for their rocket as they along with [Sean Schofer] and [Aaron Jayjack] chased what developed into an EF4 monster tornado near Lawrence, Kansas on May 28. They managed to score a direct hit on the developing tornado, only 100 feet (30 meters) away at the time, and which took the rocket to 35,000 ft (10.6 km) and dragged it almost 30 miles (42 km) downrange. They lost touch with it but miraculously recovered it from a church parking lot.

They don’t offer a lot of detail on the rocket itself, but honestly it looks pretty much off-the-shelf, albeit launched from an aimable launchpad. [ChasinSpin] does offer a few details on the instrument package, though – a custom PCB with GPS, IMU, a temperature/humidity/barometric pressure sensor, and a LoRa link to send a data packet back every second. The card also supported an SD card for high-resolution measurements at 10 times per second. Check out the launch in the video below, and be sure to mouse around to get a look at the chaotic environment they were working in.

Even if this isn’t as cool as sending a sounding rocket into an aurora, it’s still really cool. We’re looking forward to seeing what kind of data this experiment collected, and what it reveals about the inner workings of these powerful storms.

Continue reading “Storm Chasers Score Bullseye On Tornado With Instrument-Packed Rocket”

That Super Mario Bros. C64 Port Was Too Good For This World

It was foolish to think that the adventure of the Mario Bros. would ever exist outside of the castle walls of the Nintendo Entertainment System. Except for that one time it did. The Hudson Soft company was a close collaborator with Nintendo, and parlayed that favor into being tasked with bringing Super Mario Bros. to platforms beyond the NES. The result of that collaboration would be 1986’s Super Mario Special, a port for the NEC PC-88 line of desktop computers. What ended up on that 5.25″ floppy sounded reminiscent of the Famicom original, but with a grand total of four colors (including black) and not a single scrolling screen in sight; Super Mario Special felt decidedly less than spectacular to play. Those eternally flickering sprites mixed with jarring blank screen transitions would never make it outside of Japan, so for a large swath of the world Mario would remain constrained to a gray plastic cartridge for years to come.

There are no shortage of ways to play Super Mario Bros. these days. Emulation in all of its various official and unofficial forms has taken care of that. Virtually everything with a processor more capable than the NES’s 6502 can play host to the Mushroom Kingdom, however, machines more contemporary with the NES still lacked access to the iconic title.

Enter the 2019 port of Super Mario Bros. for the Commodore 64 by [ZeroPaige]. A culmination of seven years work to port the game onto one of the most prolific computers of the eighties was a clear feat of brilliance and an amazing bit of programming that would have taken 1986 by storm. No pale imitation, this was Mario on the C64. Despite all of the nuance in recreating the jump-and-run model of the original paired with enveloping all eight sound channels of a dual SID chip setup, Nintendo saw fit to stifle the proliferation of this incredible 170 kB of software because they claim it infringes on their copyright.

Continue reading “That Super Mario Bros. C64 Port Was Too Good For This World”

The Clickiest Game Of Tetris You’ll Ever Play, On A Flip-Dot

Like many other classics it’s easy to come up with ways to ruin Tetris, but hard to think of anything that will make it better. Adding more clickiness is definitely one way to improve the game, and playing Tetris on a flip-dot display certainly manages to achieve that.

The surplus flip-dot display [sinowin] used for this version of Tetris is a bit of an odd bird that needed some reverse engineering to be put to work. The display is a 7 x 30 matrix with small dots, plus a tiny green LED for each dot. Those LEDs turned out to be quite useful for replicating the flashing effect used in the original game when a row of blocks was completed, and the sound of the dots being flipped provides audio feedback. The game runs on a Teensy through a custom driver board and uses a Playstation joystick for control. The video below, in perfectly acceptable vertical format, shows the game in action and really makes us want to build our own, perhaps with a larger and even clickier flip-dot display.

The best thing about Tetris is its simplicity: simple graphics, simple controls, and simple gameplay. It’s so simple it can be played anywhere, from a smartwatch to a business card and even on a transistor tester.

Continue reading “The Clickiest Game Of Tetris You’ll Ever Play, On A Flip-Dot”

CPU Made From 74HC Chips Is A Glorious Mess

Did you ever start a project that you felt gained a life of its own? This project by [Paulo Constantino] is an entire CPU named dreamcatcher on breadboards, and is a beautiful jungle of digital. On top of that, it works to connect to an analog VGA display. How cool is that!

Designing an ALU and then a CPU is a typical exercise for students of digital design and is done using VerilogHDL or VHDL. It involves creating an ALU that can add, subtract etc while a control unit manages data moves and the like. There is also a memory fetch and instruction decode made up of de-mulitiplexers and a bunch of flip-flops that make up registers and flags. They are as complex as they sound if not more.

[Paulo Constantino] went ahead and designed the whole thing in Eagle as a schematic using 74HC logic chips. To build it though instead of a PCB he used breadboards. Everything from bus decoders to controlling an external VGA display is done using jumper wires. We did cover a video on the project a while back, but this update adds a video card interface to the build.

The CPU updates the display buffer on the VGA card, and in the video below shows the slow and steady update. The fact that the jungle of wires can drive a display is awesome. He has since started working on a 16-bit version of the processor and we’d love to see someone take it up a notch.

For those more accustomed to the PCB, the Z80 membership card project is a great build for 8-bit computer fans.

Thanks to [analog engineer] for the tip.

Continue reading “CPU Made From 74HC Chips Is A Glorious Mess”

Add USB-C To Your Laptop (Almost)

It’s a very brave person who takes a Dremel or similar to the case of their svelte new laptop in the quest for a new connector, it sounds as foolhardy as that hoax from a while back in which people tried to drill a 3.5mm jack into their new iPhones. But that’s what [BogdanTheGeek] has done, in adding a USB-C port to his Acer.

Of course, the port in question isn’t a fully functioning USB-C one, it’s a power supply jack, and it replaces the extremely unreliable barrel jack the machine was shipped with. He’s incorporated one of those little “ZYPDS” USB-C power delivery modules we’ve no-doubt all seen in the usual cheap electronic sources, and in a move of breathtaking audacity he’s cut away part of the Acer mainboard  to do so. He’s relying on the laptop’s ability to accept a range of voltages, and presumably trusting his steady hand with a rotary tool. Some Kapton tape and a bit of wire completes the work, and with a carefully reshaped hole in the outer case he’s good to go.

The result is beautifully done, and a casual observer would be hard pressed to know that it hadn’t always been a USB-C port. We’re sure there will come a moment at which someone will plug in a USB-C peripheral and expect it to work, it’s that good.

If you’d like to know a little bit more about USB-C, we’d like to direct you to our in-depth look at the subject.

This Old Korg Can’t Have Too Many Samples

The Korg DW-6000 is an entry-level synthesiser from the mid 1980s that has the classic sounds, but not enough of them. At least that was [Mateusz Kolanski]’s  view, as he hacked his model with a 16-fold increase in its wavetable memory.

At the heart of the DW-6000 is NEC’s UPD7810 16-bit microcontroller, a device stuffed with ports aplenty. The Korg doesn’t use all of those ports, so he was curious as to whether its relatively small 256 kbit ROMs could be upgraded to something much bigger with the use of four unused lines to drive their addresses. This proved to be no easy task, not least because the UPD7810 is hardly a chip with a lot of published work to learn from. A manual for it came from an unexpected source: an obscure game console used it so there is support within MAME.

A significant quantity of hardware reverse engineering and software experimenting later, and he had a ROM piggyback board to plug into his lightly-modified DW-6000. The initial model used stripboard, but naturally a decent PCB was created. That might be everything, but of course some means of working with those samples was required. Enter a Windows wavetable editor and organiser to create new ROM images, for the complete DW-6000 upgrade kit.

This project took several years, proving that persistence can pay off. If you’re not used to the way microcontrollers did their interfacing back in the 1980s then it’s definitely worth a read even if old synths aren’t your thing.

This isn’t the first bit of Korg reverse engineering we’ve brought you, either.