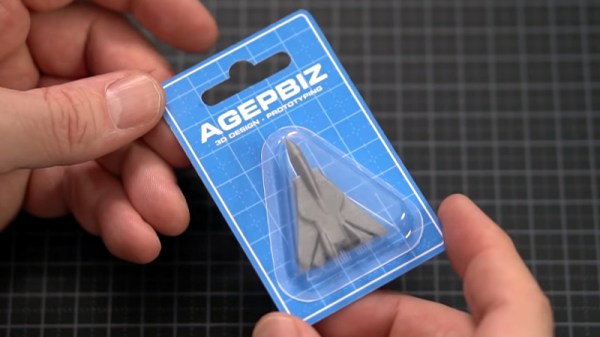
Mechpen: SCARA Drawbot For The Big Picture

It’s not uncommon to find us doodling on paper as an aid to thinking, for recreation, or simply because we’re bored. But, this kind of manual labor is so last century. It’s 2019, and we should have robots to fill our notebooks with cross-hatched illustrations. Well, [Alex Weber] is way ahead of us on this account: the outstanding SCARA drawbot he created can be unleashed to draw all manner of things at his command.

The robot, named Mechpen, and pronounced “McPen”, is of a SCARA (Selective Compliance Assembly Robot Arm) design, with two parallel axes controlling the x-y movement of the arm. Robot design is always a series of trade-offs; in this case, [Alex] has sacrificed some accuracy to achieve a long reach. Two NEMA 23 stepper motors reside in the base, along with all the electronics. This makes the base a heavy 15 kg, which is good as it helps stabilize the arm during movement. The arm uses a mix of off-the-shelf and custom hardware, most of which is dotted with holes drilled to reduce the mass of the moving parts. Two 700 mm sections of the arm made from carbon fiber tubes give the drawbot a 140 cm reach — long enough to fill an A0 paper with its beautiful mechanical doodling.

The brains behind the arm are two-tiered. An Einsy RAMBo board, designed for 3D printers, controls the stepper motors. Above that, a Raspberry Pi runs Octoprint to control the ‘bot. This choice turned out to be very convenient for working around a mechanical issue: the elbow flexes too far in the Z-axis. The difference in pen height between the elbow at 90 vs 180 degrees was 20-25 mm; too much to fix with just a spring-loaded pen. The solution: use a bed-leveling algorithm designed for 3D printers. A VL6180X distance sensor measures the distance to the paper over a number of grid points, then the software moves the servo up and down accordingly while drawing to keep the pen on the paper.

Some custom-written software converts SVG graphic files to gcode suitable for printing, allows selection of different stroke and fill types, and separation of different colors into individual gcode files to be plotted with different pens.

Definitely check out the video of Mechpen in action, after the break.

Continue reading “Mechpen: SCARA Drawbot For The Big Picture”

When Project Enclosures Go Bad: A Message From The Trenches

A wall-mounted, electric car charging station doesn’t sound like it’d require the most exciting or complicated enclosure. This was pretty much the assumption [Mastro Gippo] and his team started out with when they decided to turn what came back from a product designer into a real enclosure for the ‘Prism’ charging hardware they had developed. As it turned out, the enclosure proved to be the most challenging part of the project.

The first thought was to make a cheap, simple prototype enclosure for integration testing. This led them through trying out FDM 3D printed enclosures, wooden enclosures, folded (glued) plastic enclosures, aluminium extruded enclosures, Zamac alloy enclosures, and finally the plastic injection molded enclosure they had been avoiding due to the high costs.

The injection mold used to produce the Prism enclosures with.

Even if it meant taking out a loan to cover the setup costs, the results really do speak for themselves with a well-integrated design and two really happy looking partners-in-business. It does make us wonder how projects lacking this kind of financial leeway can get professional-grade enclosures without breaking the proverbial bank.

FDM 3D printing is always getting better and with a lot of post-processing you can have one enclosure that looks great, but that doesn’t scale. Outsourcing it to a professional 3D printing company like Shapeways is better, but it’s still not injection-molding quality and if the product is successful you’ll eventually invert the cost/benefit you were shooting for in the first place. Where is the middle ground on great-looking enclosures? Please let us know your experiences and thoughts in the comments.

Ultra Benchy Is A Big Plastic Boat, Alright

The 3DBenchy, or Benchy for short, is a popular test model for 3D printers. Designed with overhanging curved surfaces, flat planes, holes, and other difficult geometry, it’s a great way to benchmark a printer or verify that everything is set up correctly. It comes in rather handy, but at this point has also become something of a meme within the 3D printer community. Thus, when NURDspace members decided to embark on a collaborative giant print, the decision was easy – and Ultra Benchy was born!

The size chosen for the print was arbitrarily set at 700mm long, or a 1166.65% scale up of the original model. The versatile LuBan software was used to split the giant model into manageable chunks that could be printed by community members. Chunks were claimed and kept track of in a spreadsheet, with contributors instructed to print with specific settings in order to ensure quality was similar across the whole build.

With all the parts collected, the final construction was done on the 31st of August in a Youtube livestream. Reportedly, build time was a marathon 10 hours. The final result is a pleasingly patchwork Benchy, that looks quite impressive in its final assembled form.

Collaborative prints are a staple of 3D printing festivals, but the technique can also be used to create large functional assemblies from smaller 3D printed components, such as [Ivan]’s gigantic Nerf gun that we covered previously.

Continue reading “Ultra Benchy Is A Big Plastic Boat, Alright”

Force Sensitive Resistor Takes The Pain Out Of Bed Leveling

How do you know if your 3D printer bed is levelled? Oh, don’t worry – you’ll know. Without a level bed, filament won’t stick properly to the build surface and you’ll run into all sorts of other problems. Knowing how tricky it can be to get the bed just right, [Antzy] built a tool to help.

The device, which he calls the FS-Touch, is based around an Arduino Pro Micro fitted with a force sensitive resistor. This allows the distance between the bed and nozzle to be measured based on the force read by the resistor when placed in between the two.

Using the tool is simple. First, the bed is brought roughly into alignment using the typical paper method. Then, a reading is taken from one corner of the bed, and the measurement saved for reference. The other corners can then be set to the same level, with the aid of LEDs to guide the user in which direction to turn the adjustment knobs.

Measuring force in this way has the potential of being more repeatable than the somewhat difficult paper method. It promises to ease the task for users that may be struggling to get their bed in proper shape. Of course, automated bed levelling makes things even easier again. Video after the break.

Continue reading “Force Sensitive Resistor Takes The Pain Out Of Bed Leveling”

3D Printed Pen Plotter Is As Big As You Need It To Be

There’s nothing quite like building something to your own personal specifications. It’s why desktop 3D printers are such a powerful tool, and why this scalable plotter from the [Lost Projects Office] is so appealing. You just print out the end pieces and then pair it with rods of your desired length. If you’ve got some unusually large computer-controlled scribbling in mind, this is the project for you.

The design, which the team calls the Deep Ink Diver (d.i.d) is inspired by another plotter that [JuanGg] created. While the fundamentals are the same, d.i.d admittedly looks quite a bit more polished. In fact, if your 3D printed parts look good enough, this could probably pass for a commercial product.

For the electronics, the plotter uses an Arduino Uno and a matching CNC Shield. Two NEMA 17 stepper motors are used for motion: one to spin the rod that advances the paper, and the other connected to a standard GT2 belt and pulley to move the pen back and forth.

We particularly like the way [Lost Projects Office] handled lifting the pen off the paper. In the original design a solenoid was used, which took a bit of extra circuitry to drive from the CNC Shield. But for the d.i.d, a standard SG90 servo is used to lift up the arm that the pen is attached to. A small piece of elastic puts tension on the assembly so it will drop back down when the servo releases.

If this plotter isn’t quite what you’re after, don’t worry. There’s more where that came from. We’ve seen a number of very interesting 3D printed plotters that are just begging for a spot in your OctoPrint queue.

STEP Up Your Jetson Nano Game With These Printable Accessories

Found yourself with a shiny new NVIDIA Jetson Nano but tired of having it slide around your desk whenever cables get yanked? You need a stand! If only there was a convenient repository of options that anyone could print out to attach this hefty single-board computer to nearly anything. But wait, there is! [Madeline Gannon]’s accurately named jetson-nano-accessories repository supports a wider range of mounting options that you might expect, with modular interconnect-ability to boot!

A device like the Jetson Nano is a pretty incredible little System On Module (SOM), more so when you consider that it can be powered by a boring USB battery. Mounted to NVIDIA’s default carrier board the entire assembly is quite a bit bigger than something like a Raspberry Pi. With a huge amount of computing power and an obvious proclivity for real-time computer vision, the Nano is a device that wants to go out into the world! Enter these accessories.

At their core is an easily printable slot-and-tab modular interlock system which facilitates a wide range of attachments. Some bolt the carrier board to a backplate (like the gardening spike). Others incorporate clips to hold everything together and hang onto a battery and bicycle. And yes, there are boring mounts for desks, tripods, and more. Have we mentioned we love good documentation? Click into any of the mount types to find more detailed descriptions, assembly directions, and even dimensioned drawings. This is a seriously professional collection of useful kit.

Conductive Origami Lights Up Your Life

It’s taken mobile phone developers years to develop electric circuits and displays that can fold. Finally he first few have come to market — with mixed reviews and questionable utility at best. For all that R&D, there are a lot of other cases where folding circuitry might have been more useful than it seems these handsets have been. One of those is conductive origami, which in this case allows for light fixtures that turn themselves on as they are unfolded.

This conductive origami is produced by [Yael Akirav] using a 3D printer to deposit the conductive material onto fabric. From there, the light fixture can be unfolded into its final position and turned on. This isn’t just a decorative curiosity though, the design of the folding material actually incorporates the ability to turn itself on as it is unfolded. One device brightens itself as it is slowly unfolded.

This is an interesting take on foldable circuits in general, especially with some of the functionality incorporated into the physical shape of the material. We’ve seen conductive elements embroidered into fabric before, but this takes it to a new level. Surely there are more applications for a device like this that we will see in the future as well.

Thanks to [t42] for the tip!