Handheld Pong On A 6502

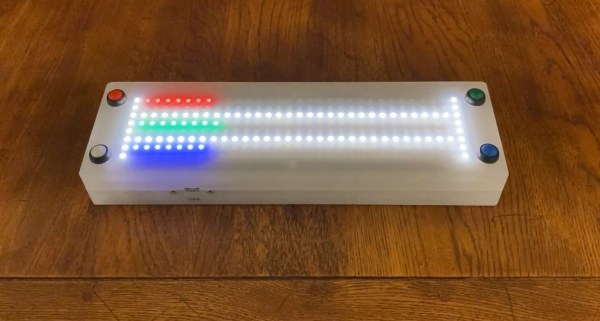
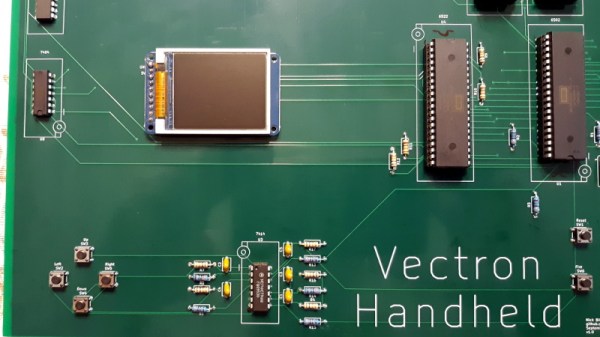
Recreating the arcade smash hit Pong in a device small enough to plug into a home television was a considerable technical challenge back in 1975. Of course, a big part of that was the fact that it needed to be cheap enough that consumers would actually buy it. But had money been no object, the Vectron Handheld by [Nick Bild] shows what a dedicated Pong board based on the 6502 CPU and 7400-series logic could have looked like.

Prototyping the Vectron Handheld

Well, aside from the display anyway. While [Nick] made sure to use components that were contemporaries of the 6502 wherever possible, he did drop in a modern SPI LCD panel. After all, it’s supposed to be a portable game system.

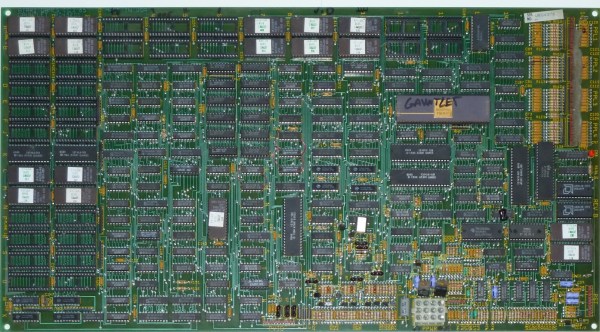
Though as you can see in the video after the break, the massive 273 mm x 221 mm PCB only just meets that description. Incidentally, there’s no technical reason for the board to be this big; [Nick] was just playing it safe as he’s still learning KiCad.

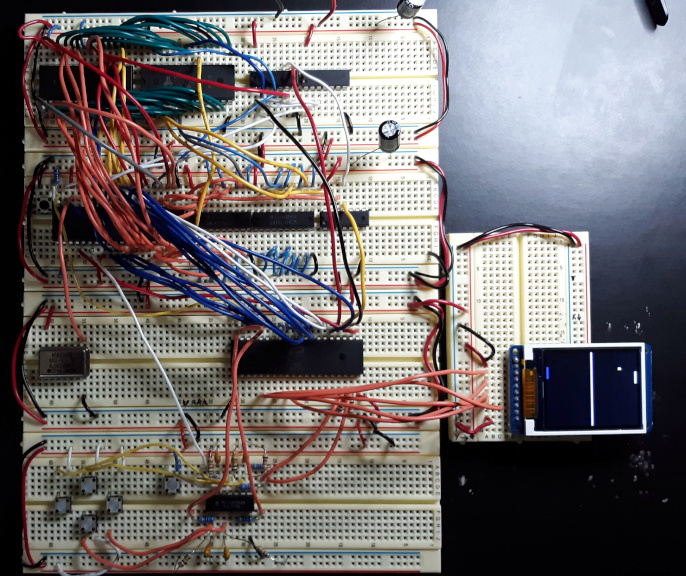
Those with a keen eye towards 6502 projects likely saw the breadboard version of the Vectron that [Nick] put together last year. Compared to the original, the circuit for the handheld has been considerably simplified as it wasn’t designed to be a general purpose 6502 computer. Whether or not you think being able to play Pong on it makes up for those shortcomings is a matter of personal preference.

Continue reading “Handheld Pong On A 6502″

Tiny Mario Clone On A Tiny Processor

We’ve become used to seeing retro games running on commodity microcontrollers where once they would have required the bleeding-edge console hardware of their day. [Duncan]’s Mario clone takes the genre a little further, using not a processor with plenty of pins for peripherals, but instead the humble ATtiny85. Its eight pins drive two OLED displays, and accept input from the buttons of a cheap Nintendo-like controller.

The write-up is split between software and hardware sections, with all the software itself available from a GitHub repository. He’s bit-banging the i2C for the displays for an impressive turn of speed, and the ATtiny’s lack of pins is addressed by clever use of resistive dividers to present a different voltage for each button pressed. With a truth table of voltages he’s even able to detect multiple simultaneous button presses. Music is achieved with the chip’s limited resources by storing the sounds in EEPROM, and clocked it at 16 MHz for smooth gameplay.

The whole is mounted inside the shell of the controller, with its USB guts removed and replaced by a smart custom PCB. An unexpected problem with ground plane fill caused a temporary roadblock reading the buttons, but the finished product is a very Nintendo-like experience. We like it.

Throwing Down The FPGA Gauntlet

Gauntlet is a well-known arcade game from 1985 with many sequels and ports to more modern architectures such as Xbox and GameCube. Thanks to its popularity and relative age, the original arcade cabinet is well documented with the schematics available online. It was regarded as the most complex and ambitious hardware Atari had ever developed at the time it was released. In what can only be described as an absolute labor of love, [Alex] has recreated the arcade hardware on the Pipistrello FPGA board.

The project can actually play Gauntlet, Gauntlet II, and Vindicators II as they all ran on the same hardware. Four joysticks are supported so up to four players can play, though the EEPROM is emulated in RAM so high scores are reset when the device is powered down. The FPGA is almost out of space and can’t quite squeeze in the SRAM needed. So an SRAM expansion daughterboard is required; nothing a quick board run from our favorite purple PCB manufacturer can’t solve.

In the repo is an incredible write-up detailing the system, how it works, and the process of debugging it. This project also includes a complete simulation of the TMS5220 Voice Synthesis Processor, as Gauntlet was the first coin-operated arcade machine with a voice synthesizer. Getting the video correct was particularly tricky and it took several tries to get the color palette and motion looking right. Since [Alex] didn’t have access to an original Gauntlet arcade cabinet, they had to make do with MAME. After writing a test to make sure the FPGA was working correctly, there were differences between the MAME emulation and the FPGA output. To help out, [Colin Davies] came to the rescue. After [Colin] hooked up an original Gauntlet Arcade PCB with the motion test loaded up, the test showed that the FPGA had the correct behavior.

During development [Alex] actually simulated several frames of the game in ISIM (at a whopping 90 seconds per frame or 90 minutes per in-game second). Using ISIM allowed them to compare system state to MAME and validate the design much faster as they could better inspect the interworkings of the different modules. Using a clever trick of grabbing state from MAME after a few seconds, they primed the FPGA state and saved themselves a few hours of simulation.

If you’re looking to get into old hardware style arcade game development, give the browser-based 8bitworkshop IDE a spin. Or start with something a little smaller in scope and size with this adorable mini CRT arcade cabinet.

Continue reading “Throwing Down The FPGA Gauntlet”

Dice Roller Keeps Germs Out Of Your Snake Eyes

Do you need a to find a more sanitary way to roll the dice at your next socially-distanced board game gathering? [CJA3D]’s pop-o-matic mason jar dice roller can roll the bones two different ways — either by hitting that big, inviting arcade button, or though a web app that everyone can access on their own phones.

We think this looks great, and is a great reuse of a glass jar. The brains of this operation is an ESP8266, which drives a continuous-rotation servo underneath the dice. Push the button or use the web app and the servo disturbs the plate, moving the dice around.

Besides the sanitary aspect, one benefit of using the web app is that there are four different speed presets for the servo. As a bonus, [CJA3D] included the files for a pair of printed 6-sided dice. Click through to the project to see it in action.

We know you take games seriously, and so do we. Just look at this dice roller that uses machine vision to ensure fairness.

Making Music With A Go Board Step Sequencer

Ever wonder what your favorite board game sounds like? Neither did we. Thankfully [Sara Adkins] did, and created a step sequencer called Let’s Go that uses the classic board game Go as input.

In the game Go, two players place black and white tokens on a grid, vying for control of the board. As the game progresses, the configuration of game pieces gets more complex and coincidentally begins to resemble Conway’s Game of Life (or a weird QR Code). Sara saw music in the evolving arrangement of circles and transformed the ancient board game into a modern instrument so others could hear it too.

To an observer, [Sara’s] adaptation looks fairly indistinguishable from the version played in China 2,500 years ago — with the exception of an overhead webcam and nearby laptop, of course. The laptop uses OpenCV to digitize the board layout. It feeds that information via Open Sound Control (OSC) into popular music creation software Max MSP (though an open-source version could probably be implemented in Pure Data), where it’s used to control a step sequencer. Each row on the board represents an instrumental voice (melodic for white pieces, percussive for black ones), and each column corresponds to a beat.

Every new game is a new piece of music that starts out simple and gradually increases in complexity. The music evolves with the board, and adds a new dimension for players to interact with the game. If you want to try it out yourself, [Sara] has the project fully documented on her website, and all of the code is available on GitHub. Now we’re just left wondering what other games sound like — [tinkartank] already answered that question for chess, but what about Settlers of Catan?

Continue reading “Making Music With A Go Board Step Sequencer”

Xbox Controller Gets Snap On Joystick From Clever 3D-Printed Design

Ball and socket linkages make for smooth operation.

People making DIY controls to enhance flight simulators is a vibrant niche of engineering and hackery, and it sure looks like Microsoft Flight Simulator is doing its part to keep the scene lively. [Akaki Kuumeri]’s latest project turns an Xbox One gamepad into a throttle-and-stick combo that consists entirely of 3D printed parts that snap together without a screw in sight. Bummed out by sold-out joysticks, or just curious? The slick-looking HOTAS (hands on throttle and stick) assembly is only a 3D printer and an afternoon away. There’s even a provision to add elastic to increase spring tension if desired.

The design looks great, and the linkages in particular look very well thought-out. Ball and socket joints smoothly transfer motion from one joystick to the other, and [Akaki] says the linkages accurately transmit motion with very little slop.

There is a video to go with the design (YouTube link, embedded below) and it may seem like it’s wrapping up near the 9 minute mark, but do not stop watching because that’s when [Akaki] begins to go into hacker-salient details about of how he designed the device and what kinds of issues he ran into while doing so. For example, he says Fusion 360 doesn’t simulate ball and socket joints well, so he had to resort to printing a bunch of prototypes to iterate until he found the right ones. Also, the cradle that holds the Xbox controller was far more difficult to design than expected, because while Valve might provide accurate CAD models of their controllers, there was no such resource for the Xbox ones. You can watch the whole video, embedded below.

Continue reading “Xbox Controller Gets Snap On Joystick From Clever 3D-Printed Design”

Digital Cribbage Board Saves Scores, Marriage

When [ccooper] told his parents he was gonna start up his electronics habit again, the last thing he expected was to save his parents’ marriage in the process. But as soon as he dropped this news, they made a special request: build us something to replace the multi-purpose manual cribbage board. It’s too ambiguous and starts too many arguments.

Cribbage is a card game that involves scoring based on hands. Traditionally, the score is kept with pegs on a wooden board with two or three sets of 60 holes. To build a digital cribbage board, [ccooper] decided to represent the positions on a field made from chained-together RGBW matrices.

These four matrices are run by an Arduino Nano Every and will display one of three scoring schemes that the parents usually play. A set of eight AA batteries ensures that Mum and Dad can play out in bright daylight and still see the LEDs. You can see how the brightness rivals the sun in the demo after the break. The code and Gerber files for the custom board are there if you want to make one for yourself, or know of another marriage that needs saving.

Every game deserves tidy record-keeping. If you’re more the RPG type, check out this amazing stat tracker made of stacked-up FR4 boards.

Continue reading “Digital Cribbage Board Saves Scores, Marriage”