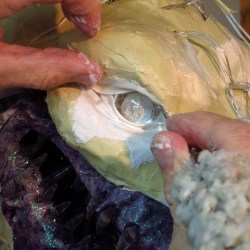
See How Paper Maché Sculptor Uses Cloth For Tricky Spots

When is paper maché not paper maché? When it is cloth, of course. [Dan Reeder] has been putting his own spin on paper maché art since the 70s and demonstrates the technique of using cloth for tricky spots in his outstanding sculpture of an Ice Dragon. Thin strips of cloth are used just as paper would be, but give a much different structure and grant natural-looking folds to spots like eyelids, nostrils, and lips.

[Dan] feels that paper maché is an under-utilized and under-rated medium, and he puts out some stunning work on his blog as well as his YouTube channel. What’s great to see are his frank descriptions and explanations of what does and doesn’t work, and he’s not afraid to try new things and explore different ways to approach problems.
Enterprising hackers may not pick paper maché as their first choice to create creating custom enclosures, but it can be done and the accessibility and ease of use of the medium are certainly undeniable. One never knows when a tool or technique may come in handy.

‘Bit’ Installation Combines Art, Markov Chains

A Markov chain is a mathematical concept of a sequence of events, in which each future event depends only on the state of the previous events. Like most mathematical concepts, it has wide-ranging applications from gambling to the stock market, but in this case, [Jonghong Park] has applied it to art.

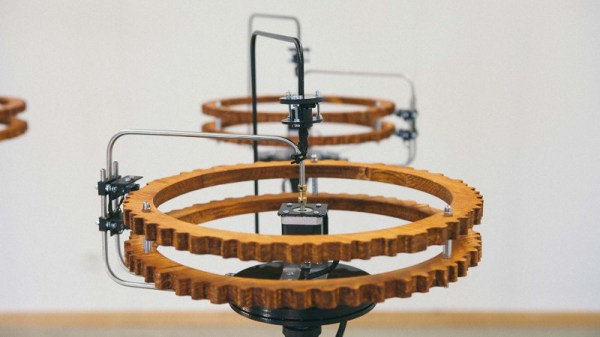
The installation, known simply as ‘bit’, consists of four machines. Each machine has two microswitches, which are moved around two wooden discs by a stepper motor. The microswitches read bumps on the surface of the disc as either a 0 or 1, and the two bits from the microswitches represent the machine’s “state”.

When a machine is called, the stepper motor rotates 1/240th of a revolution, and then the microswitches read the machine’s current state. Based on this state and the Markov Chain algorithm coded into the machines, a machine with the corresponding state is then called, which in turn moves, continuing the chain.

The piece is intended to reflect the idea of a deterministic universe, one in which the current state can be used to predict all future states. As an art piece, it combines its message with a visually attractive presentation of understated black metal and neatly finished wood.

We love a good art installation here at Hackaday – like this amazing snowflake install from a couple years back. Video after the break.

Continue reading “‘Bit’ Installation Combines Art, Markov Chains”

Young Entrepreneurs Learn What Really Goes Into Making A Product

Just to be clear, the primary goal of the Papas Inventeurs (Inventor Dads) was to have the kids make something, have fun, and learn. In that light, they enjoyed a huge success. Four children designed, made, and sold laser-cut napkin rings from a booth at the Ottawa Maker Faire as a fun learning process (English translation, original link in French.) [pepelepoisson] documented the entire thing from beginning to end with plenty of photos. Things started at proof of concept, then design brainstorming, prototyping, manufacture, booth design, and finally sales. While adults were involved, every step was done by the kids themselves.

It all began when the kids were taken to a local fab lab at the École Polytechnique and made some laser-cut napkin holders from plywood for personal use. Later, they decided to design, manufacture, and sell them at the Ottawa Maker Faire. Money for the plywood came from piggy banks, 23 different designs made the cut, and a total of 103 rings were made. A display board and signs made from reclaimed materials rounded out the whole set.

In the end, about 20% of people who visited and showed interest made a purchase, and 60 of the 103 pieces were sold for a profit of $126. Of course, the whole process also involved about 100 hours of combined work between the kids and parents and use of a laser cutter, so it’s not exactly a recipe for easy wealth. But it was an incredibly enriching experience, at least figuratively, for everyone involved.

Possibly the biggest takeaway was the way manufacturing involved much more than just pressing “GO” on a laser cutter. Some pieces needed sanding after laser cutting, and each piece got two coats of varnish. If you missed it, [Bob Baddeley] showed how labor, and not materials, ends up being the most expensive part of a product.

The Battle Between Robot Harmonica And Machine Finger Rages On

When asking the question “Do humans dream of machines?”, it’s natural to think of the feverish excitement ahead of an iPhone or Playstation launch, followed by lines around the block of enthusiastic campers, eager to get their hands on the latest hardware as soon as is humanly possible. However, it’s also the title of an art piece by [Jonghong Park], and is deserving of further contemplation. (Video after the break.)

The art piece consists of a series of eight tiny harmonicas, which are in turn, played by eight fans, which appear to have been cribbed from a low-power graphics card design. Each harmonica in turn has a microphone fitted, which, when it picks up a loud enough signal, causes an Arduino Nano to actuate a mechanical finger which slows the fan down until the noise stops. It’s the mechanical equivalent of a stern look from a parent to a noisy child. Then, the cycle begins again.

The build is very much of the type we see in the art world – put together as simply as possible, with eight Arduinos running the eight harmonicas, whereas an engineering approach may focus more on efficiency and cost. Between the squeaks from the toy harmonicas and the noise from the servos entrusted to quiet them, the machine makes quite the mechanical racket. [Jonghong] indicates that the piece speaks to the interaction of machine (robot harmonica) and humanity (the finger which quells the noise).

It’s a tidily executed build which would be at home in any modern art gallery. It recalls memories of another such installation, which combines fans and lasers into a musical machine. Continue reading “The Battle Between Robot Harmonica And Machine Finger Rages On”

Easily Deboss Notebooks With A 3D Printed Stamp

While it’s arguably a bit closer to the “Arts & Crafts” region of the making spectrum upon which we don’t usually tread on account our l33t sense of superiority, we’ve got to admit that the quick and easy notebook customization demonstrated by [Sean Hodgins] is very compelling. We don’t put ink to dead trees with nearly the frequency we used to, but when we do it might as well be Hemingway-style with a little black Hackaday emblazoned notebook.

As demonstrated in the video after the break, the process starts by designing the stamp in your CAD package of choice. For optimal results [Sean] suggests fairly large capital letters, but with practice you should be able to get into some more creative fonts. Potentially you could even use the logo of your favorite hacking blog, but who are we to dictate what you do?

Whatever you chose, it needs to be mirrored and placed on a relatively thick backing. He recommends a 2 mm thick “plate” with the letters raised on top. You’ll want to print it at a high infill percentage, but even still it shouldn’t take more than 30 minutes or so to run off. Remember there tends to be diminishing returns on infill past 50%, so taking it all the way to 100% is not going to do much but expend more time and plastic.

Once printed, [Sean] hot glues the stamp to a block of wood since putting pressure on the printed piece directly would likely crack it. Then it’s just a matter of getting your notebook, printed stamp, and blocks of wood lined up in to a suitably beefy bench vise. Getting everything aligned is one of those things that easier said than done, so expect to mess up the first couple until you get the hang of it.

When the alignment looks good, crank it down and let it sit for a few minutes. If you’re embossing the design into actual leather, wetting it a bit before putting the pressure on should help. The final effect is understated but undeniably very slick; and with the Holidays rapidly approaching this might be an excellent way to knock out some legitimately thoughtful gifts.

Ultimately the idea here is something of a lightweight version of the 3D printed press break dies used to bend aluminum or the punch and die set used for steel plates. At this point it seems there’s enough evidence to say that 3D printed objects are certainly strong enough (in compression, at least) to put some legitimate work in.

Continue reading “Easily Deboss Notebooks With A 3D Printed Stamp”

Artistic Images Made With Water Lens

It’s said that beauty and art can be found anywhere, as long as you look for it. The latest art project from [dmitry] both looks in unassuming places for that beauty, and projects what it sees for everyone to view. Like most of his projects, it’s able to produce its artwork in a very unconventional way. This particular project uses water as a lens, and by heating and cooling the water it produces a changing image.

The art installation uses a Peltier cooler to periodically freeze the water that’s being used as a lens. When light is projected through the frozen water onto a screen, the heat from the light melts the water and changes the projected image. The machine uses an Arduino and a Raspberry Pi in order to control the Peliter cooler and move the lens on top of the cooler to be frozen. Once frozen, it’s moved again into the path of the light in order to show an image through the lens.

[dmitry] intended the project to be a take on the cyclical nature of a substance from one state to another, and this is a very creative and interesting way of going about it. Of course, [dmitry]’s work always exhibits the same high build quality and interesting perspective, like his recent project which created music from the core samples of the deepest hole ever drilled.

Continue reading “Artistic Images Made With Water Lens”

Solar Heart Engineered To Beat For Decades

It’s often said that if something is worth doing it’s worth doing right, or maybe even worth overdoing. This is clearly a concept that [ANTALIFE] takes very seriously, as made abundantly clear by projects like the solar powered “beating” heart he made as a gift for his wife. What for most of us would have ended up being a junk bin build becomes a considerable engineering project in his hands, with a level of research and fine tuning that’s frankly staggering.

But [ANTALIFE] didn’t put this much thought into the device just for fun. He wants it to remain functional for as long as 30 years, and hopes he and the missus can still look on it fondly in their retirement years. Keeping an electronic device up and running for decades straight means you need to look carefully at each component and try to steer clear of any potential pitfalls.

The biggest one was the battery. More specifically, the fact he couldn’t use one. The lifetime of most rechargeable batteries is measured in hundreds of cycles, which for a device which will be charged by solar every day, means the battery is going to start showing its age in only 4 to 5 years. That simply wasn’t going to cut it.

[ANTALIFE] did some digging and realized that the solution was to use a supercapacitor, specifically the AVX SCMS22C255PRBA0. This is little wonder is rated for a staggering half million cycles, which in theory means that even with daily use it should still take a charge in the year 3300. In practice of course there are a lot of variables which will reduce that lifetime such as temperature fluctuations and the Earth being conquered by apes; but no matter what caveats you put on the figure it should still make 30 years without breaking a sweat.

Similar thought was given to choosing a solar cell with a suitably long lifetime, and he did plenty of testing and experimentation with his charging circuit, including some very nice graphs showing efficiency over time, to make sure it was up to snuff. Finally he walks the reader though his light-sensitive ring oscillator circuit which gives the device its pleasing “breathing” effect once the lights go down.

We’d love to bring you an update on this device in 30 years to see how close [ANTALIFE] got, but as we’re still trying to work the kinks out of the mobile version of the site we can’t make any guarantees about what the direct-brain interface version of HaD might look like. In the meantime though, you can read up on the long term battle between supercapacitors and traditional batteries.

Continue reading “Solar Heart Engineered To Beat For Decades”