PC in a mouse

PC In A Mouse

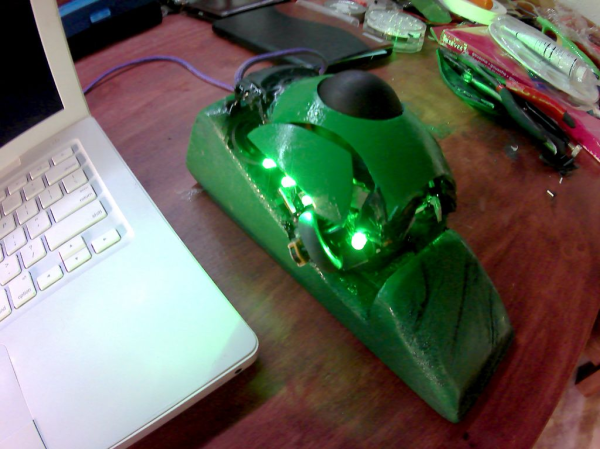
[Slider2732] got his Orange Pi Zero working with a 3 watt amplifier, wireless keyboard (with built-in mouse), and car reversing monitor. But he needed a case to house it in. He remembered that he used to make parameters for ghost hunting by filling PC mouse cases with all sorts of electronics. So why not put the Orange Pi Zero in a mouse too? Looking through his mouse collection, he picked out an old Logitech optical mouse and went to work.

We like that the Logitech has transparent bottom halves, perfect for proving to anyone who might be skeptical that the PC really is in the mouse. A great enhancement we think would be to make the mouse actually be the mouse too! But there doesn’t seem to be enough room left for that. What’s smaller than a Pi Zero that will also run the armbian Linux distribution, OpenELEC Mediacenter, Kodi and a bunch of games?

He even set up the wireless networking for watching YouTube videos. Check out the build and demo video after the break.

Continue reading “PC In A Mouse”

3D Printed Key-Code Is Plastic Digital Logic

3D printers are great for creating static objects, but if you’re clever, it’s possible to print functional devices. If you’re absolutely brilliant you can go far beyond that, which is the case here. This door handle with a key-code lock does it all with 3D printing using mechanism designs that look like alien technology. This is just one application of a much more interesting mechanical digital logic they’re developing (PDF).

Working from the [Hasso-Plattner-Institut], the research team is focusing on metamaterials as mechanisms in and of themselves. The crux of this lock is a series of bistable springs that — if the correct code is entered — will trigger in series to unlock the door. The project builds on the grid of shearing cells seen in the door handle we featured last year. It happens quickly in the video, but the intricate cascade of the handle unlocking is a treat to witness.

It’s a fascinating show of mechanical design. The common elements of digital electronics are all present: set or unset bits, logic gates, propagation issues, the whole works. But there are added challenges in this system, like the need for special cells that can turn the logic chain by 90 degrees and split the signal into more than one part.

This signal splitting is seen in the upper right (bifurcation) and leads into what is in effect an amplifier. The locking bolt must be moved twice the distance of a normal cell, so a dual-cell input is necessary to offset the loss of force from the incoming smaller cells. Cognitively we understand this, but we’re still trying to gain an intuitive sense of the amplifer mechanism.

One thing’s for sure, the overall concept is far cooler than this admittedly awesome door lock mechanism. The paper is worth your time for a deep dive. It mentions their design editor software. You can play with it online but we don’t think it’s been updated to include the new logic cells yet.

Continue reading “3D Printed Key-Code Is Plastic Digital Logic”

Another 74XX Series CPU

[Jack Eisenmann] is no stranger to building impressive DIY CPU’s on vast stretches of breadboard. This time [Jack] has done away with the seventeen breadboards he used in his last 8-bit computer and instead has gone a step further and designed a set of generously utilised PCB’s for the CPU. The result is the DUO Enterprise.

The CPU design is based around an 8-bit data bus and a 24-bit address bus. As usual, a minimal yet carefully chosen instruction set allows [Jack] to do all the heavy lifting in software as part of the compiler and operating system he is working on. There is no sign of a display yet, instead the computer communicates via a dumb terminal. We love the aluminum foil for shielding! Check out the video, below, to see what we mean.

Over the years, we have seen many of [Jack]’s other CPU builds featured on Hackaday. One of his first designs was a 4-bit CPU that could play many games on a LED matrix.Later he did a much more impressive 8-bit CPU along with analog video output and an OS ofcourse. It could even play pong. He even built a Single Instruction Set Computer (SISC).

His final goal with DUO Enterprise is to allow anyone to utilise its computing power by submitting programs and calculations. Heads up [Jack], our neural net needs training soon.

Continue reading “Another 74XX Series CPU”

Magsafe 1 To Magsafe 2 The Cheap Way

[Klakinoumi] wanted to use their Magsafe 1 charger from 2007 with their newer Macbook Pro Retina from 2012 — but it had a Magsafe 2 port. There were a few options on the table (buy an adapter, buy a new charger, cry) but those wouldn’t do. [Klakinoumi] went with the brute force option of grinding a Magsafe 1 charger to fit Magsafe 2.

Based on the existence of passive adapters that allow Magsafe 1 chargers to work with newer laptops, we’d assume that the older chargers are probably electrically similar to the newer models. That said, it’s not our gear and we’d definitely be checking first.

With that out of the way, it’s a simple enough modification — grind away the Magsafe 1’s magnet until it fits into a Magsafe 2 port. It really is that easy. The spring-loaded pins all seem to line up with the newer port’s pads. [Klakinoumi] reports it worked successfully in their tests with 2012, 2014 and 2015 Macbooks but that it should be attempted at your own risk — good advice, as laptops ain’t cheap.

When doing this mod, consider taking care not to overheat the connector during grinding. You could both melt plastic parts of the connector, or ruin the magnet by heating it past its Curie point.

Interested in the protocol Magsafe speaks over those little golden pins? Find out here.

Count Your Zombies! A Left4Dead 2 Stat Tracker

Sure, you’re getting further and further into the game and finishing missions, but the true progress for a zombie shooter is how many zombies you’ve killed, right? [Evan Juras] agreed, so he set off to build a hardware stat tracker for Left4Dead 2!

Left4Dead 2 tracks a bunch of stats and at the end of each level, those stats are updated on your Steam page. [Evan] used a Python script running on a Raspberry Pi to connect to the internet and grab four different stats from your Steam profile. Those stats are displayed on an RGB 16×2 display. To house the project, a case for it was designed and [Evan] had it 3D printed. There are two buttons on the case: one to update the stats and another to cycle through them. If no buttons are pressed then the display cycles through the stats every minute and updates the stats every 24 hours.

The video below shows a summary of the build process and describes the hardware and software used. [Evan] has plans for tracking stats from other games through Steam and his python code is available on Github. Python is becoming the go-to tool for interacting with video game bots and now, stats — see this list of Pokemon Go bots. Also, check out this feature about running MicroPython on an ESP8266 if you wanted to build something similar to this without the Raspberry Pi.

Continue reading “Count Your Zombies! A Left4Dead 2 Stat Tracker”

Super Computing With Mini ITX Cluster

[Colin Alston] was able to snag a handful of Mini ITX motherboards for cheap and built a mini super computer he calls TinyJaguar. Named partly after the AMD Sempron 2650 APU, the TinyJaguar boasts four, yes that’s four MSI AM1I Mini-ITX motherboards, each with 4GB of DDR memory.

A Raspberry Pi with custom software manages the cluster, and along with some TTL and relays, controls the power to the four nodes. The mini super computer resides in a custom acrylic case held together by an array of 3D printed parts and fasteners.There’s even a rack-like faceplate near the bottom to host the RPi, an Ethernet switch, an array of status LEDs, and the two buttons.

With 16 total cores of computing power (including GPU), the TinyJaguar is quite capable of doing some pretty cool stuff such as running Jupyter notebook with IPyParallel. [Colin] ran into some issues getting the GPU to behave with PyOpenCL. It took a bit of pain and time, but in the end he was able to get the GPUs up, and wrote a small message passing program to show two of the cores were up and working together.

Be sure to check out [Colin’s] super computer project page, specifically the ten project logs that walk through everything that went into this build. He also posted his code if you want to take a look under the hood.

Reinventing The Harwell Dekatron

A huge number of modern replicas of retro computers pass our screens here at Hackaday, and among them are an astonishing variety of technologies. Those who weren’t lucky enough to be present in the days when the building blocks of computing were coming together may have missed out on understanding gate-level operation of a computer. Put your super-powerful and super-complex systems-on-chip aside sometime and dig into the details of their distant ancestors.

Most such machines follow a very conventional architecture, so it is something of a surprise to find a project recreating a modern version of something far more obscure. The Harwell Dekatron, also known as the WITCH, can be found at the National Museum Of Computing in Bletchley, UK, and [David Anders] is building a modern all-electronic replica of it.

The original machine is currently the world’s oldest working digital computer, a hybrid electromechanical computer built at the start of the 1950s  to perform calculations for British nuclear scientists. It was retired by the end of that decade and found its way — via a technical college, a museum, and a period of storage in a council archive — to Bletchley where it was restored to working order by 2012. Its special feature is the use of dekatron discharge tubes as memory, allowing an instant visual display of its working as it happens.

[David]’s replica uses modern logic chips to replicate the building blocks of the Harwell Dekatron, and his write-up is as fascinating for that as it is for his study of the real thing in the museum. We ran into [Dave] showing off this project at the Hackaday Dallas event last year and are excited to learn of the advancements since then from his Hackaday.io page. He’s put his research and designs on GitHub, and a series of YouTube videos, the introduction to which we’ve put below the break.

Continue reading “Reinventing The Harwell Dekatron”