Once upon a time I was a real mad scientist. I was into non-conventional propulsion with the idea of somehow interacting with the quantum vacuum fluctuations, the zero point energy field. I was into it despite having only a vague understanding of what that was and without regard for how unlikely or impossible anyone said it was to interact with on a macro scale. But we all had to come from somewhere, and that was my introduction to the world of high voltages and homemade capacitors.
And along the way I made some pretty interesting, or different, capacitors which I’ll talk about here.
Large Wax Cylindrical Capacitor
As the photos show, this capacitor is fairly large, appearing like a thick chunk of paraffin wax sandwiched between two wood disks. Inside, the lead wires go to two aluminum flashing disks that are the capacitor plates spaced 2.5cm (1 inch) apart. But in between them the dielectric consists of seven more aluminum flashing disks separated by plain cotton sheets immersed in more paraffin wax. See, I told you these capacitors were different.
Big wax cylindrical capacitor
Exposed wax of the capacitor
The experiment and the capacitor’s interior
I won’t go into the reasoning behind the construction — it was all shot-in-the-dark ideas, backed by hope, unicorn hairs, and practically no theory. The interesting thing here was the experiment itself. It worked!
I sat the capacitor on top of a tall 4″ diameter ABS pipe which in turn sat on a digital scale on the floor. High voltage in the tens of kilovolts was put across the capacitor through thickly insulated wires. The power supply contained a flyback transformer and Cockcroft-Walton voltage multiplier at the HV side. As I dialed up the voltage, the scale showed a reducing weight. I had weight-loss!
But after a few hours of reversing polarities and flipping the capacitor the other way around and taking plenty of notes, I found the cause. The weight-loss happened only when the feed wires were oriented with the top one feeding downward as shown in the diagram, but there was no weight change when the top wire was oriented horizontally. I’d seen high voltage wires moving before and here it was again, producing what looked like weight-loss on the scale.
But that’s only one of the interesting capacitors I’ve made. After the break we get into gravitators, polysulfide and even barium titanate.
When we are taught about oscillators as newbie engineers, we are shown a variety of waveforms on an oscilloscope or in a textbook. This is a sine wave, they say, this is a sawtooth, this is a square wave, and so on. We’re taught to look at the lines on the screen as idealised, a square wave is truly square, and the transition from low to high voltage and back again is instantaneous.
In most cases this assumption is harmless. If we look into the subject a little deeper we learn that what seemed an instantaneous cliff-face is in fact a very steep slope, but when a circuit does its business in milliseconds there is usually no harm in ignoring a transition time measured in nanoseconds. The glue logic for your Arduino project can take its time.
Sometimes though, the rise time of a logic transition is important. The application that prompted this article was the measurement of oscilloscope bandwidth by looking at how quickly the ‘scope catches up with a pulse that exceeds its bandwidth, for example. When the instrument can happily measure the transition times of all your usual pulse generators, something out of the ordinary is called for. So it’s worth taking a look at the rise times you’d expect from everyday circuitry, examining a few techniques for generating rise times that are much faster. Continue reading “The Fastest Rise Time In The West: Making A Truly Quick Pulse Edge”→
It seems like every other day we hear about some hacker, tinkerer, maker, coder or one of the many other Do-It-Yourself engineer types getting their hands into a complex field once reserved to only a select few. Costs have come down, enabling common everyday folks to equip themselves with 3D printers, laser cutters, CNC mills and a host of other once very expensive pieces of equipment. Getting PCB boards made is literally dirt cheap, and there are more inexpensive Linux single board computers than we can keep track of these days. Combining the lowering hardware costs with the ever increasing wealth of knowledge available on the internet creates a perfect environment for DIYers to push into ever more specific scientific fields.
One of these fields is biomedical research. In labs across the world, you’ll find a host of different machines used to study and create biological and chemical compounds. These machines include DNA and protein synthesizers, mass spectrometers, UV spectrometers, lyophilizers, liquid chromatography machines, fraction collectors… I could go on and on.
These machines are prohibitively expensive to the DIYer. But they don’t have to be. We have the ability to make these machines in our garages if we wanted to. So why aren’t we? One of the reasons we see very few biomedical hacks is because the chemistry knowledge needed to make and operate these machines is generally not in the typical DIYers toolbox. This is something that we believe needs to change, and we start today.
In this article, we’re going to go over how to convert basic chemical formulas, such as C9H804 (aspirin), into its molecular structure, and visa versa. Such knowledge might be elementary, but it is a requirement for anyone who wishes to get started in biomedical hacking, and a great starting point for the curious among us.
Practically any combination of motor and gearbox can be mathematically arranged to fit all sorts of problems. You could lift a crane with a pager motor, it just might take a few hundred years. However, figuring out exactly what ratio you need can feel bit backwards the first time you have to do it.
A gear is nothing more than a clever way to make two circles rotate in concert with each other as if they were perfectly joined at their circumferences. Rather than relying on the friction between two rotating disks in contact, the designer instead relies on the strength of a gear tooth as the factor limiting the amount of torque that can be applied to the gear.
Everything is in gearing is neatly proportional. As long as your point of reference is correct, and some other stuff. Uh, it gets easier with practice.
Now as my physics professors taught me to do, let’s skip the semantics and spare ourselves some pedantics. Let us assume that all gears have a constant velocity when you’ve averaged it all out. Sure there is a perceptible difference between a perfect involute and a primitive lantern gear, but for the sake of discussion it doesn’t matter at all. Especially if you’re just going to 3D print the thing. Let’s say that they’re sitting on perfect bearings and friction isn’t a thing unless we make it so. Also we’ll go ahead and make them perfectly aligned, depthed, and toleranced.
Typically, a gearbox is used for two things. You have a smaller torque that you’d like to make into a bigger one or you have one rotational velocity that you’d like to exchange for another. Typically torque is represented with a capital or lowercase Tau (Ττ) and rotational velocity likes to have a lowercase omega (ω). It also doesn’t matter at all; it just makes your equations look cooler.
Now a lot of tutorials like to start with the idea of rolling a smaller circle against a bigger one. If the smaller circle is a third as large as the big one, it will take three rotations of the small circle to make the big one rotate twice. However, it is my opinion that thinking it in terms of the force applied allows a designer to think about the gearing more effectively.
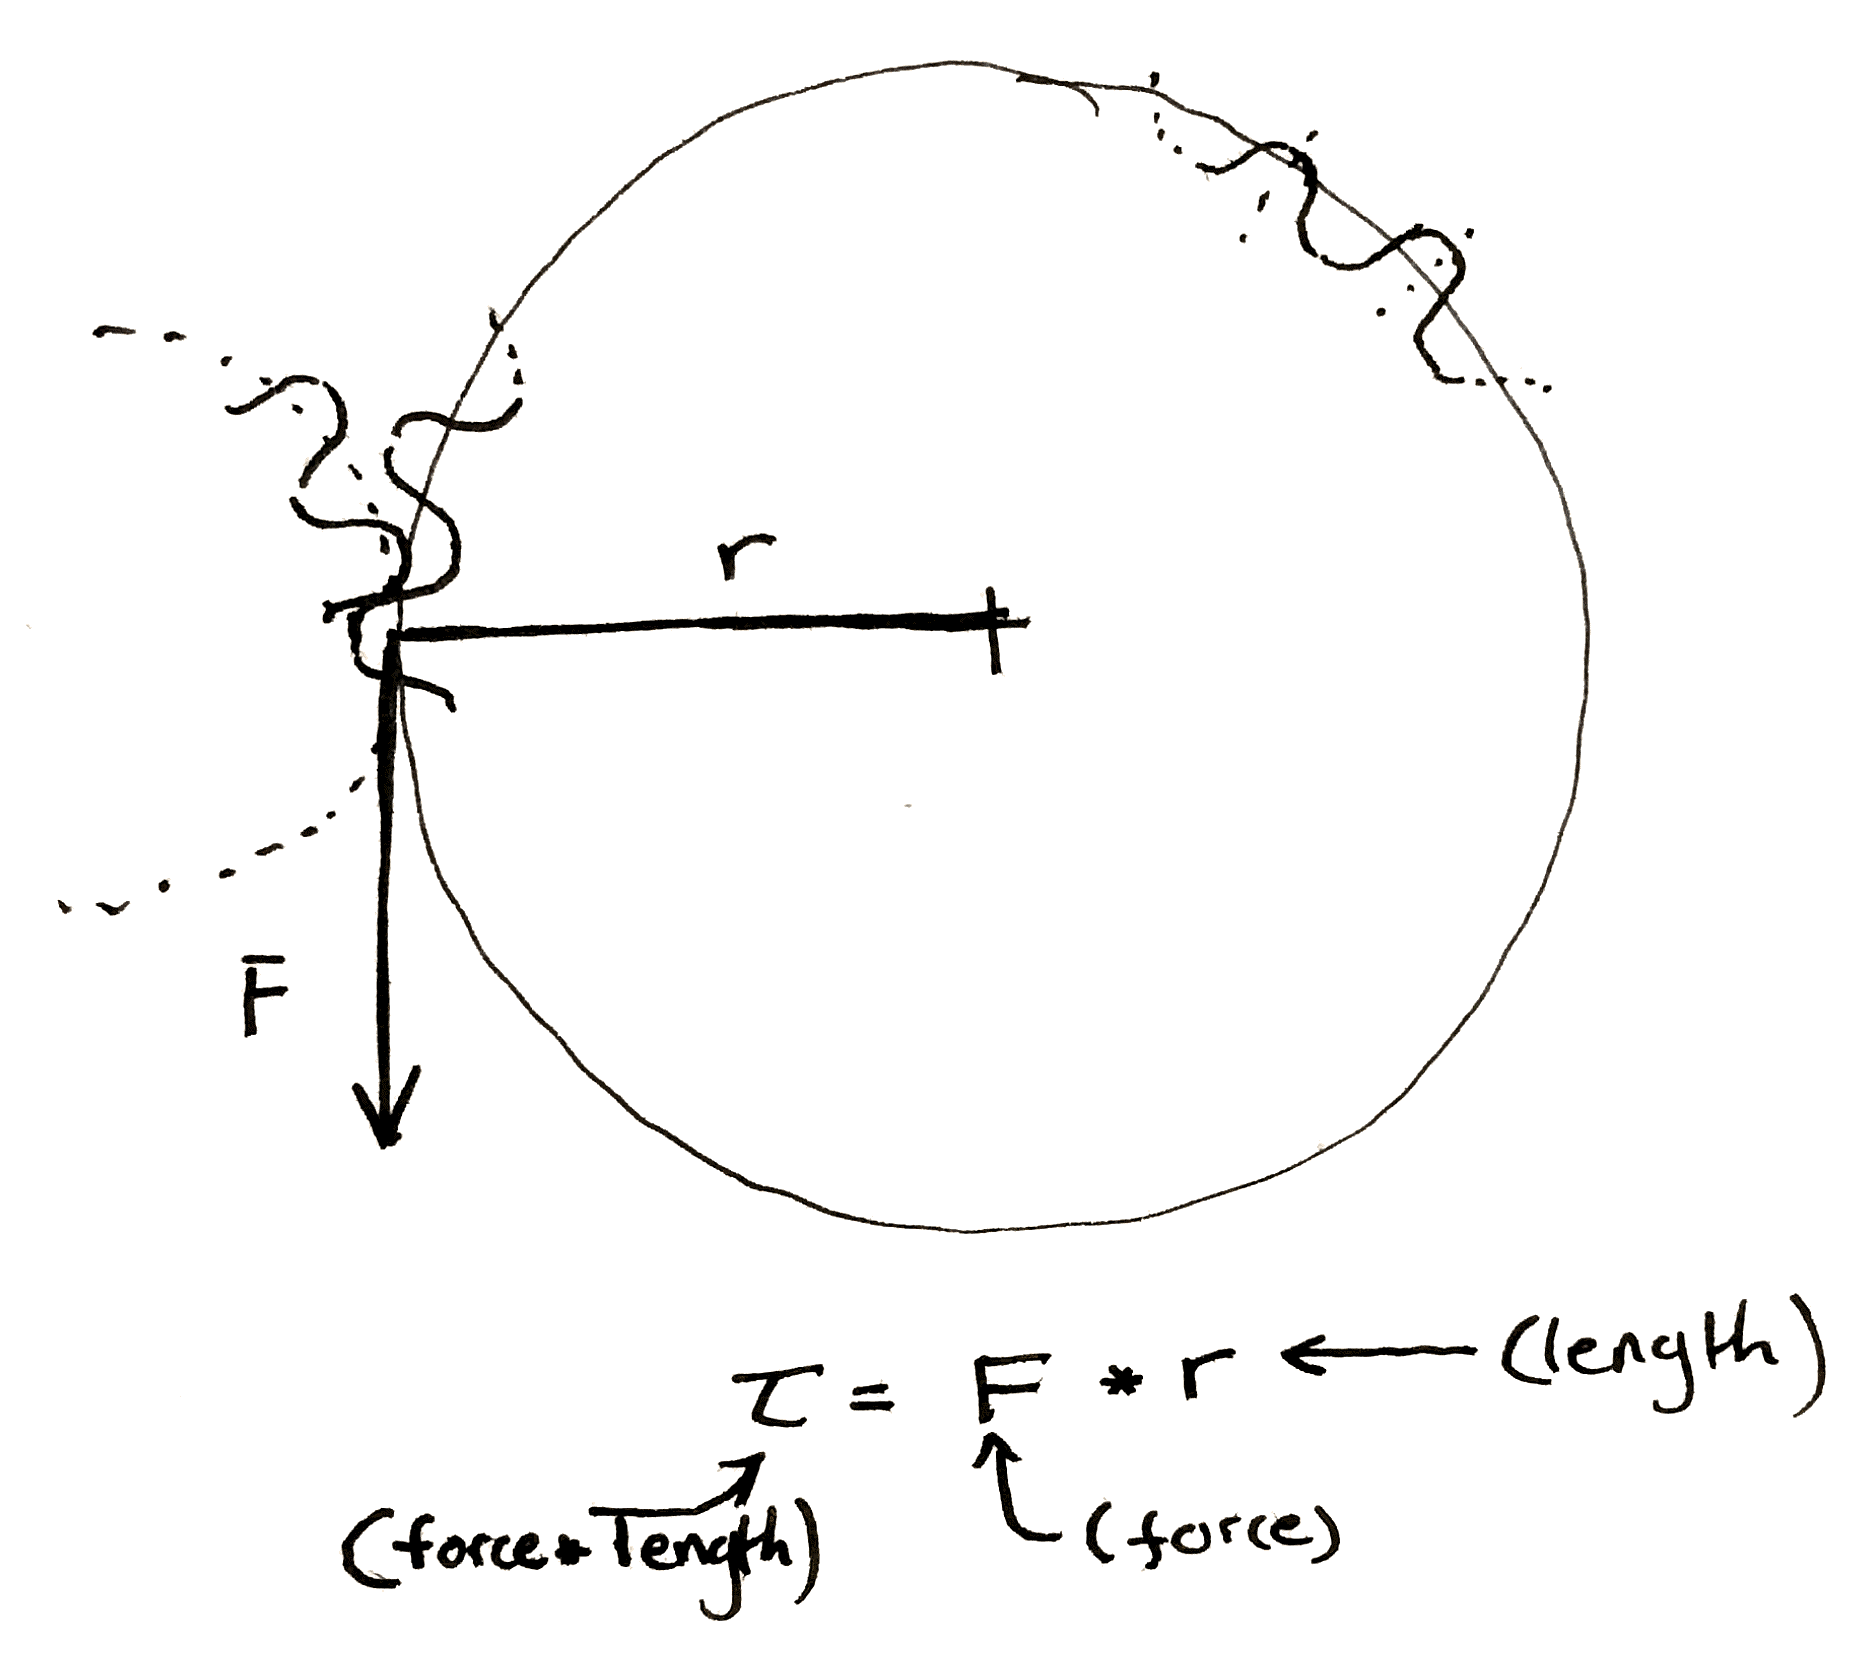
If the friction between the two surfaces of the circle is perfect, then any force applied tangentially to one of the circles will result in a perfectly perpendicular and equal force to the other circle at the point of contact between the two. Midway through writing the preceding sentence I began to understand why textbooks are so abstruse, so I also drew a picture. This results in two equations.
Now, when you have a force perpendicular to the line drawn to describe the radius, the equation for torque becomes really simple.
Multiply the length of the “lever arm”, “radius”, etc. by the force to get the preceding equations. Make sure to include the units.
You should end up force-unit * length-unit. Since I usually work in smaller gears I like to use N * mm. American websites typically use oz-in to rate motors. It is technically ozf-in (ounce-force), but the US customary system has a fetish for obtuseness.
We can make some observations. The smaller gear always sees less torque at its center. This initially seemed a bit counter-intuitive to me. If I’m using a cheater bar to turn a bolt the longer I make the bar the more torque I can put on the bolt. So if I touch the outside of a really large gear I should be seeing a ton of torque at the center of a small gear rotating along with it. However, as we mentioned before, any torque applied on the outside of the larger gear is seen equal and tangential on the smaller. It’s as if you’re touching the outside of the small gear. The torque has to be smaller.
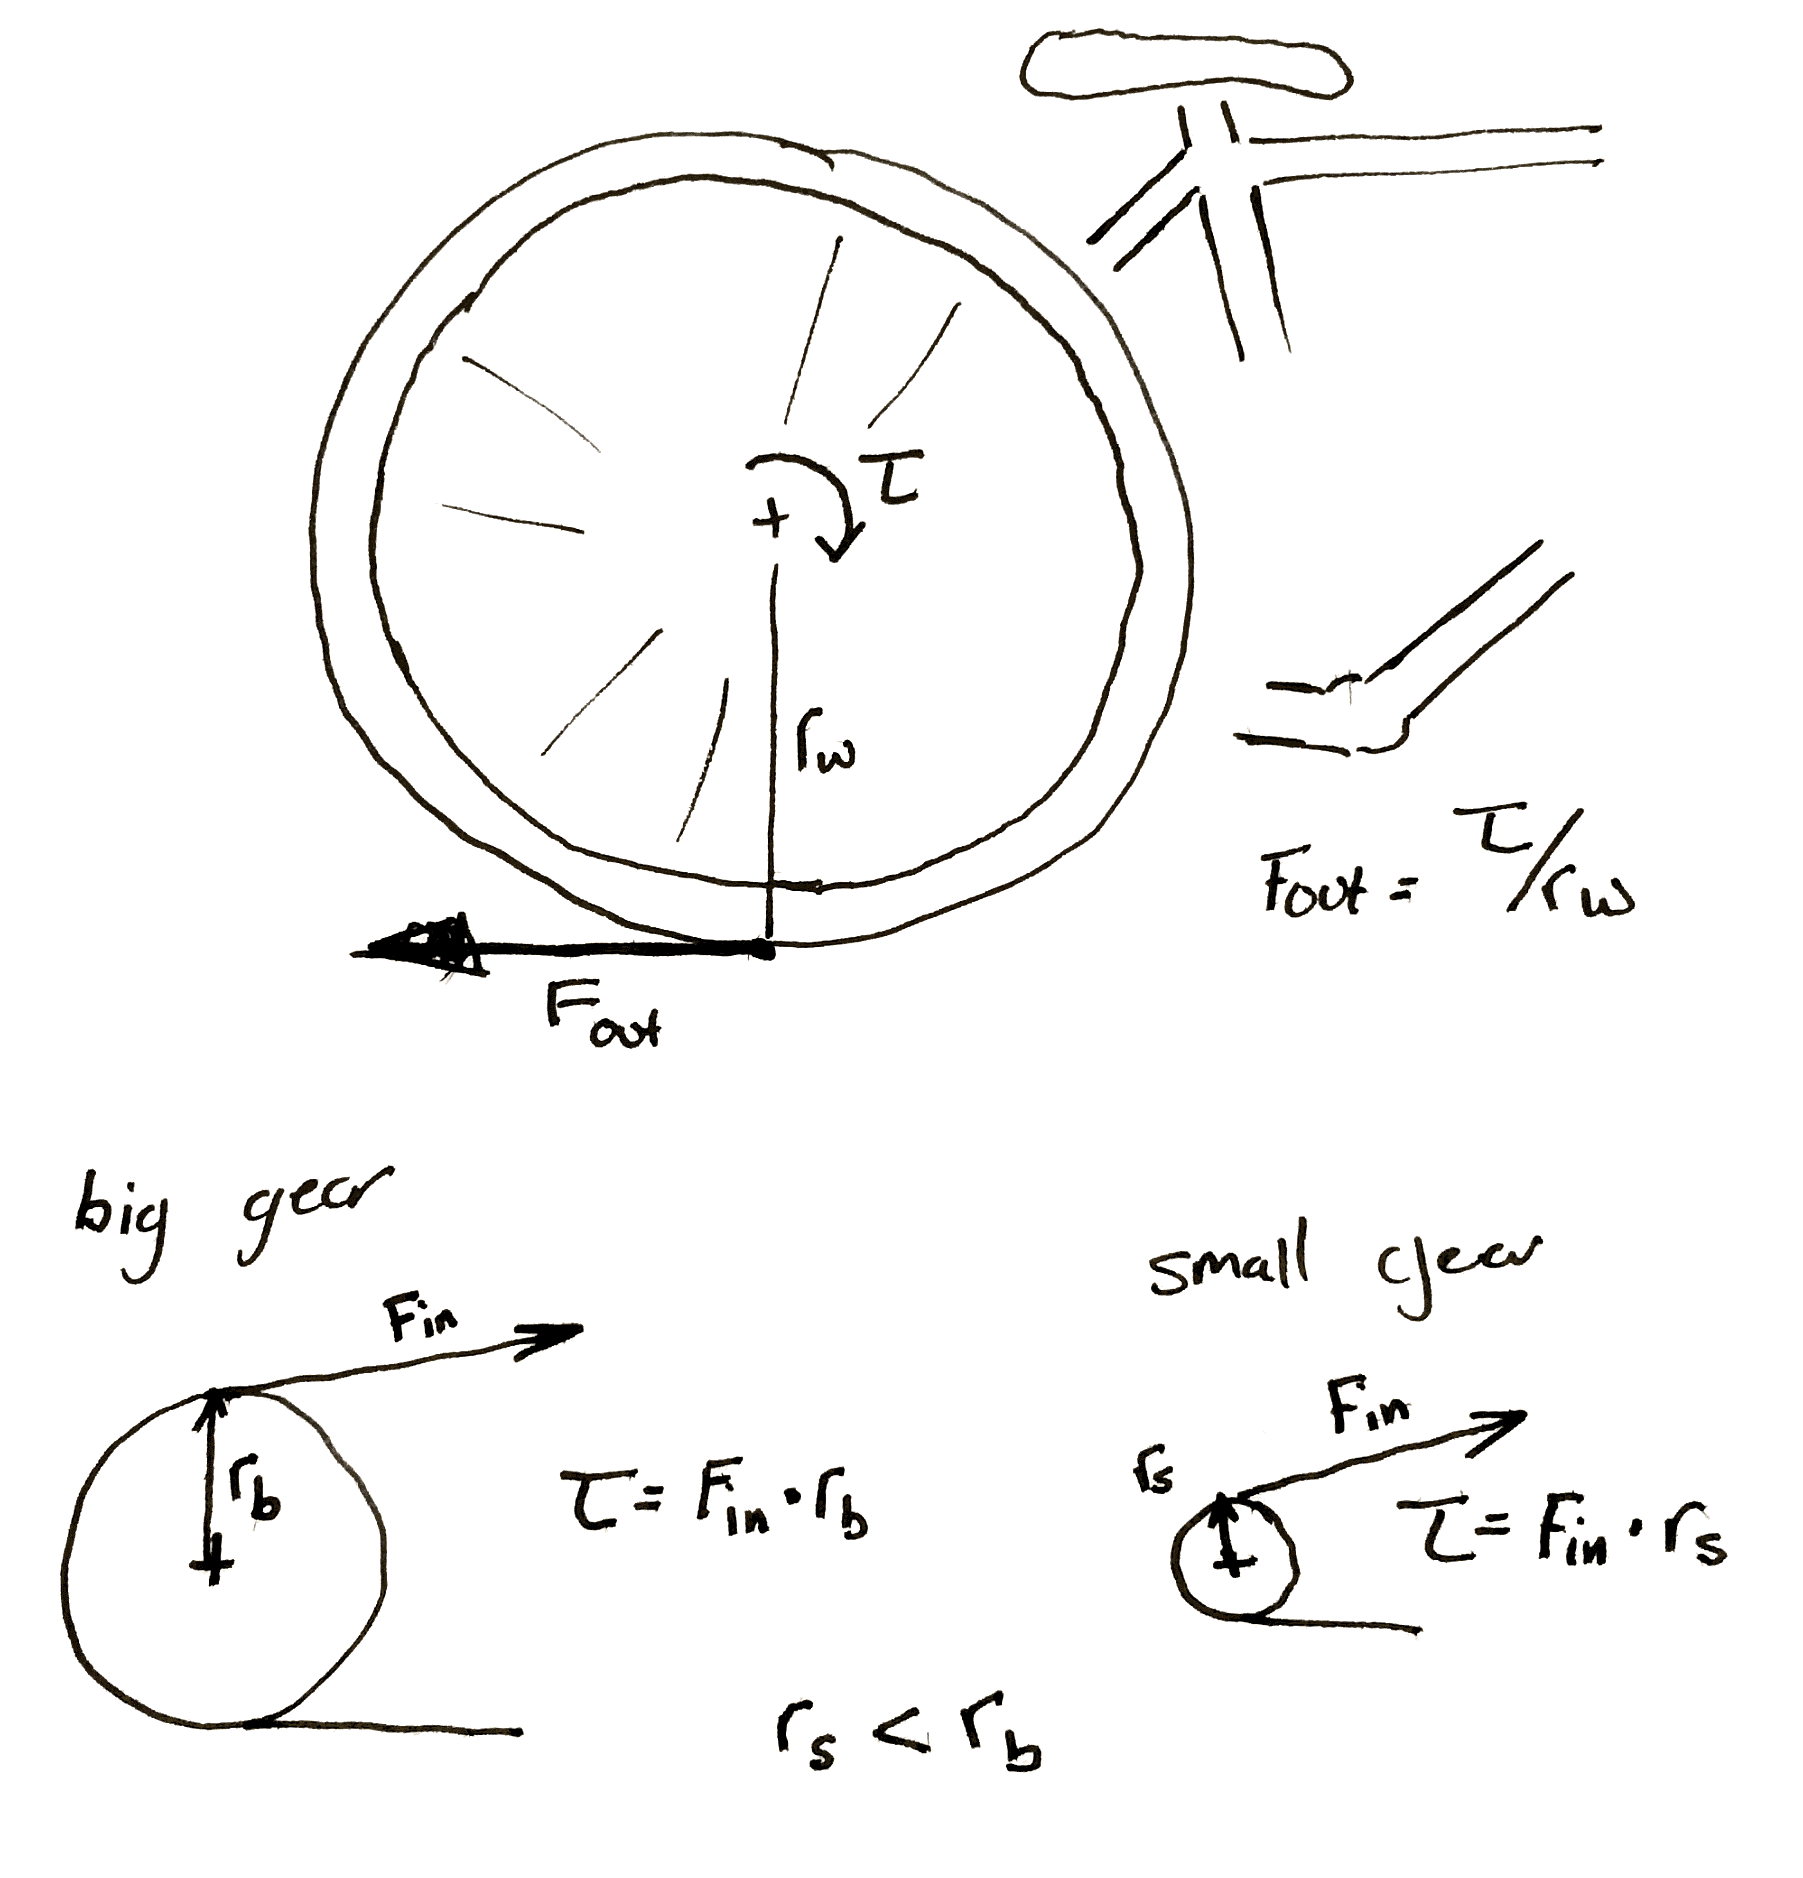
This is why you have to pedal so much harder when the rear sprocket on a bicycle gets smaller. Each time you make the sprocket smaller you shrink the torque input into the wheel. If the perpendicular output where the wheel hits the ground is <input from the small gear> / <radius of the wheel> then it’s obvious why this happens.
Hopefully my diagram doesn’t win a prize for awfulness. Then again, an award is an award. Remember that the bicycle wheel and its input gear are rigidly attached to each other.
It’s also important to note that any time you increase the torque, the speed of the gears slow by the same proportion. If you need 60 N*m out of a motor that can give 20 N*m and you use a 3:1 gearbox to do it. If the motor previously ran at 30 rpm it’s now running at 10 rpm.
Let’s jump right into an example. Let’s say you want to make a device that automatically lifts your window blinds. You’ve got some junk and a 3D printer.
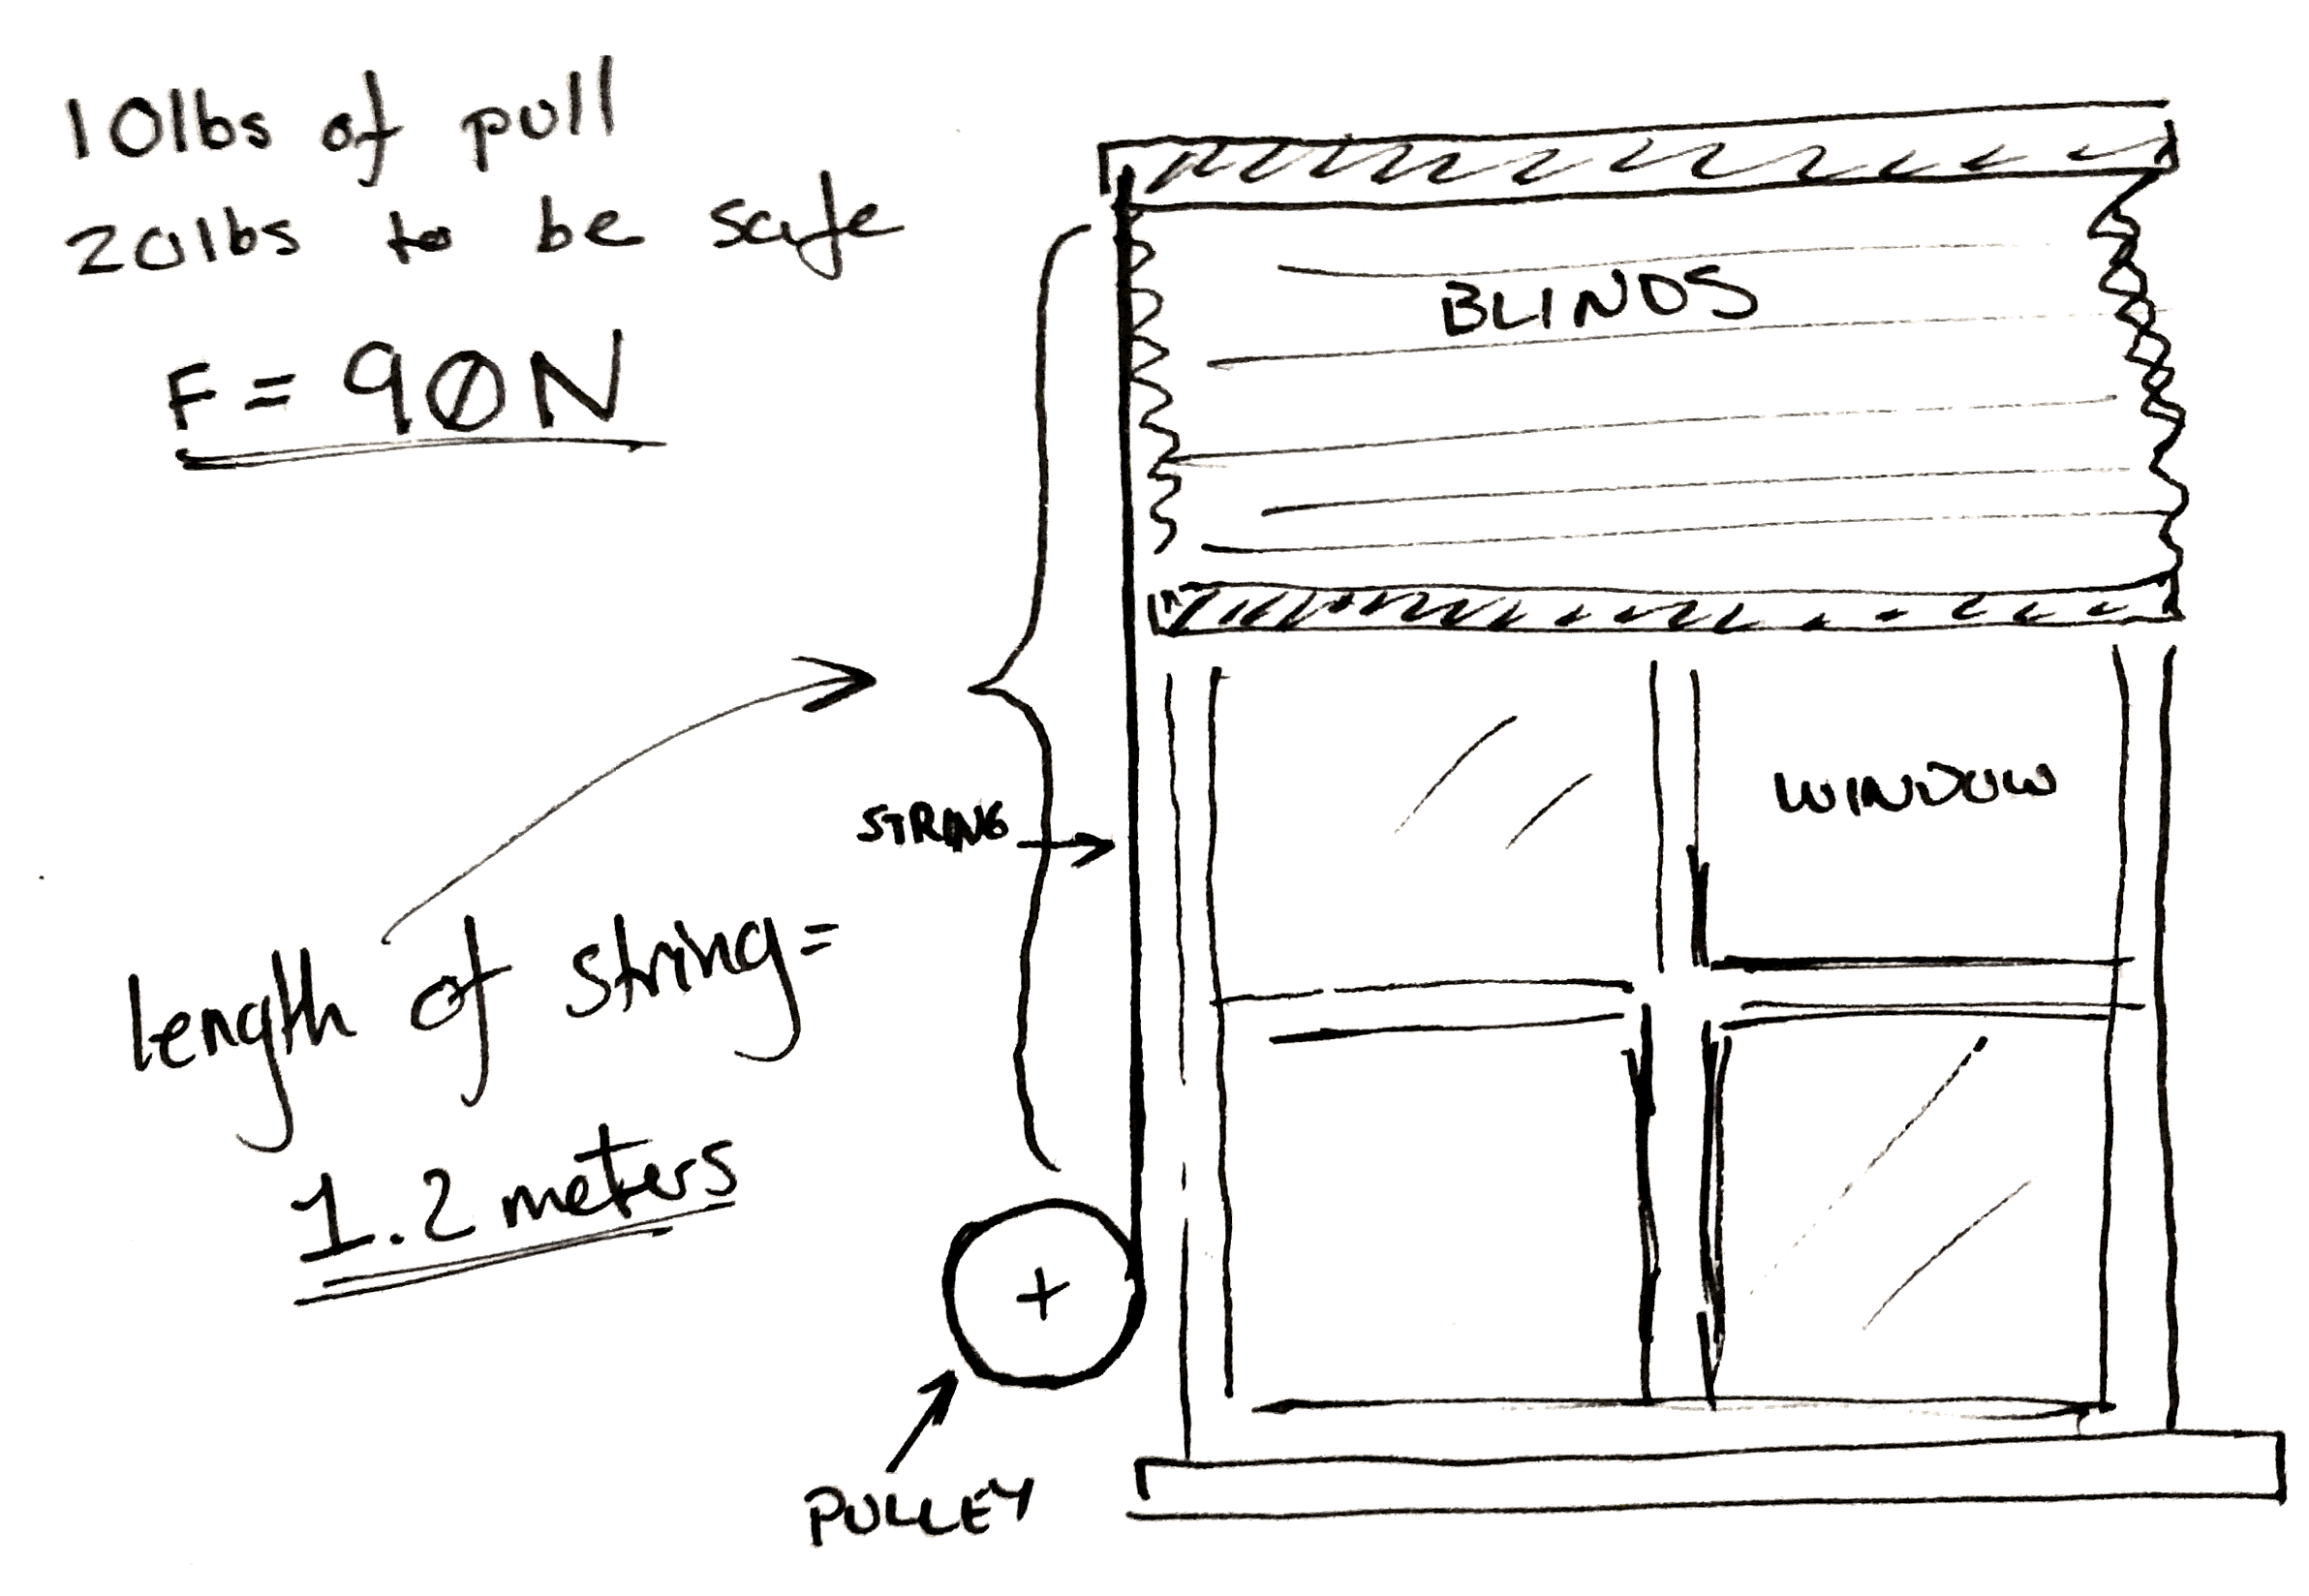
The problem set-up.
Now you’ve taken a spring scale and pulled until the shutter moves and you know you need 10 lbs. of pull to get the blinds to pull up. To make it easy on yourself you multiply this number by two so you know you need exactly 20 lbs of force to pull the curtain up. Then to make it really easy on yourself convert it all to Newtons. It’s approximately 90 N.
Now you don’t really care how fast the blinds pull up, but you go ahead and pull them up yourself. You get the feeling that the blinds won’t appreciate being lifted faster than the whole range in two seconds. You personally don’t care if takes ten seconds to, but you’d like it not to take too long.
You also measure the length of string pulled out to raise the blinds. It’s 1.2 meters.
A classic.
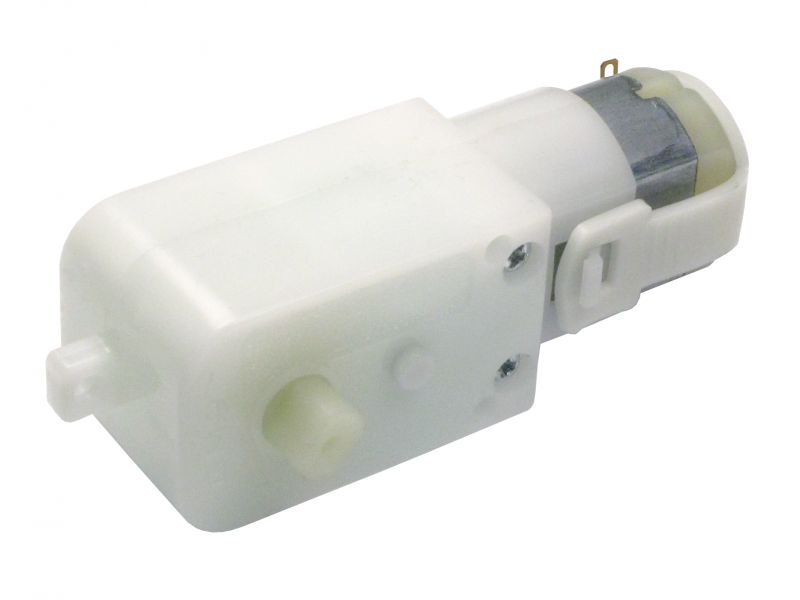
Lastly, you only have one spare power supply and a matching motor left in your entire laboratory after you followed the advice in a Hackaday article. Cursing the day the author was born, you sullenly write down the last specifications. You’ve got one of those cheap GM9 gear motors. 5 V, 66 rpm, and 300 N*mm. You damn him as you think fondly of your mountain of windshield washer motors and 80 lb server rack power supplies that you tossed out.
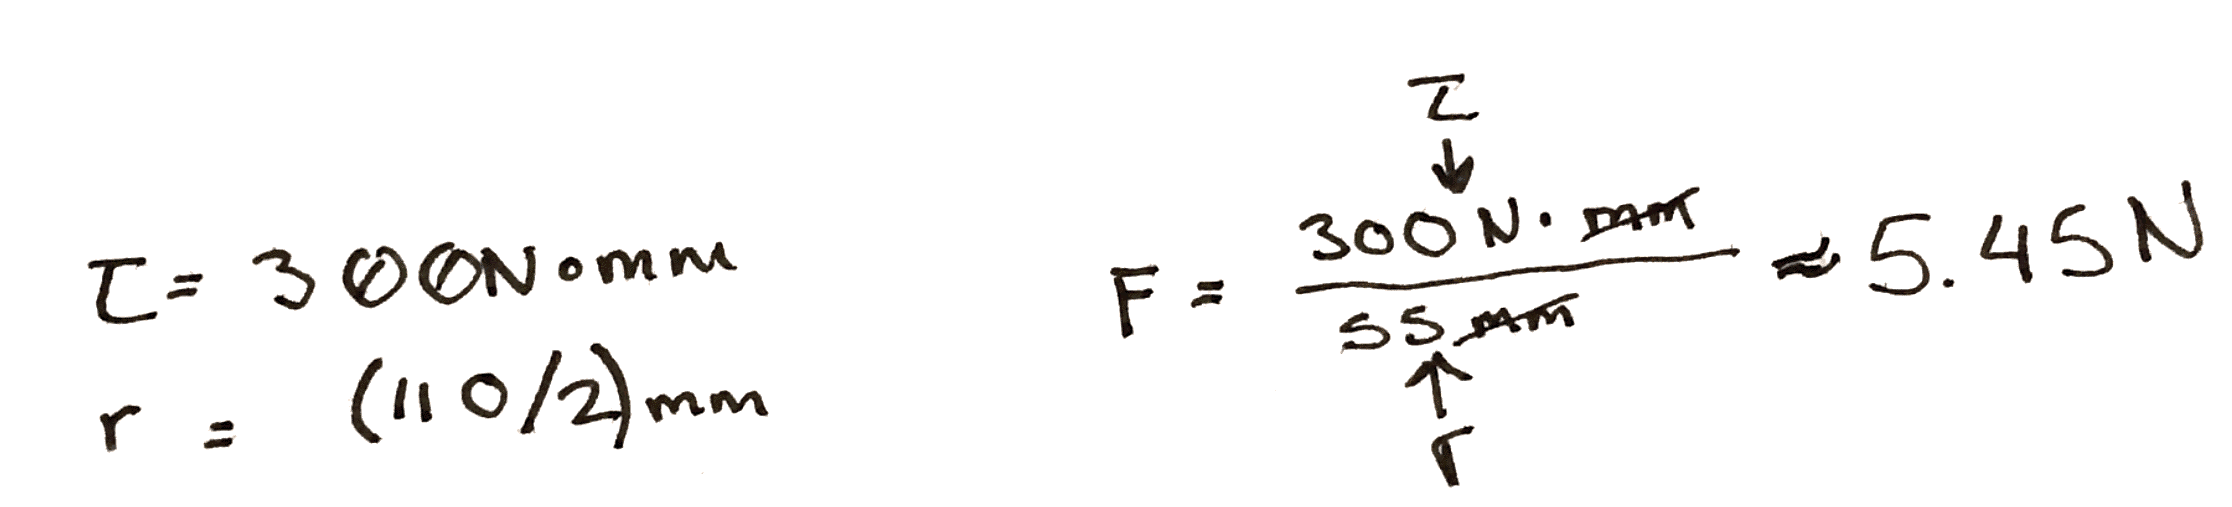
To start with, you do some experiments with a pulley. You arbitrarily pick, 3D print, and find that a 100 mm in diameter pulley seems to wind it up nicely by hand. By the end of the winding the outside diameter of the string is 110 mm. So you use the torque equations above. You find that at the end of the rotation, if you attach the motor directly, there is only 5.45 N of force being applied to the string. Not nearly enough.
Hrm..
So, since you know everything is more or less proportional, you divide 90 N / 5.45 N, and arrive at an answer of 17. So, at a minimum for every turn of the pulley you need 17 turns of the motor to get the torque needed.
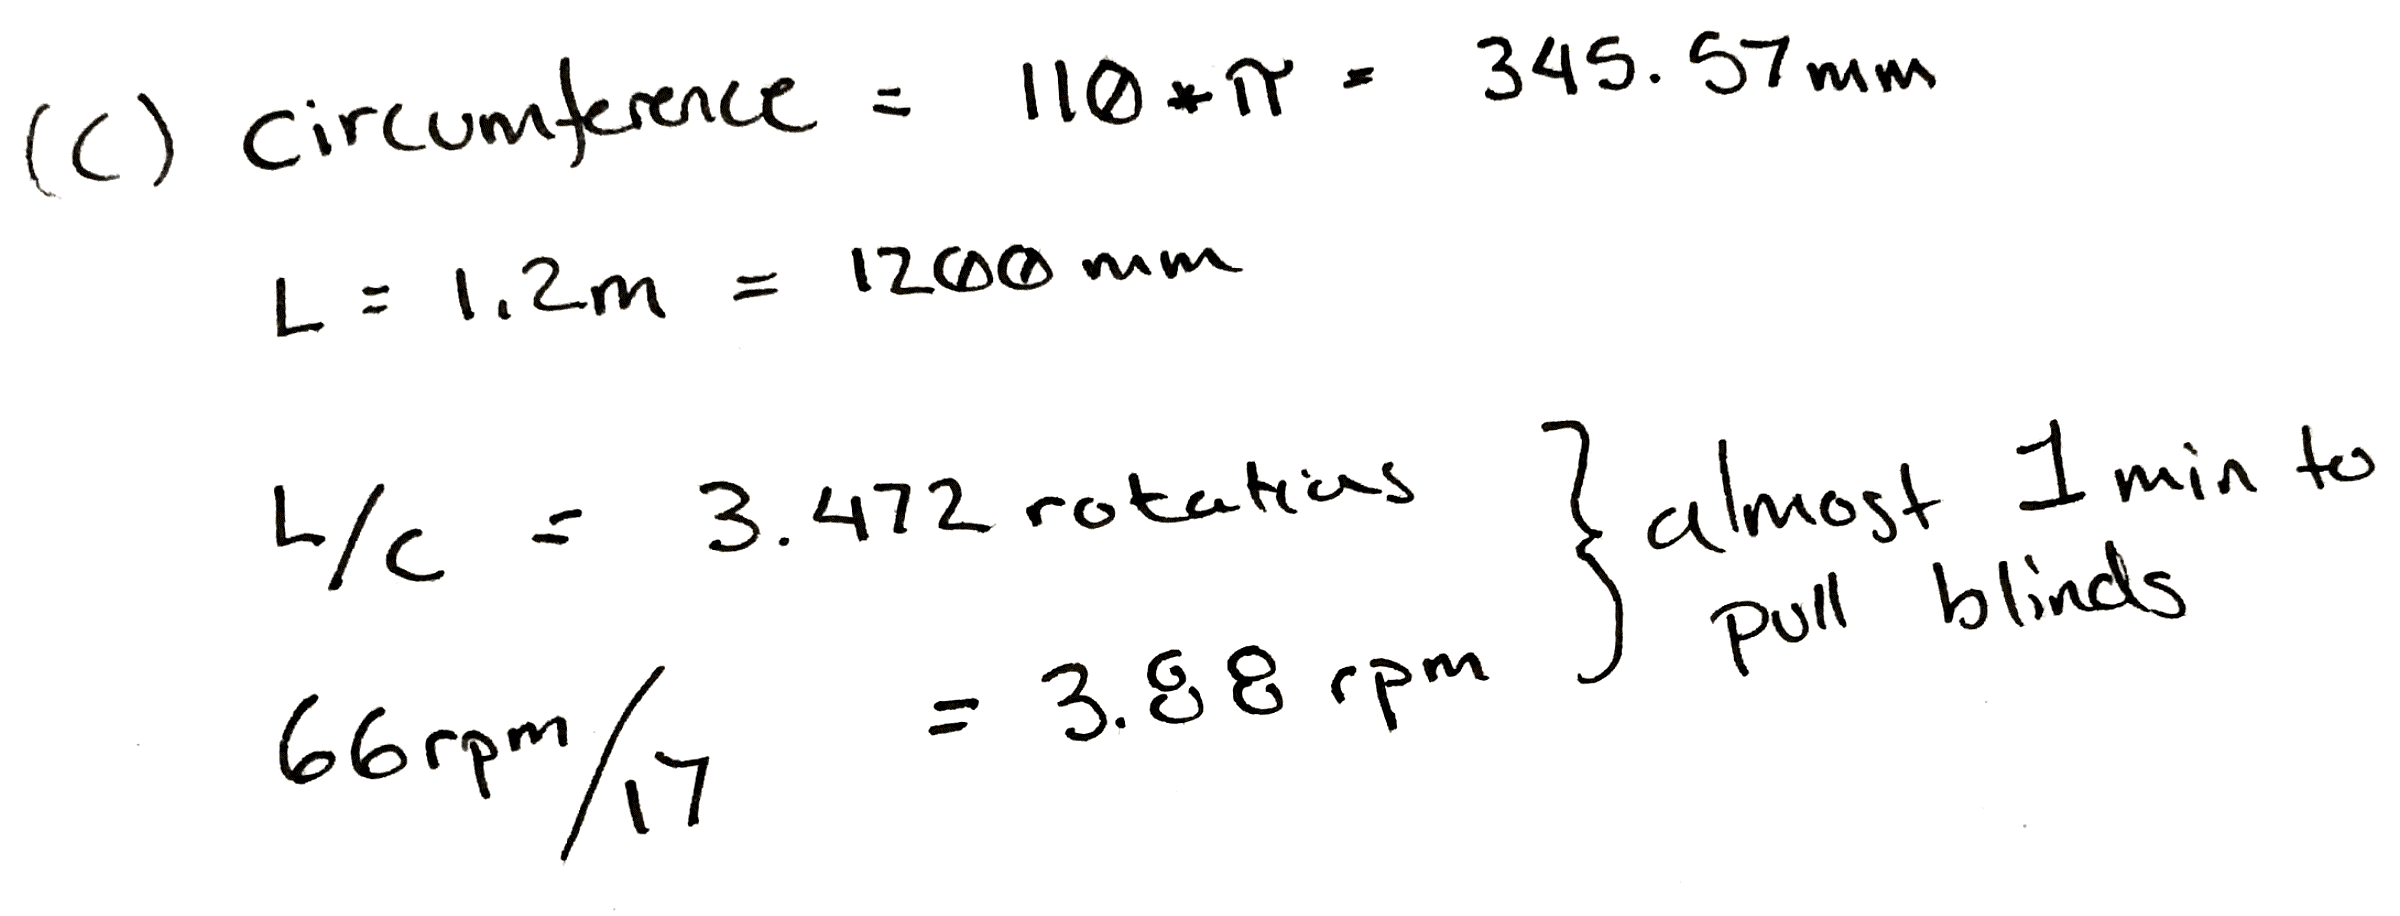
That would be okay, but it messes with our other specification. At a 17:1 ratio, it will take our 66 rpm motor pretty close to a minute to wind the blinds up.
Damn.
This is a moment for some pondering. Make a coffee. Maybe go write a relaxing comment to a Hackaday writer listing their various flaws, perceived and true, in excruciating detail.
What if you wound the string up on a closet rod? Those are only about 30 mm in diameter. You take a bit of rod and wind it up. It seems to work and since it’s wider the string only ends up adding 5 mm to the final diameter. You rework the calculation and find that in this case you only need a ratio of 6! Yes.
Now some of you who have done this before are likely gnashing your teeth, or more likely already down in the comments. Unfortunately it’s all proportional. While you only need a ratio of 6:1 now, nearly a third. You also need to rotate the pulley approximately three times as much to pull the same length of cord.
Sometimes you can’t win. In this case the only solution is to order a new motor. You look online for a bit and realize that one of the 12 V motors you threw away last week would work perfectly for this. You wouldn’t even need a gear box. You could attach it straight to the pulley. You look around your perfectly clean and orderly garage and feel empty.
However, just for fun you build a 6:1 gearbox anyway. It’s a hack after all.
Cover photo of the hilariously complicated Do Nothing Machine credit to the Joe Martin Foundation.
At some point you’ve decided that you’re going to sell your wireless product (or any product with a clock that operates above 8kHz) in the United States. Good luck! You’re going to have to go through the FCC to get listed on the FCC OET EAS (Office of Engineering and Technology, Equipment Authorization System). Well… maybe.
As with everything FCC related, it’s very complicated, there are TLAs and confusing terms everywhere, and it will take you a lot longer than you’d like to figure out what it means for you. Whether you suffer through this, breeze by without a hitch, or never plan to subject yourself to this process, the FCC dance is an entertaining story so let’s dive in!
Last week, we had a look at a carbon-infused PETG filament. This week, I’d like to show you two composites based on a more common thermoplastic in 3D printing: ABS. Among a whole lot of other engineering plastics, the french company Nanovia manufactures Kevlar-like aramid-fiber-infused and carbon-fiber-infused ABS 3D printing filaments. These materials promise tougher parts with less warping while being just as easy to print as regular ABS. Let’s check them out!
What’s not to love about animatronics? Just peel back any puppet’s silicone skin to uncover a cluster of mechatronic wizardry that gives it a life on the big screen. I’ve been hunting online for a good intro to these beasts, but I’ve only turned up one detailed resource–albeit a pretty good one–from the Stan Winston Tutorials series. Only 30 seconds into the intro video, I could feel those tentacles waking up my lowest and most gutteral urge to create physical things. Like it or not, I was hooked; I just had to build one… or a few. This is how you built a very real animatronic tentacle.
I built this. And you can too!
If you’re getting started in this realm, I’ll be honest: the Stan Winston Tutorial is actually a great place to start. In about two hours, instructor Richard Landon covers the mindset, the set of go-to components, and the techniques for fabricating a tentacle mechanism with a set of garage tools–not to mention giving us tons of real-film examples along the way [1].
We also get a sneak peek into how we might build more complicated devices from the same basic techniques. I’d like to pick up exactly where he left off: 4-way two-stage tentacles. And, of course, if you’ve picked up on just how much I like a certain laser-cuttable plastic at this point, I’m going to put a modern twist on Landon’s design. These design tweaks should enable you to build your own tentacle and controller with nothing more but a few off-the-shelf parts, some Delrin, and a laser cutter… Ok, fine, a couple 3D printed parts managed to creep their way in too.
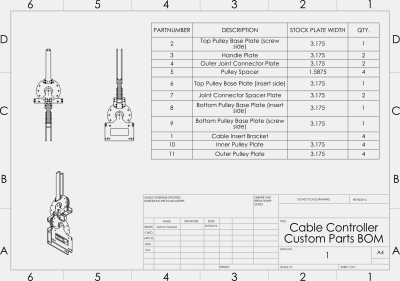
In a good-ol’ engineers-for-engineers fashion, I’m doing something a little different for this post: I’m finishing off this series with a set of assembly videos, a BOM, and the original CAD files to make that beast on the front page come to life. As for why, I figured: why not? Even though these mechanisms have lived in the robotics community and film industry for years, they’re still lacking the treatment of a solid, open design. This is my first shot at closing that gap. Get yourself a cup of coffee. I’m about to give you every bleeding detail on the-how-and-why behind these beasts.














 In a good-ol’ engineers-for-engineers fashion, I’m doing something a little different for this post: I’m finishing off this series with a set of assembly videos, a BOM, and the original CAD files to make that beast on the front page come to life. As for why, I figured: why not? Even though these mechanisms have lived in the robotics community and film industry for years, they’re still lacking the treatment of a solid, open design. This is my first shot at closing that gap. Get yourself a cup of coffee. I’m about to give you every bleeding detail on the-how-and-why behind these beasts.








