Learning Verilog For FPGAs: Hardware At Last!

Getting into FPGA design isn’t a monolithic experience. You have to figure out a toolchain, learn how to think in hardware during the design, and translate that into working Verliog. The end goal is getting your work onto an actual piece of hardware, and that’s what this post is all about.

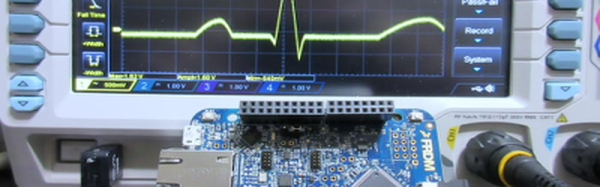
In the previous pair of installments in this series, you built a simple Verilog demonstration consisting of an adder and a few flip flop-based circuits. The simulations work, so now it is time to put the design into a real FPGA and see if it works in the real world. The FPGA board we’ll use is the Lattice iCEstick, an inexpensive ($22) board that fits into a USB socket.

Like most vendors, Lattice lets you download free tools that will work with the iCEstick. I had planned to use them. I didn’t. If you don’t want to hear me rant about the tools, feel free to skip down to the next heading.

Continue reading “Learning Verilog For FPGAs: Hardware At Last!”

You Own Your MRI Brainscan; Do Something Interesting With It

The most complicated and fascinating gadget you will ever own is your brain. Why not pay tribute to this wonder by creating a 3D scale model that you can print yourself? If you have had a full-head MRI scan, it is simple to take this data and create a 3D model that you can print out on any 3D printer. Here’s how to print your brain.

To begin, you are going to need an MRI scan. Unfortunately, the low-field MRI that [Peter Jansen] is working on won’t quite cut it (yet): you’ll have to get the pros to do it. The type of scan also matters, because we want a scan that focusses in on the brain itself, not the bits around it. What type you get depends on what your doctor wants to know, as the radiologist can run a lot of different scans and analysis of the data to show different types of tissue. After looking through the scans that I got, I settled on one that was labelled eB1000i(BRAIN) With and Without Contrast. To a radiologist, that information means a lot, telling you what type of scan it is, and that it was done with a contrast agent, a metal dye that is injected to make water-rich tissues (like my brain) more visible. The number refers to something called the diffusion weighting, which helps the doctor look for swelling that can indicate things like strokes, tumors, etc. There’s a good guide to some of the jargon here.

Continue reading “You Own Your MRI Brainscan; Do Something Interesting With It”

Learning Verilog For FPGAs: Flip Flops

Last time I talked about how to create an adder in Verilog with an eye to putting it into a Lattice iCEstick board. The adder is a combinatorial circuit and didn’t use a clock. This time, we’ll finish the demo design and add two clocked elements: a latch that remembers if the adder has ever generated a carry and also some counters to divide the 12 MHz clock down to a half-second pulse to blink some of the onboard LEDs.

Why Clocks?

Clocks are an important part of practical digital design. Suppose you have a two input AND gate. Then imagine both inputs go from zero to one, which should take the output from zero to one, also. On paper, that seems reasonable, but in real life, the two signals might not arrive at the same time. So there’s some small period of time where the output is “wrong.” For a single gate, this probably isn’t a big deal since the delay is probably minuscule. But the errors will add up and in a more complex circuit it would be easy to get glitches while the inputs to combinatorial gates change with different delays.

Continue reading “Learning Verilog For FPGAs: Flip Flops”

Learning Verilog For FPGAs: The Tools And Building An Adder

Over the last year we’ve had several posts about the Lattice Semiconductor iCEstick which is shown below. The board looks like an overgrown USB stick with no case, but it is really an FPGA development board. The specs are modest and there is a limited amount of I/O, but the price (about $22, depending on where you shop) is right. I’ve wanted to do a Verilog walk through video series for awhile, and decided this would be the right target platform. You can experiment with a real FPGA without breaking the bank.

In reality, you can learn a lot about FPGAs without ever using real hardware. As you’ll see, a lot of FPGA development occurs with simulated FPGAs that run on your PC. But if you are like me, blinking a virtual LED just isn’t as exciting as making a real one glow. However, for the first two examples I cover you don’t need any hardware beyond your computer. If you want to get ready, you can order an iCEstick and maybe it’ll arrive before Part III of this series if published.

Continue reading “Learning Verilog For FPGAs: The Tools And Building An Adder”

Embed With Elliot: The Volatile Keyword

Last time on Embed with Elliot we covered the static keyword, which you can use while declaring a variable or function to increase the duration of the variable without enlarging the scope as you would with a global variable. This piqued the curiosity of a couple of our readers, and we thought we’d run over another (sometimes misunderstood) variable declaration option, namely the volatile keyword.

On its face, volatile is very simple. You use it to tell the compiler that the declared variable can change without notice, and this changes the way that the compiler optimizes with respect to this variable. In big-computer programming, you almost never end up using volatile in C. But in the embedded world, we end up using volatile in one trivial and two very important circumstances, so it’s worth taking a look.

Continue reading “Embed With Elliot: The Volatile Keyword”

Becoming A State Machine Design Mastermind

Imagine a robot with an all-around bump sensor. The response to the bump sensor activating depends on the previous state of the robot. If it had been going forward, a bump will send it backwards and vice versa. This robot exhibits behavior that is easy to model as a state machine. That is, the outputs of the machine (motor drive) depend not only on the inputs (the bump sensor) but also on the current state of the machine (going forward or backward).

As state machines go, that’s not an especially complicated one. Many state machines have lots of states with complex conditions. For example, consider a phone switchboard. The reaction to a phone going off hook depends on the state of the line. If the state is ringing, picking up the phone makes a connection. If the state is idle, the phone gets a dial tone. The switchboard also has to have states for timeouts, connection failures, three way calling, and more.

If you master state machines your design and debug cycles will both move along faster. Part of this is understanding and part is knowing about the tools you can choose to use. I’ll cover both below.

Continue reading “Becoming A State Machine Design Mastermind”

I2C Bus Splitting With A More Professional Touch

Last week, I covered some of the bitter details of an interesting hack that lets us split up the I²C clock line into multiple outputs with a demultiplexer, effectively giving us “Chip Selects” for devices with the same address.

This week, I figured it’d be best to layout a slightly more practical method for solving the same problem of talking to I²C devices that each have the same address.

I actually had a great collection of comments mention the same family of chips I’m using to tackle this issue, and I’m glad that we’re jumping off the same lead as we explore the design space.

Recalling the Work of Our Predecessors

Before figuring out a clever way of hacking together our own solution, it’s best to see if someone before us has already gone through all of the trouble to solve that problem. In this case–we’re in luck–so much that the exact bus-splitting behavior we want is embedded into a discrete IC, known as the PCA9547.

chip_reverence

It’s worth remembering that our predecessors have labored tirelessly to create such a commodity piece of silicon.

The PCA9547 (PDF) is an octal, I²C bus multiplexer, and I daresay, it’s probably the most practical solution for this scenario. Not only does the chip provide 8 separate buses, up to seven more additional PCA9547s can be connected to enable communication with up to 64 identical devices! What’s more, the PCA9547 comes with the additional benefit of being compatible with both 3.3V and 5V logic-level devices on separate buses. Finally, as opposed to last week’s “hack,” each bus is bidirectional, which means the PCA9547 is fully compliant with the I²C spec.

Selecting one of the eight I²C buses is done via a transfer on the I²C bus itself. It’s worth mentioning that this method does introduce a small amount of latency compared to the previous clock-splitter solution from last week. Nevertheless, if you’re planning to read multiple devices sequentially from a single bus anyway, then getting as close-as-possible to a simultaneous read/write from each device isn’t likely a constraint on your system.


With a breakout board to expose the pads, I mocked up a quick-n-dirty Arduino Library to get the conversation started and duplicated last week’s demo.

Happily enough, with a single function to change the bus address, the PCA9547 is pretty much a drop-in solution that “just works.” It’s definitely reassuring that we can stand on the shoulders of our chip designers to get the job done quickly. (They’ve also likely done quite a bit more testing to ensure their device performs as promised.) Just like last week, feel free to check out the demo source code up on Github.

Until next time–cheers!