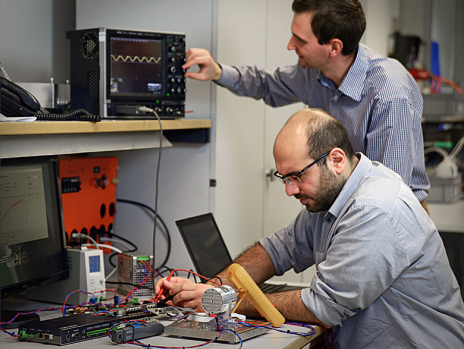
Satellites make many of our everyday activities possible, and the technology continues to improve by leaps and bounds. A prototype, recently completed by [Arda Tüysüz]’s team at ETH Zürich’s Power Electronics Systems Lab in collaboration with its Celeroton spinoff, aims to improve satellite attitude positioning with a high speed, magnetically levitated motor.
Beginning as a doctoral thesis work led by [Tüysüz], the motor builds on existing technologies, but has been arranged into a new application — with great effect. Currently, the maneuvering motors on board satellites are operated at a low rpm to reduce wear, must be sealed in a low-nitrogen environment to prevent rusting of the components, and the microvibrations induced by the ball-bearings in the motors reduces the positioning accuracy. With one felling swoop, this new prototype motor overcomes all of those problems.
Almost exactly two years ago, shocking news thundered across the electronics blogosphere. There was a new WiFi module on the block. It was called the ESP8266, a simple serial device capable of taking care of an 802.11 network and a WiFi stack, giving any project with a microcontroller access to the Internet. Earlier modules to connect microcontrollers were sufficient for the task, but nothing could beat the ESP8266 on price.
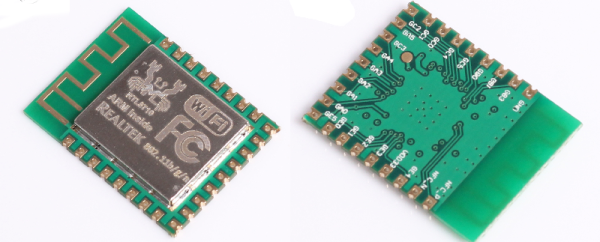
The RTL8710 dev kit
Now, there’s a new module that’s even cheaper and more powerful than the ESP8266, and just like all of our favorite parts from China, it inexplicably shows up on eBay and AliExpress before anywhere else. It’s the Realtek RTL8710, available on eBay, on AliExpress, and elsewhere around the web for about $1.50 per device. There’s also a dev kit for the device featuring breakouts, an additional microcontroller, and a few switches and buttons for about $15.
As you would expect, there is zero English-language data available about the RTL8710, everything is in Chinese. There is a forum of sorts going over this new chip, and the Google Translatrix is good enough to glean a little bit of info about the new chip.
The RTL8710 features an ARM processor clocked at 166MHz. Stock, this module is running FreeRTOS. There’s 1MB of Flash, 48k of RAM available to the user, up to 21 GPIOs, 3 I2C, 4 PWM pins, and 2 PCM. This module also comes with an FCC logo, but I can’t find anything on the FCC website about this module.
If anything, the Realtek RTL8710 isn’t meant to be a competitor to the ESP8266. While extremely popular and still very useful, the ‘next gen’ ESP32 is due to be released in a month or so, and with the exception of Bluetooth on the ESP32, this Realtek module should match its capabilities quite well. Whether anyone can get an English datasheet is another matter, but if history is any indication a few English language RTL8710 forums will pop up a few hours after this is posted.
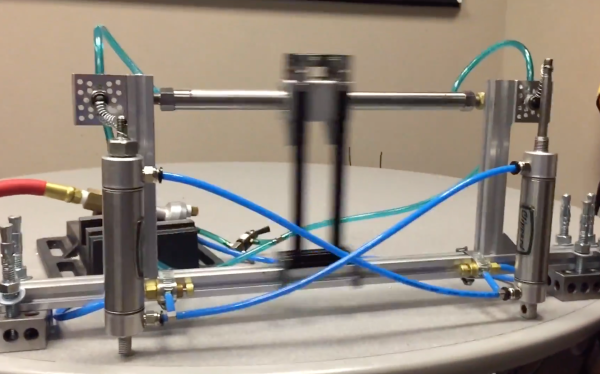
It’s true that a lot of the projects we feature here (and build ourselves) are created to accomplish some sort of goal. But, many times the project itself is the goal. That’s the case with [Proto_G’s] self-oscillating pneumatic machine, which he built with no particular use in mind.
Most Hackaday readers are familiar with the Amazon Dash button even if it has not yet made an appearance in their country or region. A WiFi enabled button emblazoned with a product logo, that triggers an Amazon order for that product when you press it. Stick it on your washing machine, press the button when you run out of laundry soap, and as if by magic some laundry soap appears. You still have to get out of your armchair to collect the soap from the delivery guy, but maybe they’re working on that problem too.
Of course the embedded computer concealed within the Dash button has been the subject of much interest within our community, and quite a few creative uses have been made of repurposed and reverse engineered examples.
Earlier this year a new Dash button model appeared. Largely similar on the outside, but sporting a comprehensive hardware update internally. Gone is the STM32 processor to be replaced by an Atmel part, and unfortunately since they also made changes to its communication protocol, gone also are most of the hacks for the device.
[Evan Allen] writes to us with his work on bending the new Dash button to his will. He goes into detail on the subject of retrieving their MAC addresses, and modifications to existing hacks to allow the buttons to be intercepted/redirected to trigger his MQTT server. It’s not by any means the end of the story and we’re sure we’ll see more accomplished uses of the new Dash button in due course, but it’s a start.
If the new button’s hardware interests you then [Matthew Petroff]’s teardown is definitely worth a look. As well as the Atmel chips — discovered to be a ATSAMG55J19A-MU with an ATWINC1500B wireless chip — the buttons now support power from a AA cell, and boast a significantly reduced power consumption. We really, really, need to pwn this tasty new hardware!
[3DTOPO] does a lot of metal casting (video link, embedded below). That’s obvious by the full and appropriate set of safety gear, a rarity on YouTube.
They had all the equipment to do it the normal way: craft or CNC out a master, produce a drag and a copy, make any necessary cores, and finally; pour the mold. This is a long and tedious process. It has a high rate of error, and there is a parting line.
Another set of methods are the lost ones. With these methods the master is produced out of a material like foam or wax. The master is surrounded by refractory and then melted, burned, or baked out of the mold. Finally the metal is poured in. Theoretically, a perfect reproduction is made without ever having to open the mold. Continue reading “Metal Casting With Single Shelled PLA Masters”→
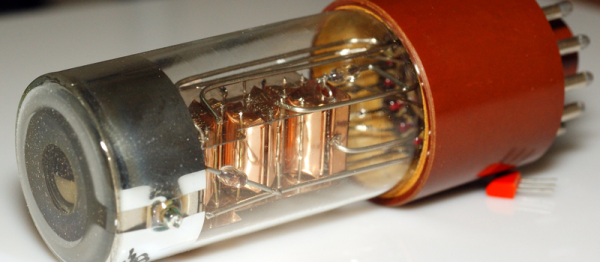
On the heels of our post on retro-Soviet transistor teardowns and die-shots, [nikitas] wrote in to tell us about a huge thread on rare vacuum devices of all varieties: oddball cathode-ray tubes, obscure Nixies, and strange Soviet valves. We thought the other forum post was overwhelming at just over 110 pages, but how about 391 pages (and counting) of blown-glass electronics?
If you read through the decaptholon, we mentioned that a particularly enthusiastic poster, [lalka], looked to be cataloguing every Soviet oscillator circuit. It turns out that he’s also the one behind this incredible (random) compendium of everything that’s had the air sucked out of it.
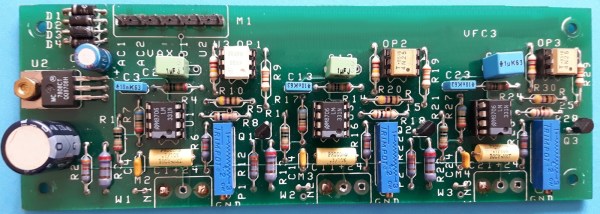
This one’s not a flashy hack, it’s a great piece of work and a good trick to have up your sleeve. Sometimes you’ve got a voltage difference that you’d like to measure, but either the ground potential is at a different level, or the voltages are too high for your lowly microcontroller.
There are tons of tricks with resistive voltage dividers that you can play. But if you want serious electrical isolation from the target, there’s only one way to go — an optocoupler. But optocouplers only really transmit digital signals, and [Giovanni Carrera] needed to measure an analog voltage.
Enter the voltage-to-frequency IC that does just what it says: produces a square wave with a frequency that’s proportional to the voltage applied. Pass this square wave through an optocoupler, and you can hit one side with voltages approaching lightning strikes without damaging the microcontroller on the other side. And you’re still able to measure the voltage accurately by measuring the frequency on the digital I/O pins of the microcontroller.
[Giovanni] built up and documented a nice circuit. He even tested it for linearity. If you’re ever in the position of needing to measure a voltage in a non-traditional way, you’ll thank him later.