A Saturday afternoon. The work week was done, the household chores were wrapped up, and with almost a week left until Christmas, there was just enough wiggle room to deny that there was still a ton of work left to prepare for that event. It seemed like the perfect time to escape into the shop and knock out a quick project, one that has been on the back burner since at least March. I’m nothing if not skilled in the ways of procrastination.
This was to be a simple project — adding an aluminum plate to a plastic enclosure that would serve as an antenna entry point into my shack. Easy as pie — cut out an rectangle of aluminum, cut and drill a few holes, call it a day. Almost all of my projects start out that way, and almost every time I forget that pretty much every one of those builds goes off the rails at exactly the same point: when I realize that I don’t have the fasteners needed. That’s what happened with this build, which had been going swimmingly up to that point — no major screw-ups, no blood drawn. And so it was off to the hardware store I trundled, looking for the right fasteners to finish the job.
Finding hardware has long been where my productivity goes to die. Even though I live a stone’s throw from at least half a dozen stores, each with a vast selection of hardware and most open weekends and nights, the loss of momentum that results from changing from build-mode to procure-mode has historically been deadly to my projects. I’m sure I’m not the only one who has run into this issue, so the question is: what can a hacker do to prevent having to run out for just the right fasteners?
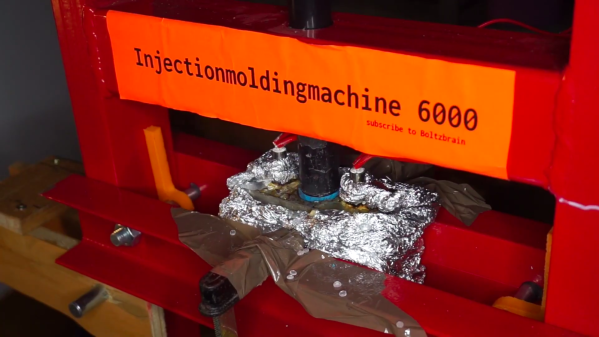
While 3D printing has now become easily accessible and cheap, there are still several use cases where you need the advantages offered by injection molding, even for small batch runs. Professional small-batch injection molding can be pretty expensive, and buying a manual machine can cost quite a bit. Of course, there are a number of DIY injection molding projects to choose from, but they usually involve a fair amount of tools and labour. [Bolzbrain] wanted to bypass all of the heavy cutting, welding and frame assembly work, so he’s built himself a DIY Injection Molding Press for cheap using an off the shelf, six ton hydraulic press. At final count, he ended up spending about €150 for the machine and another €120 for tools to build the machine. He also managed to locate a cheap, local CNC service that gave him a good deal on machining the Dies. But of course you can’t put a price on the lessons learnt and the satisfaction of having built it by hand.
Choosing the hydraulic press is a great idea as it provides the high pressure needed for the job without the operator having to exert a lot of effort, which is a big drawback with some of the other DIY machines. As a bonus, the structural frame is quite sturdy and well suited for this purpose. The other main part of such a machine is the heated injection block and there are several different ways of doing it. After some amount of studying probable solutions, he decided to build a heated aluminium block through which the plastic granules can be rammed using the hydraulic piston. Heating is provided by a pair of 500W heaters and a type ‘k’ thermocouple does temperature sensing. An industrial PID controller adjusts the block temperature via a solid state relay. Overall, the electrical and mechanical layout cannot get any simpler.
[Bolzbrain] did a great job of documenting his build over a series of videos and more wizened hackers watching them will squirm in their seats spotting the numerous fails. He bought the cheapest pedestal drill machine that he could buy and watching the drill struggle while making a 26mm hole in the aluminium block is quite jarring.
The electrical wiring has a lot of scope for improvement – with 220V AC heaters, exposed wiring and jury rigged panel held up with a pair of clamps. Installing and removing the die is a task and requires a lot of fiddling with several C-clamps — something which needs to be repeated for every shot. Maybe toggle clamps could help him to ease die fixing and removal. Once he figures out about mold release agents and wall draft angles, he won’t have to struggle trying to remove the molded article from the die. Then there’s the issue of proper runner design so that the thermo-plastic can quickly fill the mold cavity completely without any pockets.
But in the end, all that matters is that he is getting reasonably good molded parts for his purposes. With more tweaking and incremental improvements, we’re sure he’ll get better results. The video after the break is a short overview of his build, but the project page has a series of detailed videos covering all aspects of the project. And if you’d like to get an introduction to desktop injection molding, check out “Benchtop Injection Molding for the Home Gamer”
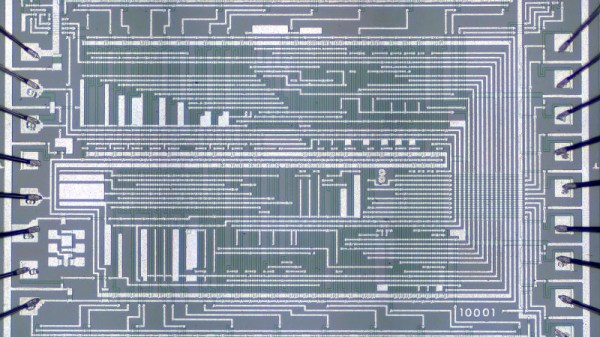
We’ve seen so many explorations of older semiconductors at the hands of [Ken Shirriff], that we know enough to expect a good read when he releases a new one. His latest doesn’t disappoint, as he delves into the workings of one of the first hand-held electronic calculators. The Sharp EL-8 from 1969 had five MOS ICs at its heart, and among them the NRD2256 keyboard/display chip is getting the [Shirriff] treatment with a decapping and thorough reverse engineering.
The basic functions of the chip are explained more easily than might be expected since this is a relatively simple device by later standards. The fascinating part of the dissection comes in the explanation of the technology, first in introducing the reader to PMOS FETs which required a relatively high negative voltage to operate, and then in explaining its use of four-phase logic. We’re used to static logic that holds a state depending upon its inputs, but the technologies of the day all called for an output transistor that would pull unacceptable current for a calculator. Four phase logic solved this by creating dynamic gates using a four-phase clock signal, relying on the an output capacitor in the gate to hold the value. It’s a technology that lose out in the 1970s as later TTL and CMOS variants arrived that did not have the output current drain. Fascinating stuff!
[Ken] gave a talk at the Hackaday Superconference a couple of years ago, if you’ve not seen it then it’s worth a watch.
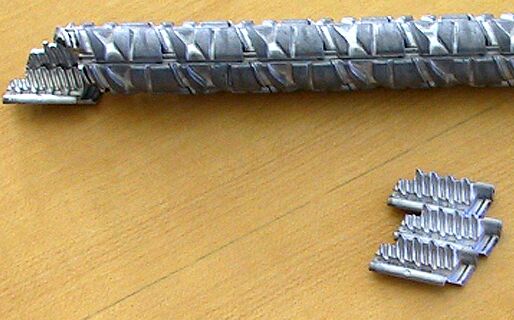
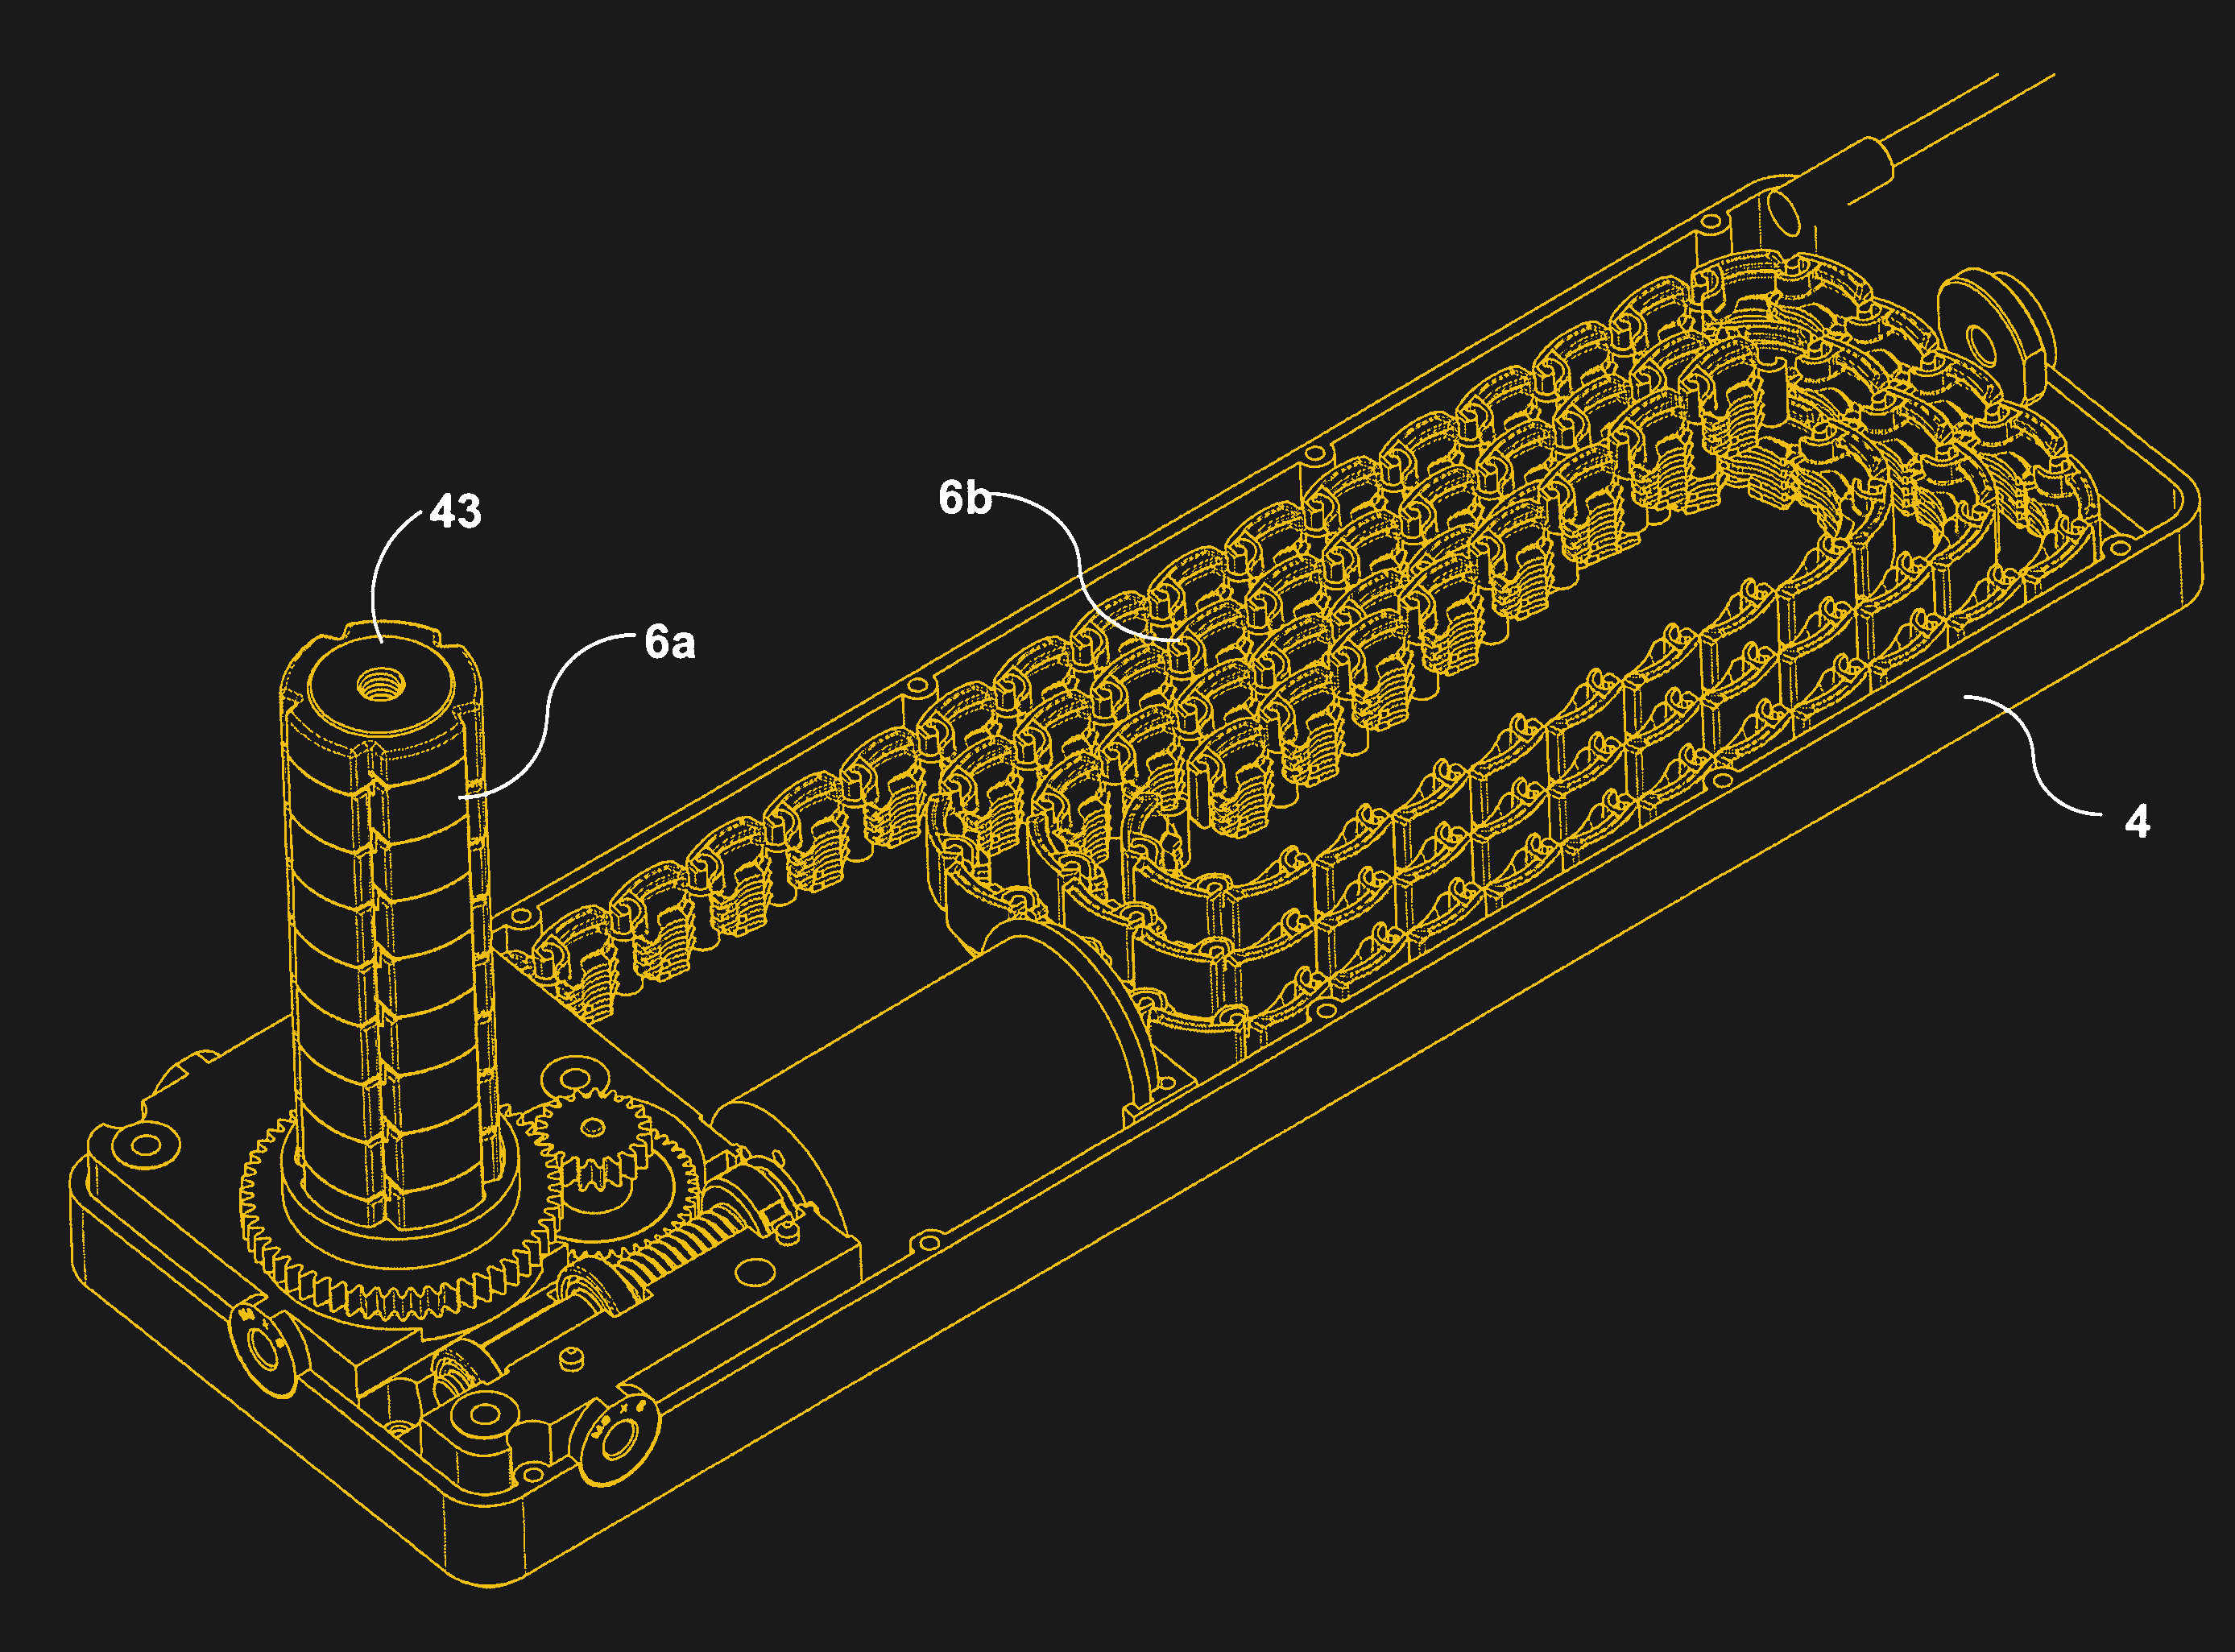
The device, trademarked as the Kataka but generically referred to as a Segmented Spindle, is a compact form of linear actuator that uses a novel belt arrangement to create a device that can reduce to a very small thickness, while crowing to seemingly impossible dimensions when fully extended. This is the key advantage over conventional actuators, which usually retract into a housing of at least the length of the piston.
It’s somewhat magical to watch the device in action, seeing the piston appear “out of nowhere”. Kataka’s youtube channel is now sadly inactive, but contains many videos of the device used in various scenarios, such as lifting chairs and cupboards. We’re impressed with the amount of load the device can support. When used in scissor lifts, it also offers the unique advantage of a flat force/torque curve.
Most records of the device online are roughly a decade old. Though numerous prototypes were made, and a patent was issued, it seems the mechanism never took off or saw mainstream use. We wonder if, with more recognition and the advent of 3D printing, we might see the design crop up in the odd maker project.
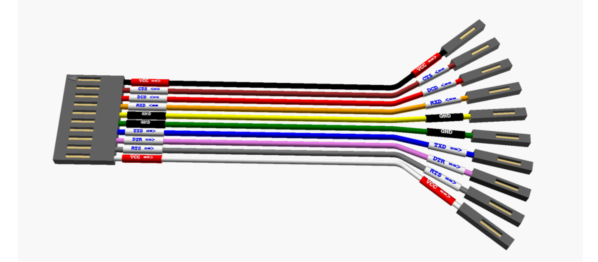
Every hacker has an assortment of USB to TTL-serial adapters kicking around in their lab, and we have all been annoyed that each one has a different pinout. You layout a PCB or breadboard for the Sparkfun flavor (GND, CTS, VCC, TXD, RXD, DTR), but when you begin troubleshooting all you can find is a CH340 board (GND, +5V, TXD, RXD, DTR, +3.3V). You have to jumper everything, and it becomes a mess. It wasn’t much better back in the days of RS-232 level signaling, either. While the pinouts were consistent, there were other headaches. Did the connection need a NULL modem adaptor? And if you were unlucky, you might need a DB-25 to DE-9 adaptor, and the really unlucky might need one or more gender changers. Surely there’s a better way.
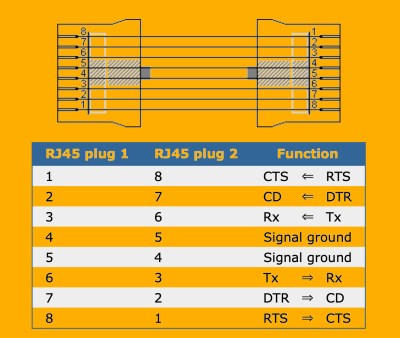
It turns out there was a better way, although it didn’t seem to have become as popular as one might expect. Back in 1987 [Dave Yost] formalized an interconnection scheme using RJ45 plugs and jacks while at Berkeley. The signals were arranged in a mirrored fashion so that each cable is always a crossover — just plug two cables back-to-back if you really need a straight thru connection.
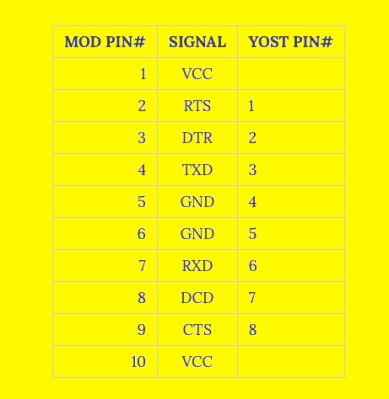
Even though he was dealing with RS-232 serial, nothing prevents us from using this scheme for logic level signaling. For example, consider the following 1×10 header pinout, where the original 8-pins are expanded to 10 to allow for power:
Yost Original Pinout
Example of Modified Yost Pinout
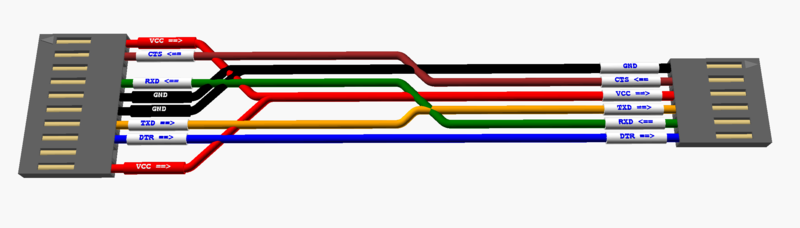
This is an extreme example, and can obviously be shrunk depending on how much handshaking, if any, or power is desired. Such a pinout lets you switch between DCE and DTE by simply flipping the connector around. And if a Dupont-style header slips off too easily in your applications, you could always use an RJ connector. This still doesn’t solve the Tower of Babel pinout problem with the USB-TTL adaptors. But standardizing on a serial pinout such as this for your projects and making cables or kludging your TTL adaptors will make serial debugging less painful.
Yost to Sparkfun Adaptor Cable
Back when he released this scheme in 1987, [Dave] pontificated:
“Maybe one day before the year 2,000, the world will have a new, simple, high-speed, flow-controlled, standard type of connection for point-to-point applications currently using RS-232, with an adaptor available to talk to old, RS-232 equipment.”
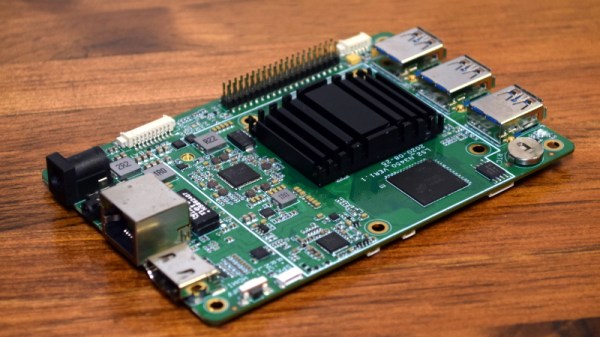
From the old Gumstix boards to everyone’s favorite Raspberry Pi, common single-board computers (SBCs) have traditionally had at least one thing in common: an ARM processor. But that’s not to say hackers and makers haven’t been interested in an SBC with a proper x86 processor. Which is why the $99 Hackboard 2 is so exciting. With a modern x86 chip at the core it’s akin to a small footprint desktop motherboard, but with all the extra features that we’ve come to expect in a hacker-friendly SBC.
So what’s the big deal? In a word, compatibility. The fact that these diminutive computing devices shied away from the x86 architecture that most of us have been using on our desktops and laptops since the 1980s originally introduced software compatibility issues, but this was largely outweighed by the advantages of ARM. The latest NVIDIA Jetson is running on an ARM chip for the same reason the smartphone in your pocket is: they’re smaller, cheaper, and more energy efficient than x86.
However they’re rarely more powerful. Even the latest and greatest Raspberry Pi 4, often touted as a viable desktop replacement thanks to its quad core Cortex-A72, will get absolutely trounced by the pokiest of Intel’s Celeron CPUs. The performance gap is just too great. While the Pi can admirably handle most of the tasks the hacker community asks of it, there will always be a call for a board that puts raw processing power before anything else.
Sucking down nearly 40 watts at full tilt, the Hackboard 2 isn’t the SBC you’d want to use for a solar powered weather station. But if you’re putting together a set top box to play back video and run the occasional emulator, its Celeron N4020 processor and Intel UHD 600 GPU represent the most powerful combination available for a device of this size.
These days, we’re blessed with cellular data networks that span great swathes of the Earth. By and large, they’re used to watch TV shows and argue with strangers online. However, they’re also a great tool to use to interact with hardware in remote locations, particularly mobile ones where a wired connection is impractical.
In this series, we’re taking a look at tips and tricks for doing remote cellular admin the right way. First things first, you’ll need a data connection – so let’s look at choosing a modem.
Options Abound
When shopping around for cellular data modems, it can be difficult to wade through the variety of options out there and find something fit for purpose. Modems in this space are often marketed for very specific use cases; at the consumer level, many are designed to be a no-fuss home broadband solution, while in the commercial space, they’re aimed primarily to provide free WiFi for restaurants and cafes. For use in remote admin, the presence of certain features can be critical, so it pays to do your research before spending your hard earned money. We’ve laid out some of the common options below.
Consumer Models
The Sierra Aircard 320U is ancient now, with limited frequency bands available. Its flimsy flexible connector is also a drawback. However, its ease of configuration with Linux systems makes it a dream to use in remote access situations. Unlike many others, it acts as a Direct IP connection, not appearing as a separate router.
Many telecommunications providers around the world sell cheap USB dongles for connecting to the Internet, with these first becoming popular with the rise of 3G. They’re somewhat less common now in the 5G era, with the market shifting more towards WiFi-enabled devices that share internet among several users. These devices can often be had for under $50, and used on prepaid and contract data plans.
These devices are often the first stop for the budding enthusiast building a project that needs remote admin over the cellular network. However, they come with certain caveats that can make them less attractive for this use. Aimed at home users, they are often heavily locked down with firmware that provides minimal configuration options. They’re generally unable to be set up for port forwarding, even if you can convince your telco to give you a real IP instead of carrier-grade NAT. Worse, many appear to the host computer as a router themselves, adding another layer of NAT that can further complicate things. Perhaps most frustratingly, with these telco-delivered modems, the model number printed on the box is often not a great guide as to what you’re getting.
A perfect example is the Huawei E8327. This comes in a huge number of sub-models, with various versions of the modem operating in different routing modes, on different bands, and some even omitting major features like external antenna connectors. Often, it’s impossible to know exactly what features the device has until you open the box and strip the cover off, at which point you’re unable to return the device for your money back.
All is not lost, however. The use of VPNs can help get around NAT issues, and for the more adventurous, some models even have custom firmware available on the deeper, darker forums on the web. For the truly cash strapped, they’re a viable option for those willing to deal with the inevitable headaches. There are generally some modems that stand out over others in this space for configurability and ease of use. This writer has had great success with a now-aging Sierra Aircard 320U, while others have found luck with the Huawei E3372-607. As per earlier warnings though, you don’t want to accidentally end up with an E3372-608 – thar be dragons.