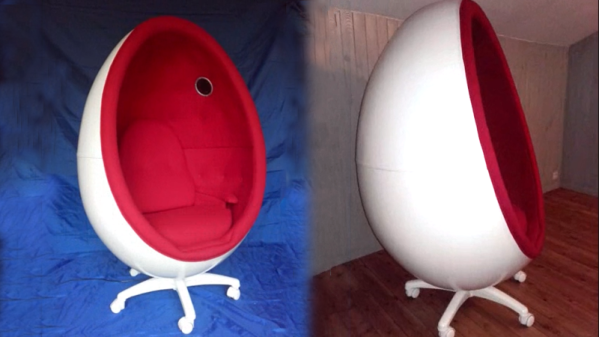
Speech recognition to control a faucet

Talk To The Faucet

Your hands are filthy from working on your latest project and you need to run the water to wash them. But you don’t want to get the taps filthy too. Wouldn’t it be nice if you could just tell them to turn on hot, or cold? Or if the water’s too cold, you could tell them to make it warmer. [Vije Miller] did just that, he added servo motors to his kitchen tap and enlisted an AI to interpret his voice commands.

Look closely at the photo and you can guess that he started with a single-lever type of tap, the kind which can be worked with an elbow, so this project was probably just for fun and judging by his video below, he does have a sense of humor. But the idea is practical for dual taps with rotating knobs. He did realize, however, that in future versions he should move the servo motor openings from the top plate to the bottom instead, to avoid any water getting in. A NodeMCU ESP8266 ESP-12E board serves for communicating with the speech recognition side but other than the name, JacobAI, he’s keeping the speech part to himself. We secretly suspect that he has a friend named Jacob.

However, we can think of a number of options for it such as DeepSpeech and Wit.ai which we covered when talking about natural language phone bots, and the ubiquitous Alexa as used here with another NodeMCU for turning on Christmas tree lights.

Continue reading “Talk To The Faucet”

Raspberry Pi As 433 MHz To MQTT Gateway

Many low-cost wireless temperature and humidity sensors use a 433 MHz transmitter to send data back to their base stations. This is a great choice for the manufacturer of said devices because it’s simple and the radios are cheap, but it does limit what we as the consumer can do with it a bit. Generally speaking, you won’t be reading data from these sensors on your computer unless you’ve got an SDR device and some experience with GNU Radio and reading the Nexus protocol.

But [Aquaticus] has developed a very comprehensive piece of software that should make integrating these type of sensors into your home automation system much easier, as long as you’ve got a spare Raspberry Pi lying around. Called nexus433, it uses a cheap 433 MHz receiver connected to the Pi’s GPIO pins to receive data from environmental sensors using the popular Nexus communication protocol. A few known compatible sensors are listed in the project documentation, one of which can be had for as little as $5 USD shipped.

In addition to publishing the temperature, humidity, and battery level values from the sensors to MQTT, it even tracks connection quality for each individual sensor and when they go on and offline. To be sure, this is no simple hack. In nexus433, [Aquaticus] has created a mature Linux service with enough flexibility that you shouldn’t have any problems working it into your automation setup, whether it’s Home Assistant or something you’ve put together yourself.

We’ve seen a number of home automation hacks using these ubiquitous 433 MHz radios,  from controlling them with an ESP8266 to hacking a popular TP-LINK router into a low-cost home automation hub.

Air Conditioner Remote Reverse Engineered Despite Esoteric Protocol

Infra-red remote control is something of a Done Deal when it comes to hardware hacking, it has been comprehensively reverse engineered, and there exist libraries and software packages to seamlessly take care of all its quirks. Just occasionally though, along comes an IR remote whose protocol doesn’t follow that well-worn path

[William Dudley] found himself in this position with an air-conditioning unit remote control. He found it sent a stream of data with all settings of the machine rather than the single command codes you might expect from a familiar TV remote. The solution was to reverse engineer and reimplement the IR codes.

His reverse engineering relied on an Arduino and IR receiver which he used to sniff the packets coming out of the remote. Eventually he was able to recognise some of the functions from the remote, and create his own protocol that can recreate most of the remote’s functions. This was pushed over to a Raspberry Pi Zero which uses an IR LED to command the air conditioner, joining the ranks of his growing home automation setup.

The write-up makes for a fascinating primer on analysis of obscure IR protocols, and is well worth a read for anybody with an interest in the topic. Meanwhile if you want more IR reverse engineering stories, try this tale of a bathroom scale.

What’s Behind The Door? An IoT Light Switch

We’re not sure who designed [Max Glenister]’s place, but they had some strange ideas about interior door positioning. The door to his office is right next to a corner, yet it opens into the room instead of toward the wall. Well, that issue’s been taken care of. But the architect and the electrician got the last laugh, because now the light switch is blocked by the open door.

Folks, this is the stuff that IoT is made for. [Max] here solved one problem, and another sprang up in its place. What better reason for your maiden voyage into the cloud than a terrible inconvenience? He studied up on IoT servo-controlled light switching, but found that most of the precedent deals with protruding American switches rather than the rockers that light up the UK. [Max] got what he needed, though. Now he controls the light with a simple software slider on his phone. It uses the Blynk platform to send servo rotation commands to a NodeMCU, which moves the servo horn enough to work the switch. It’s simple, non-intrusive, and it doesn’t involve messing with mains electricity.

His plan was to design a new light switch cover with mounting brackets for the board and servo that screws into the existing holes. That worked out pretty well, but the weight of the beefy servo forced [Max] to use a bit of Gorilla tape for support. He’s currently dreaming up ways to make the next version easily detachable.

Got those protruding American switches? [Suyash] shed light on that problem a while back.

ESP8266 Internet Controlled LED Dimmer

There’s no shortage of debate about the “Internet of Things”, largely centered on security and questions about how much anyone really needs to be able to turn on their porch light from the other side of the planet. But while many of us are still wrestling with the realistic application of IoT gadgets, there’s undoubtedly those among us who have found ways to put this technology to work for them.

One such IoT devotee is [Sasa Karanovic], who writes in to tell us about his very impressive custom IoT LED dimmer based on the ESP8266. Rather than rely on a commercial lighting controller, he’s designed his own hardware and software to meet his specific needs. With the LED strips now controllable by any device on his network, he’s started working on Python scripts which can detect what he’s doing on his computer and react accordingly. For example, if he’s watching a movie the lights will automatically dim, and come back up when he’s done.

[Sasa] has provided all the files necessary to follow in his footsteps, from the Gerber files for his PCB to the Arduino code he’s running on the ESP. The source code is especially worth checking out, as he’s worked in a lot of niceties that we don’t always see with DIY projects. From making sure the ESP8266 gets a resolvable DNS hostname on the network to using websockets which update all connected clients with status info in real-time, he’s really put a lot of work into making the experience as complete as possible.

He’s explains in his blog post what needs to be edited to put this code to work in your own environment, and there’s even some descriptive comments in the code and a helpful debug mode so you can see how everything works. It’s always a good idea to consider that somebody else down the road might be using your code; taking a few minutes to make things clear can save them hours of stumbling around in the dark.

If you need more inspiration for your ESP8266 lighting project, check out this ambient lighting controller for a kid’s room, or this professional under-cabinet lighting controller.

IoT Solar Pool Heating

A backyard swimming pool can be a great place to take a refreshing dip on a summer’s day. It can also be a place to freeze your giblets off if the sun has been hiding for even a few hours. That can make pools an iffy proposition unless they’re heated, and that starts to get really expensive in terms of upfront costs and ongoing charges for fuel or power. Unless you put the sun and the IoT to work for pool-heating needs.

Preferences vary, of course, but [Martin Harizanov] and his family clearly like their swims on the warm side. With nobody using the pool when it was below 25°C (77°F), [Martin] picked up a few bits to harness the sun to warm the water. Loops of PVC lawn irrigation tubing were tossed onto a shed roof with a favorable solar aspect and connected to the pool with a length of garden hose. The black thin-wall tubing is perfect for capturing the sun’s energy, and 200 meters of the stuff can really heat things up fast. A small pump is controlled by a microcontroller — it’s not explicitly stated but we suspect it’s a Raspberry Pi — with a pair of temperature sensors to sample the water in the pool and in the heating loop. Metrics are gathered and logged by Emoncms, an open source energy monitoring app. [Martin] says he’s harvesting about 10 kW from the sun on a good day, and that the pool water in the heating loop has gotten up to a steamy 55°C (131°F) without any other energy inputs other than the pump.

Plenty of others have made the leap to solar for pool season extension, with designs from the simple to the more complex. And if you live where the sun doesn’t shine, there’s always a compost water heater.

Give The Clapper A Hand

While “The Clapper” probably first conjures images of low-budget commercials, it was still a useful way to remotely switch lights and other things around the house. But if the lights you want to switch weren’t plugged into the wall, like a ceiling fan, for example, The Clapper was not going to help you. To add some functionality to this infamous device, [Robin] built one from scratch that has all the extra features built in that you could ever want.

First, the new Clapper attaches to the light switch directly, favoring mechanical action of the switch itself rather than an electromechanical relay which requires wiring. With this setup, it would be easy to install even if you rent an apartment and can’t do things like rewire outlets and it has the advantage of being able to switch any device, even if it doesn’t plug into the wall. There’s also a built-in microphone to listen for claps, but since it’s open-source you could program it to actuate the switch when it hears any sound. It also includes the ability to be wired in to a home automation system as well.

If the reason you’ve stayed out of the home automation game is that you live in a rental and can’t make the necessary modifications to your home, [Robin]’s Clapper might be just the thing you need to finally automate your living space. All the files are available on the project site, including the 3D printing plans and the project code. Once you get started in home automation, though, there’s a lot more you can do with it.

Continue reading “Give The Clapper A Hand”