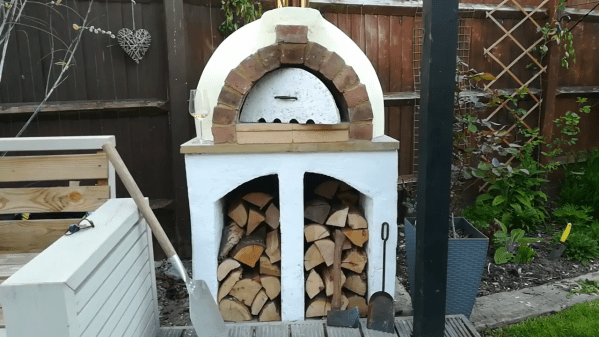
Preserved Lemons On A Hacker’s Budget

“If you wish to make an apple pie from scratch, you must first invent the universe.” [Carl Sagan]. If you wish to make preserved lemons the same way as [Uri Tuchman], you have to start with that mentality. Video also below. The recipe for [Uri]’s preserved lemons involves two ingredients see sea salt, and sliced lemons, but we don’t expect you came here looking for a recipe and the food is less important than the journey.

Recipes take for granted that we have all the necessary utensils on hand, but what if you are missing one? What if you are missing all of them? Life’s lemons won’t get the best of us, and if we’re utensil-poor and tool-rich we will make those lemons regret trying to take a bite out of us. The first fixture for cutting lemons is a cutting board, then a knife, and finally an airtight container. We see him make all of them from stock material by hand. Does that seem like a lot of work? You forgot that if you’re going to eat up, you’ll need a serving platter and fork. If he ever opens a restaurant, don’t expect it to be fast food.

Maybe humans will only need one tool in the kitchen someday but at least one cat receives food from a single silicone-brained tool.

Continue reading “Preserved Lemons On A Hacker’s Budget”

A New KiCAD Tutorial Hits The Scene

KiCAD has a rightfully earned image problem regarding beginners. The shiny new version 5 has improved things (and we’re very excited for v6!) but the tool is a bit obtuse even when coming from a electronics design background, so we’re always excited to see new learning material. [Mike Watts] is the latest to join the esteemed group of people willing to export their knowledge with his KiCAD tutorial series on GitHub that takes the aspiring user from schematic through fab and assembly.

The tutorial is focused around the process of creating a development board for the dimuitive Microchip née Atmel ATSAMD10 Cortex M0 ARM CPU. It opens by asking the reader to create a schematic and proceeds to teach by directing them to perform certain actions then explaining what’s going on and which shortcuts can accelerate things. This method continues through layout, manufacturing, and assembly.

Of note is that when defining the board outline [Mike] describes how to use OpenSCAD to parametrically define it; a neat micro-tutorial on using the two great tools to compliment each other. We also love that upon successful completion of the tutorial series the user will have developed a tiny but useful development board that can be assembled for about $3 in single quantities!

As with all open source work, if you have quibbles or want to contribute open a pull request and give [Mike] a hand!

Make Your Own SPL DB Meter With A Microphone And MCU

Measuring equipment such as SPL (Sound Pressure Level) decibel meters may seem daunting, but this article by [Shawon M. Shahryiar] shows that making your own need only have two essential ingredients: a microphone and a microcontroller. Obviously the microphone is for measuring the sound pressure level, and its output is then fed into the ADC of the microcontroller which does some math before sending the result to a display.

[Shawon] runs through all of the theory behind the calculations that have to be performed, before showing the C code that runs on the PIC18F242 8-bit MCU targeted by the prototype setup. The display is a graphical LCD type, capable of displaying the text with values as well as bar graphs indicating the measured levels. For the measurements themselves, the RMS value is taken of 16 ADC samples while the algorithm takes into account the specifications of the Seeed-sourced microphone module, specifically its average 50 dB sensitivity rating.

Although a full schematic is not provided, the essentials are all there for anyone to build their own SPL dB meter using virtually any microphone and MCU with built-in ADC. As the article also notes, opting for a higher quality microphone will yield better result and of course a faster MCU will offer more options, including FFT processing. Since the code itself is fairly basic, it should be easy enough to port it to an ARM-based MCU, which would allow one to use for example a TFT LCD.

Take a peek after the break for a video of the article’s SPL dB meter in action.

Continue reading “Make Your Own SPL DB Meter With A Microphone And MCU”

Making Flexible Overmolded Parts With Urethane Resin

Resin casting videos have taken social media by storm of late. Everything from inlaid driftwood tables to fancy pens are getting the treatment. Pouring some nicely colored epoxy is straightforward enough, but it’s just the tip of the iceberg. [Eric Strebel] has some serious skills in resin casting, and has lately been working on some overmolded electroniics with urethane resin (Youtube link, embedded below).

The build starts with the creation of a silicone mold, using a 3D printed SLA master. The part in question is for a prototype medical device, and requires overmolding, in which a flexible PCB is covered in flexible urethane. Wooden pins are used to allow the flexible PCB to clip into the mold for accurate location, and a small shield is placed over the metal contacts of the PCB to avoid them being covered in silicone.

Initial tests are done with an empty mold to determine the correct material to use, before the actual parts are ready to produce. [Eric] takes great care with the final production, as any mistakes would waste the expensive prototype PCBs provided to him by the client. With the electronics placed in the mold, the resin is degassed and carefully injected, using a syringe to minimise the chance of any air bubbles. With some delicate cleanup by hand, the completed parts are ready for delivery.

It’s a process that covers the basics of overmolding for a prototype part, as well as showing off [Eric]’s skill at producing quality prototype parts. We’ve seen [Eric]’s work before, too – like his discussion of the value of cardboard in product design. Video after the break.

Continue reading “Making Flexible Overmolded Parts With Urethane Resin”

Blacksmithing For The Uninitiated: Curves And Rings

You know the funny looking side of the anvil? That’s where the best curves come from. It’s called the anvil horn and is the blacksmith’s friend when bending steel and shaping it into curves.

The principle of bending a piece of steel stock is very easy to understand. Heat it up to temperature, and hammer it over a curved profile to the intended shape. A gentler touch is required than when you are shaping metal. That’s because the intent is to bend the metal rather than deform. Let’s take a look!

Continue reading “Blacksmithing For The Uninitiated: Curves And Rings”

Getting MIDI Under Control

When [Mr. Sobolak] started his DIY Midi Fighter he already had experience with the MIDI protocol, and because it is only natural once you have mastered something to expand on the success and build something more impressive, more useful, and more button-y. He is far from rare in this regard. More buttons mean more than extra mounting holes, for example an Arduino’s I/O will fill up quickly as potentiometers hog precious analog inputs and button arrays take digital ones. Multiplexing came to the rescue, a logic-based way to monitor or control more devices, in contrast to the serial protocols used by an IO expander.

Multiplexing was not in [Mr. Sobolak]’s repertoire, but it was a fitting time to learn and who doesn’t love acquiring a new skill by improving upon a past project? All the buttons were easy enough to mount but keeping the wires tidy was not in the scope of this project, so if you have a weak stomach when it comes to a “bird’s nest” on the underside you may want to look away and think of something neat. Regardless of how well-groomed the wires are, the system works and you can listen to a demo after the break. Perhaps the tangle of copper beneath serves a purpose as it buoys the board up in lieu of an enclosure.

We are looking forward to the exciting new versions where more solutions are exercised, but sometimes, you just have to tackle a problem with the tools you have, like when the code won’t compile with the MIDI and NeoPixel libraries together so he adds an Uno to take care of the LEDs. Is it the most elegant? No. Did it get the job done? Yes, and if you don’t flip over the board, you would not even know.

Continue reading “Getting MIDI Under Control”

E-Book Reader Gets Page Turn Buttons, Is None The Wiser

Most e-book readers don’t have physical page turn buttons. Why? They just don’t. Virtual page turns are accomplished with a tap at a screen edge. Determined to reduce the awkwardness of one-handed use, [Sagar Vaze] modified a Kobo e-reader with two physical page turn buttons as a weekend project.

[Sagar] points out that since the underlying OS of the Kobo device is Linux, it is possible to fake touches to the screen (and therefore trigger page turns) by recording then replaying the appropriate input event. However, there was a more direct solution available to those willing to tamper slightly with the hardware. Touch sensing on the screen is done via an infrared break-beam system. Along two edges of the screen are IR emitters, and opposite the emitters are receivers. Broadly speaking, when a fingertip touches the display a minimum of two IR beams are broken, and the physical location of the fingertip can therefore be determined by analyzing exactly how the IR pattern has been changed.

To spoof page turns, [Sagar] briefly shorts two IR emitters: one on each axis. The sudden winking out of the IR is interpreted by the device as a crisp tap, and the device obediently turns the page. The only hitch is that both IR emitters must be shorted at the same time. If one is shorted before the other, the device ignores it. Double-pole switches would probably do the trick, but with the part bin coming up empty in that respect, [Sagar] instead used a few transistors to accomplish the same thing. A 3D printed enclosure rounds out the whole mod, and a brief video is embedded below.

Continue reading “E-Book Reader Gets Page Turn Buttons, Is None The Wiser”