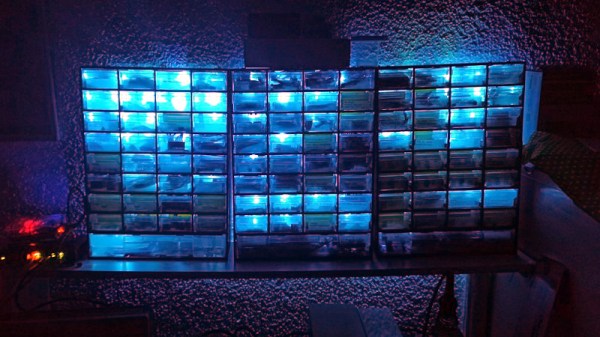
COB LED Teardown

[Big Clive] picked up some chip-on-board (COB) LEDs meant for hydroponics that were very unusual and set out to examine them on video. Despite damaging the board almost right away, he managed to do some testing on these arrays and you can see the results in the video below. He also compares it to older LED modules.

The 144 LEDs produce a lot of light. In addition to powering the device up, he also looks at the construction of the LEDs under a magnification, comparing the older style that used tiny bond wires to make connections versus the new version soldered on the board directly.

Continue reading “COB LED Teardown”

The Empire Strikes Back With The ESP8266

Like many of us, [Matthew Wentworth] is always looking for a reason to build something. So when he found a 3D model of the “DF.9” laser turret from The Empire Strikes Back intended for Star Wars board games on Thingiverse, he decided it was a perfect excuse opportunity to not only try his hand at remixing an existing 3D design, but adding electronics to it to create something interactive.

As the model was originally intended for a board game, it was obviously quite small. So the first order of business was scaling everything up to twice the original dimensions. As [Matthew] notes, the fact that it still looks so good when expanded by such a large degree is a credit to how detailed the original model is. Once blown up to more useful proportions, he modified the head of the turret as well as the barrel to accept the electronics he planned on grafting into the model.

He created a mount for a standard nine gram servo inside the head of the turret which allows it to rotate, and the barrel got an LED stuck in the end. Both of which are controlled with a NodeMCU ESP8266 development board, allowing [Matthew] to control the direction and intensity of the pew-pew over WiFi. He mentions that in the future he would like to add sound effects that are synchronized to the turret rotation and LED blinking.

For the software side of the project, he used Blynk to quickly build a smartphone interface for the turret. This is the first time he had used Blynk, and reports that outside of a little trial and error, it was some of the easiest code he’s ever written for the Arduino. This is a sentiment we’ve been seeing a lot of recently towards Blynk, and it’s interesting to see how often it shows up in ESP8266 projects now.

Looking ahead [Matthew] says he wants to paint and detail the turret, as the bright orange color scheme probably wouldn’t do terribly well on Hoth. If he can manage the time, he’d also like to add it to the long list of OpenCV-powered turrets that hackers love harassing their friends and family with.

Continue reading “The Empire Strikes Back With The ESP8266”

Freeform Wire Frame Tulip Blooms To The Touch

Holidays are always good for setting a deadline for finishing fun projects, and every Valentine’s Day we see projects delivering special one-of-a-kind gifts. Why buy a perishable bulk-grown biological commodity shipped with a large carbon footprint when we can build something special of our own? [Jiří Praus] certainly seemed to think so, his wife will receive a circuit sculpture tulip that blooms when she touches it.

via @jipraus

This project drew from [Jiří]’s experience with aesthetic LED projects. His Arduino-powered snowflake, with LEDs mounted on a custom PCB, is a product available on Tindie. For our recent circuit sculpture contest, his entry is a wire frame variant on his snowflake. This tulip has 7 Adafruit NeoPixel in the center and 30 white SMD LEDs in the petals, which look great. But with the addition of mechanical articulation, this project has raised the bar for all that follow.

We hope [Jiří] will add more details for this project to his Hackaday.io profile. In the meantime, look over his recent Tweets for more details on how this mechanical tulip works. We could see pictures and short videos of details like the wire-and-tube mechanism that allowed all the petals to be actuated by a single servo, and the components that are tidily packaged inside that wooden base.

Need more digital expressions of love? We have no shortage of hearts. Animated LED hearts, illuminated acrylic hearts, and talking hearts. We’re a little short on flower projects, but we do have X-ray of a rose among others to accompany [Jiří]’s tulip.

Continue reading “Freeform Wire Frame Tulip Blooms To The Touch”

This 3D Printed LED Softbox Really Shines

Generally speaking, objects made on desktop 3D printers are pretty small. This is of course no surprise, as filament based printers are fairly slow and most don’t have very large beds to begin with. Most people don’t want to wait days for their project to complete, so they use 3D printed parts where it makes sense and supplement them with more traditional components such as aluminum extrusion wherever possible. But not always…

This 3D printed photography softbox created by [Nicholas Sherlock] doesn’t take the easy way out for anything. With the exception of the LEDs and the electronics to drive them, everything in the design has been printed on his Prusa i3. It wasn’t the easiest or fastest way to do it, but it’s hard to argue with the end result. Perhaps even more impressive than the final product is what it took to get there: he actually had to develop a completely new style of part infill he’s calling “Scattered Rectilinear” to pull it off.

Overall the design of the light itself isn’t that complex, ultimately it’s just a box with some LEDs mounted at the back and a pretty simple circuit to control their intensity. The critics will say he could have just used a cardboard box, or maybe wood if he wanted something a little bit stronger. But the point of this project was never the box itself, or the LEDs inside it. It’s all about the diffuser.

[Nicholas] forked Prusa’s version of Slic3r to add in his “Scattered Rectilinear” infill pattern, which is specifically designed to avoid the standard “ribs” inside of a 3D printed object. This is accomplished with randomized straight infill passes, rather than the traditionally overlapped ones. The inside of the print looks very reminiscent of fiberglass mat, which is perhaps the best way to conceptualize its construction. In terms of the final part strength, this infill is abysmal. But on the plus side, the light from the LEDs passing through it emerges with a soft pleasing look that completely obscures the individual points of light.

Anyone with a big enough 3D printer can run off their own copy of his light, as [Nicholas] has released not only his forked version of Slic3r but all of the STL files for the individual components. He’s also put together an exceptionally well documented Thingiverse page that has instructions and detailed build photos, something that’s unfortunately very rare for that platform.

If you’re in the market for a DIY softbox and don’t have a 3D printer handy, fear not. We’ve covered a few that you can build with more traditional methods, as well as several tips and tricks which you can use to get the most out of your photos and videos.

3D Printed Diffusers Make More Natural Light

A strip of LEDs may be a simple and flexible way to add light to a project, but they don’t always look natural.  There is an easy way to make them look better, though: add a diffuser. That’s what [Nate Damen] did using a 3D printer. He created a diffuser using PETG giving a standard string of LEDs a softer and more natural look that makes them look more like older light sources such as fluorescent strips or EL wire, but with the flexible colors of LEDs. The PETG material he used has a naturally somewhat cloudy look, so it acts as a diffuser without needing any extra treatment.

Continue reading “3D Printed Diffusers Make More Natural Light”

Modernizing A Soviet-era LED Matrix

Used in everything from calculators to military hardware, the 3LS363A is an interesting piece of vintage hardware. With a resolution of 5 x 7 (plus a decimal point), the Soviet-made displays contain no electronics and are simply an array of 36 green LEDs. It’s not hard to drive one of them in a pinch, but [Dmitry Grinberg] thought this classic device deserved a bit better than the minimum.

He’s developed a small board that sits behind the 3LS363A and allows you to control it over I2C for a much more modern experience when working with these vintage displays. Powered by the ATtiny406, his adapter board makes it easy to chain the modules together and even handles niceties like flipping the displayed image to account for different mounting positions. While most of us probably won’t have the chance to play around with these relatively rare displays, there’s still plenty of useful information here if you’re thinking of creating your own I2C gadgets.

In his write-up, [Dmitry] explains his rationale behind the design and some of the quirks of working with the display. For example he explains how he gave each column of the display its own FET, but to save space on the board ended up running the single decimal point (technically its own column) directly off of a spare GPIO pin. Relying on the low duty cycle, he even left current limiting resistors off the design. The end result is a tiny board that keeps the same footprint of the 3LS363A itself.

[Dmitry] went all out with developing the firmware for his new “smart” 3LS363A displays, and has written up documentation for the different commands he has implemented. From re-configuring the I2C address to updating the firmware, he’s made sure no stone was left unturned for this project. We’re not ones to shy away from a quick and dirty code, but it’s always nice to see when somebody has really put some thought into the software side of a project.

We’ve seen our fair share of oddball Soviet displays here at Hackaday, utilizing everything from heavy duty incandescent bulbs to remarkably tiny “intelligent” LEDs. While it’s unlikely any of them will dethrone the nixie as king of the retro display devices, it’s always interesting to see unusual hardware being used in the wild.

What Happened To The 100,000-Hour LED Bulbs?

Early adopters of LED lighting will remember 50,000 hour or even 100,000 hour lifetime ratings printed on the box. But during a recent trip to the hardware store the longest advertised lifetime I found was 25,000 hours. Others claimed only 7,500 or 15,000 hours. And yes, these are brand-name bulbs from Cree and GE.

So, what happened to those 100,000 hour residential LED bulbs? Were the initial estimates just over-optimistic? Was it all marketing hype? Or, did we not know enough about LED aging to predict the true useful life of a bulb?

I put these questions to the test. Join me after the break for some background on the light bulb cartel from the days of incandescent bulbs (not a joke, a cartel controlled the life of your bulbs), and for the destruction of some modern LED bulbs to see why the lifetimes are clocking in a lot lower than the original wave of LED replacements.

Continue reading “What Happened To The 100,000-Hour LED Bulbs?”