Hacking A 30-year-old Russian VFD

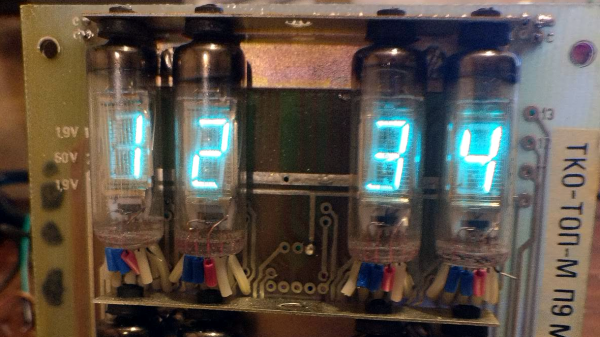
Reddit user [InThePartsBin] found some VFDs (Vacuum Fluorescent Displays) on an old PCB on eBay. The Russian boards date from 1987 and have a bunch of through-hole resistors, transistors and a some mystery ICs, plastic wraps around the legs and the top of the tube is held steady by a rubber grommet (the tip itself goes through a hole in a board mounted perpendicular to the main board.) Being the curious kind of person we like, and seeing the boards weren’t too expensive, he bought some in order to play around with to see if he could bring them back to life.

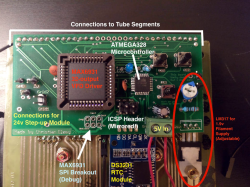
After getting the VFDs lighting up and figuring out the circuitry on the back, [InThePartsBin] decided that a clock was the best thing to build out of it. It was decided that a specialized VFD driver chip was the easiest way to make the thing work, so a MAX6934 was ordered. To give the clock some brains, an ATmega328 was recruited and to keep time, [InThePartsBin] had some DS3231 real-time clock modules left over from a previous project, so they were recruited as well. A daughterboard was designed to sit on the back of the vintage board and hold the ‘328 and the VFD driver chip.

Once [InThePartsBin] soldered on the components it was time to fire it up and send 1’s to the driver to turn on all the segments on all the tubes. Success! The only thing that [InThePartsBin] has left to do is write the code for the clock, but all the segments and tubes are controllable now, so the hardware part is done. There are other VFD clock projects on the site: Check out this one, or this one, and bask in the beautiful steel-blue glow.

Via Reddit.

Tiny Function Generator On The ATtiny85, Complete With OLED

It’s easy to have a soft spot for “mini” yet perfectly functional versions of electronic workbench tools, like [David Johnson-Davies]’s Tiny Function Generator which uses an ATtiny85 to generate different waveforms at up to 5 kHz. It’s complete with a small OLED display to show the waveform and frequency selected. One of the reasons projects like this are great is not only because they tend to show off some software, but because they are great examples of the kind of fantastic possibilities that are open to anyone who wants to develop an idea. For example, it wasn’t all that long ago that OLEDs were exotic beasts. Today, they’re available off the shelf with simple interfaces and sample code.

The Tiny Function Generator uses a method called DDS (Direct Digital Synthesis) on an ATtiny85 microcontroller, which [David] wrote up in an earlier post of his about waveform generation on an ATtiny85. With a few extra components like a rotary encoder and OLED display, the Tiny Function Generator fits on a small breadboard. He goes into detail regarding the waveform generation as well as making big text on the small OLED and reading the rotary encoder reliably. His schematic and source code are both available from his site.

Small but functional microcontroller-based electronic equipment are nifty projects, and other examples include the xprotolab and the AVR-based Transistor Tester (which as a project has evolved into a general purpose part identifier.)

Microgamer Is A Micro:Bit Handheld Console

The BBC micro:bit single board ARM computer aimed at education does not feature as often as many of its competitors  in these pages. It’s not the cheapest of boards, and interfacing to it in all but the most basic of ways calls for a slightly esoteric edge connector. We’re then very pleased to see that edge connector turned from a liability into a feature by [Fabien Chouteau] with his handheld console, he uses micro:bits preprogrammed with different games in the manner of game cartridges in commercial consoles.

The micro:bit sits in its edge connector on the underside of a handheld PCB above a pair of AAA batteries, while on the other side are an OLED display and the usual set of pushbuttons. It’s a particularly simple board as the micro:bit contains all the circuitry required to support its peripherals.

He’s coded the games using the Arduino IDE with a modified version of the Arduboy2 library that allows him to easily port Arduboy games written for Arduino hardware. It’s a work in progress as there are a few more features to incorporate, but the idea of using micro:bits as cartridges is rather special. There is a video of the console in action, which we’ve placed below the break.

Continue reading “Microgamer Is A Micro:Bit Handheld Console”

x86 emulation running DOS on ESP8266

PC-XT Emulator On ESP8266

Do you remember the simpler times when you had a DOS command line, a handful of commands, and you talked to the hardware through a few BIOS and DOS interrupts? Okay, maybe it was a little limited, but nostalgia doesn’t care. Now [mcuhacker] is working on bringing some of those memories back by getting a PC-XT emulator running on an ESP8266.

For the x86 CPU emulator, he ported Fake86 which is written in C, and created an Arduino IDE environment for it. The MS-DOS 3.3 bootdisk image is stored in flash and is accessed as the A: drive. There’s no keyboard yet but he has 640×200 CGA working with 80×25 characters on a 3.5″ TFT display with the help of a low pass filter circuit. In the video below he shows it booting to the point where it asks for the date.

Continue reading “PC-XT Emulator On ESP8266”

Debugging With Serial Print At 5333333 Baud

Debugging with printf is something [StorePeter] has always found super handy, and as a result he’s always been interested in tweaking the process for improvements. This kind of debugging usually has microcontrollers sending messages over a serial port, but in embedded development there isn’t always a hardware UART, or it might already be in use. His preferred method of avoiding those problems is to use a USB to Serial adapter and bit-bang the serial on the microcontroller side. It was during this process that it occurred to [StorePeter] that there was a lot of streamlining he could be doing, and thanks to serial terminal programs that support arbitrary baud rates, he’s reliably sending debug messages over serial at 5.3 Mbit/sec, or 5333333 Baud. His code is available for download from his site, and works perfectly in the Arduino IDE.

The whole thing consists of some simple, easily ported code to implement a bare minimum bit-banged serial communication. This is output only, no feedback, and timing consists of just sending bits as quickly as the CPU can handle, leaving it up to the USB Serial adapter and rest of the world to handle whatever that speed turns out to be. On a 16 MHz AVR, transmitting one bit can be done in three instructions, which comes out to about 5333333 baud or roughly 5.3 Mbit/sec. Set a terminal program to 5333333 baud, and you can get a “Hello world” in about 20 microseconds compared to 1 millisecond at 115200 baud.

He’s got additional tips on using serial print debugging as a process, and he’s done a followup where he stress-tests the reliability of a 5.3 MBit/sec serial stream from an ATMega2560 at 16 MHz in his 3D printer, and found no missed packets. That certainly covers using printf as a debugger, so how about a method of using the debugger as printf?

These Small PCBs Are Made For Model Rocketry

Model rocketry hobbyists are familiar with the need to roll their own solutions when putting high-tech features into rockets, and a desire to include a microcontroller in a rocket while still keeping things flexible and modular is what led [concretedog] to design a system using 22 mm diameter stackable PCBs designed to easily fit inside rocket bodies. The system uses a couple of 2 mm threaded rods for robust mounting and provides an ATTiny85 microcontroller, power control, and an optional small prototyping area. Making self-contained modular sleds that fit easily into rocket bodies (or any tube with a roughly one-inch inner diameter) is much easier as a result.

The original goal was to ease the prototyping of microcontroller-driven functions like delayed ignition or altimeter triggers in small Estes rockets, but [concretedog] felt there were probably other uses for the boards as well and made the design files available on GitHub. (Thanks!)

We have seen stackable PCBs for rocketry before with the amazingly polished M3 Avionics project, but [concretedog]’s design is much more accessible to some hobbyist-level tinkering; especially since the ATTiny85 can be programmed using the Arduino IDE and the boards themselves are just an order from OSH Park away.

[via Dangerous Prototypes Blog]


Microchip Introduces Tiny Cheap Linux Modules

Linux is in everything these days, and that means designers and engineers are crying out for a simple, easy-to-use module that simplifies the design of building a product to do something with Linux. The best example of this product category would probably be the Raspberry Pi Compute Module, followed by the C.H.I.P. Pro and its GR8 module. There are dozens of boards with Allwinner and Mali chips stuffed inside that can be used to build a Linux product, and the ‘BeagleBone on a Chip’ is a fantastic product if you need Linux and want to poke pins really, really fast.

Now Microchip is rolling out with their answer to the Linux System on Module. The SAMA5D2 is a single chip in a BGA package with a small footprint that runs Linux. It’s capable, it’s cheap, and if you want to put Linux in a project, this is your newest option.

The core product in this new Microchip lineup is the SAMA5D2 SIP, a system in package that puts an ARM Cortex-A5 CPU and DDR2 memory in a single BGA package that, with a cursory examination, looks easy enough to design a PCB around and reflow. There are four chips in this lineup, with 128 Mbit, 512 Mbit, and 1 Gbit of DDR2 memory. The 128 Mbit chip is meant for bare metal and RTOS applications, with the higher memory chips capable of running Linux at least as well as a repurposed router.

This chip is at the core of Microchip’s ATSAMA5D2 SOM, a system on module that adds power management (that only requires a single 3.3V supply), an Ethernet PHY, and boot memory into a single package that’s effectively as hand-solderable as a QFN package. It’s Linux on a Chip, or at least as close as we’ve gotten to such a concept.

Adding Linux to a project is hard, and while there are modules and systems that can do it, we’re always welcoming more options given to designers. While these modules and systems aren’t exactly cheap compared to a beefy ARM microcontroller — the SIP starts at around $9, the SOM is available for $39 in 100-unit quantities — this price is quite low compared to other Linux-on-Modules available.