Hackaday Prize 2022: Digital Dice Towers Built In Beautiful Retro Cases

Retro hardware often looks fantastic, but we may find we no longer need it for its original function. [John Anderson] found that to be the case with some old Heathkit gear, and set about giving them a fun overhaul.

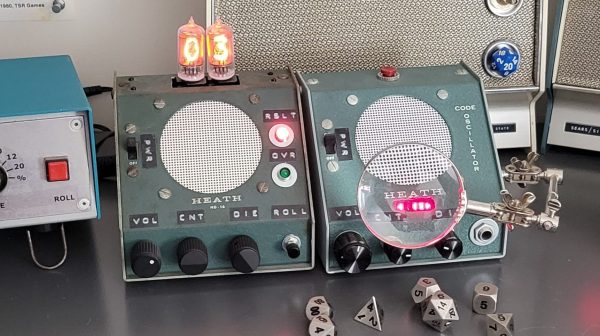
With the help of AVR microcontrollers, the devices have been repurposed into electronic dice towers for playing Dungeons & Dragons. A seed is generated based on the chip’s uptime, and supplied to a pseudorandom number generator that emulates dice rolls. The devices can be configured to roll a variety of dice, including the usual 6, 8, 10, and 20-sided varieties. Plus, they can be set to roll multiple dice at a time — useful when you’re rolling complicated spells and attacks in combat.

[John] has converted a variety of Heathkit devices, from Morse code trainers to digital multi-meters. They provide their beautiful cases and a great retro aesthetic, and we think they’d make fitting table decoration for retro cyberpunk tabletop games, too.

Creating your own electronic dice is a great way to get familiar with programming microcontrollers. Video after the break.

Continue reading “Hackaday Prize 2022: Digital Dice Towers Built In Beautiful Retro Cases”

DOOM Runs On The EMFCamp Tidal Badge

If it’s got a chip and a screen, someone’s trying to run DOOM on it. The latest entry in this fad is from [Phil Ashby], who figured out how to get the game running on the EMFCamp Tidal Badge as seamlessly as possible.

The badge is based on the ESP32-S3. It’s the latest version of the ESP32, which can run the iconic shooter pretty easily. However, [Phil] set himself a trickier challenge. He wanted to port DOOM to the badge while having it remain compatible with the MicroPython platform already on it. Plus, he wanted to be able to distribute it easily with the TiDAL Hatchery, a platform for sharing apps for the badge.

In the end, it took some deft hacking to make the game run on a microcontroller platform that isn’t really set up for running “applications.” It took some tricks to scale the video output and get the colors right, of course, but it’s there and working.

The state of the art is now so advanced that they managed to port DOOM into DOOM so you can DOOM while you DOOM. Video after the break.

Continue reading DOOM Runs On The EMFCamp Tidal Badge”

Tiny Pinball Machine Also Runs X86 Code

As arcades become more and more rare, plenty of pinball enthusiasts are moving these intricate machines to their home collections in basements, garages, and guest rooms. But if you’re not fortunate enough to live in a home that can support a space-intensive hobby like pinball machines, there are some solutions to that problem. This one, for example, fits on the palm of your hand and also happens to run some impressive software for its size.

The machine isn’t a mechanical pinball machine like its larger cousins, though. Its essentially a 3D printed case made to look like a pinball machine with two screens attached. It does have a working plunger for launching the ball and two buttons on the sides for the approximation of authenticity, but it’s actually running Pinball Fantasies — a pinball simulator designed to run on x86 hardware from the 90s. This sports an ESP32 on the inside, which has just enough computing capability to run an x86 emulator that can load these games in DOS.

The game includes haptic feedback and zips along at 60 frames per second, which really brings the pinball experience to its maximum level given the game’s minuscule size. It’s impressive for fitting a lot into a small space, both from physical and software points-of-view. For more full-sized digital pinball builds, take a look at this one which comes exceptionally close to replicating the real thing.

Continue reading “Tiny Pinball Machine Also Runs X86 Code”

Washington, DC Finally Gets Its Own PCB Metro Map

There was a time, not so long ago, when folks who wanted to make their own custom PCBs would have found themselves in the market for a bucket of acid and a second-hand laser printer. These days, all you have to do is click a few buttons in your EDA program of choice and send the files off for fabrication. It’s easy, cheap, and nobody ends up with chemical burns.

This has obviously had a transformative effect on the electronics hobby — when you can place traces on a PCB like an artist using a brush, it’s only a matter of time before you get projects like [Logan Arkema]’s DCTransistor. This open source board uses carefully arranged RGB LEDs to recreate the Washington Metropolitan Area Transit Authority (WMATA) metro map, and thanks to an ESP8266 connected to their API, can display the positions of trains in real-time.

If you’re getting a sense of déjà vu here, it’s not just in your head. We’ve seen similar maps created for other major metropolitan areas, and [Logan] certainly isn’t trying to take credit for the idea. In fact, he was a bit surprised to find that nobody had ever made one for the DC area — so he decided to take on the challenge himself. He reasoned it would be a good way to hone his PCB design skills and become more comfortable with embedded development. We’d say the end result proves his theory correct, and makes one more city that can boast about its IoT cartography.

Looking to hang a DCTransistor on your own wall? [Logan] says he’ll be dropping the board design files and schematics into the project’s GitHub repository soon, and he also plans on selling pre-made boards in the near future.

We covered this London “tube” map back in 2020, and were impressed by the attention to detail that went into similar displays for Tokyo, Singapore, and the San Francisco Bay Area a year later. Perhaps it’s time to map out your own hometown in LEDs?

Embedded Dashboard Definitely Displays Data

Oftentimes, we’ll find ourselves using an PC attached to a project for serial debugging. Other times, we’ll be squinting at a status LED trying to remember the flash code we invented. This embedded dashboard from [hgrodriguez] aims to land somewhere in the middle.

The dashboard features LEDs, several 5×7 matrix displays, and will also mount a small OLED display as well. Everything onboard is driven by an ItsyBitsy board, featuring an Atmega32u4 microcontroller. Data can be fed to the ItsyBitsy via UART, SPI, or eventually, I2C as well.

With the ItsyBitsy handling actually driving the various displays, your project only need send out debug data over one of the listed interfaces. The ItsyBitsy will then display your byte values or word values on the matrix displays, flash the LEDs as required, and so on.

The result is a useful little console that can show you what’s going on in the brain of your microcontroller project. It’s no substitute for a full serial terminal, but it could definitely come in handy when you need to get eyes on a few variables in RAM!

It’s Linux. On An ESP32

By today’s standards, the necessities for running a Linux-based operating system are surprisingly meagre in terms of RAM and processor power. Back in the day we ran earlier Linux versions on Intel 386 and 486 machines with tiny quantities of memory compared to the multi-gigabyte many-core powerhouses we do today.

So it stands to reason that many of the more powerful microcontrollers should also run Linux, but of course they are often unable because the lack a memory management unit. The original ESP32 is just such a candidate, plenty of power but unable to run Linux. Not so fast, because [Dror Gluska] has managed to boot a Linux kernel on Espressif’s dual-core chip. How on earth? By emulating a RISC-V processor on it and booting a RISC-V version of the kernel.

The emulator in question is [Fabrice Belard]’s TinyEMU, a piece of software that brings both RISC-V and x86 to limited-spec platforms, and the write-up describes the extensive optimization and tracing of ESP32 bottlenecks which was finally able to get a Linux kernel booting in 1 minute and 35 seconds. Of course it’s simply an exercise to prove it can be done and we won’t be seeing Linux-based ESP projects any time soon, but it’s still an impressive piece of work.

This isn’t the lowest-spec microcontroller we’ve seen run Linux, back in 2012 we saw it on emulated ARM running on an 8-bit AVR.

One Shot IR Helper Is A Great Beginner Project

Sometimes you need a little utility device to do a very simple job, and do it well.This one-shot IR helper from [Gregory Sanders] is just that. 

[Gregory] had a TV that didn’t support automatically turning on when the power was applied. This is frustrating when you like to leave devices switched hard off when not in use to save on standby energy draw. Thus, there needed to be a way to send the screen an on signal when his multi-monitor setup was powered on.

A simple circuit paired with a Pi Pico was pressed into service. The Pico flashes an IR LED, squirting out the requisite code to tell the TCL branded TV to switch on. [Gregory] figured out the codes by using an Arduino to read the output of the TV’s remote with an IR sensor. The hook here is the code is written in MicroPython, using IR libraries from [Peter Hinch].

Now, when [Gregory] powers up his rig, the IR sender will trigger the TV to switch on. It’s a little frustrating that the auto-on function wasn’t available in the factory, but regardless, now everything’s working as it should. If you want to do this in reverse, consider building a TV-B-Gone or a silencer for the boomboxes used by dancing grandmas!