A pair of RP2040-based USB microphones

Mico Is A USB Microphone Based On A Pi Pico

When [Mahesh Venkitachalam] was experimenting with machine learning for audio applications on a Raspberry Pi, he found himself looking for a simple USB microphone. A cheap one was easy to find, but the sound quality and directionality left much to be desired. A large, studio-quality mic would be overkill, so [Mahesh] decided to simply build exactly what was needed: a compact, yet high-quality USB microphone that he called Mico.

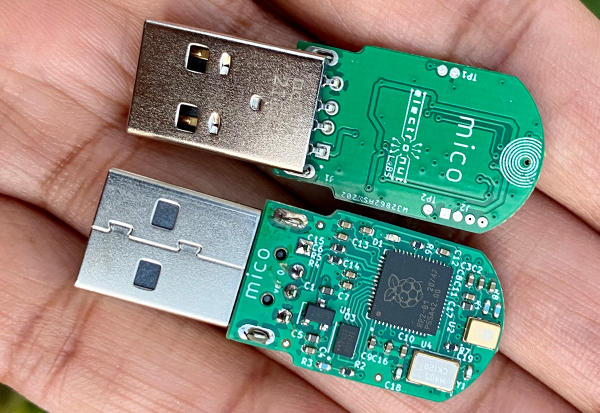
The sensing device is a MEMS microphone that outputs a pulse density modulated (PDM) signal. There are chips available to directly interface such a microphone to a USB port, but [Mahesh] found them difficult to work with and therefore settled on something he knew already: the Raspberry Pi Pico platform. Luckily, someone had already figured out how to read out a microphone and present a USB device to a PC, so all that was needed was to put all the bits together into a convenient form factor.

The great thing about the Pico platform is that its main controller chip, the RP2040, is available as a separate component. [Mahesh] designed a sleek little PCB that holds the RP2040 along with the MEMS microphone and a USB connector. The end result looks tidy enough that it might have come out of a mass-produced gizmo. Those don’t usually come with full schematics and source code, but the Mico does: everything is available on its GitHub page for anyone to re-use and improve.

You can judge the sound quality for yourself in the video embedded below. If you like DIY USB microphones, you’re in luck: we’ve featured one based on an STM32 as well as a beautiful recreation of a studio-quality mic.

Continue reading “Mico Is A USB Microphone Based On A Pi Pico”

WS2812s On A 6502

We can still remember when the WS2812 LED first came into our consciousness, way back in the mists of time. The timing diagrams in the datasheet-of-questionable-veracity made it sound quite tricky, with tight timing tolerances and essentially a high-speed two-bit PWM data protocol at 500 kHz. It was a challenge to bit-bang with an ATtiny85 back then, but there’s no way something as old and crusty as an Apple II would be up to snuff, right?

[Anders Nielsen] took up the challenge of getting the venerable 6502 processor to drive Neopixels and won! After all, if the chip is good enough for Bender and the Terminator T-800, it should be able to blink some colored LEDs, right? The secret sauce is shift registers!

Specifically, [Anders] abuses the 74LS165 parallel-in, serial-out shift register for his dirty work. Instead of bit-banging the WS2812’s “long high is a 1, short high is a 0” signal directly, the first few bits of the shift register are hard-wired to VCC and the last few to GND.

The bits in the middle determine if the pulse shifted out is long or short, and they’re set by the 6502, through a 6522 VIA chip, just like the Apple II would have. Clocking the data out of the shift register handles the timing-critical stuff. Very clever!

Video below the break.

Continue reading “WS2812s On A 6502”

Tiny Switch Ornament Plays GIFs With An ESP32

It constantly amazes us what we hackers can build these days, (electronics shortages aside) we have access to an incredible array of parts, with specifications that only a few years ago would be bank-breaking and longer ago just fantasy. It’s nice to see people building one-offs just for fun, in spite of the current difficulties getting parts to actually be delivered. For example, check out this miniaturized Nintendo Switch created by [scottbez1] that plays animated GIFs from an SD card on tiny 1.14″ LCD display.

Obviously such a diminutive hack requires a custom PCB, which was a job for KiCAD. Armed with a 3D model of the LCD, the casing and PCB outline were drawn using Fusion 360. The PCB hosts a LilyGo ESP32 module for all the heavy lifting, with the WiFi adding some fun future capabilities not yet explored. The design is about as tight as it can get without pushing the limits of the PCB process too far, including a neat trick of sneaking passives inside the body of the SD card! That’s another space-saving idea we’ll be banking.

All-in-all a neat little hack, showing some good modelling and construction techniques and a good looking end result. Code for your reference may be found on the project GitHub, but as of writing the hardware design is not available.

Whilst this project shrinks the Switch, here’s one that goes the other way and super-sizes it, and if you have a switch lite but crave a little modern charging magic, then look no further than this Qi wireless charging hack.

Continue reading “Tiny Switch Ornament Plays GIFs With An ESP32”

Keynote Video: Elecia White Finds Treasure In The Memory Map

If you dig microcontrollers, and you like to dig into how they work, Elecia White wants to help you navigate their innermost secrets with the help of memory map files. In this refreshingly funny, but very deep keynote talk from the 2021 Hackaday Remoticon, Elecia guides us through one of the most intimidating artifacts of compilation — a file that lists where everything is being put in the microcontroller’s memory — and points out landmarks that help to make it more navigable.

And when you need to look into the map file, you probably really need to look into the map file. When your embedded widget mysteriously stops working, memory problems are some of the usual suspects. Maybe you ran out of RAM or flash storage space, maybe you have some odd hard fault and you want to know what part of the program is causing the trouble, or maybe you need to do some speed profiling to make it all run faster. In all of these cases, you get an absolute memory address. What lives there? Look it up in the memory map!

Continue reading “Keynote Video: Elecia White Finds Treasure In The Memory Map”

Google’s T-Rex Game Ported To The ESP32

Most Chrome users will have come across a neat little Easter egg when their Internet connection has gone down – a game known as “T-Rex” where a dinosaur must be jumped over cactii. Whether or not this is accurate in terms of the evolutionary timeline, it’s a bit of fun, and Volos Projects educator [Danko Bertović] decided to port the game to the ESP32.

The game runs on the LILYGO TTGO T-Display development board, which pairs the powerful microcontroller with a 1.14-inch color LCD. His clone goes as far as authentically replicating the “No Internet” page from within Google Chrome, before kicking into the game at the press of a tactile button.

The game is built using a sprite-based engine, which enables gameplay with a minimum of flickering on the screen. Transparency is included to stop the sprites from occluding other screen elements unnecessarily. [Danko] hasn’t yet released a full tutorial on using sprites on the ESP32, but code is available for your own digestion.

It’s not the first time we’ve seen [Danko]’s ESP32 games, as he’s developed a few over the years. Others have gone so far as coding 8-bit emulators for the platform. Video after the break.

Continue reading “Google’s T-Rex Game Ported To The ESP32”

A robotic turret shooting plastic balls at a man

Automated Turret Keeps Dorm Clean, RoboCop Style

Students’ dorm rooms are not generally known to be the most orderly of places. Whether it’s mountains of dishes in the sink, piles of clothes waiting to be washed, or random bits and bobs strewn across the hallway, cleaning up is pretty low on the agenda for many dorm dwellers.

[Luis Marx] seems to have invented a useful solution to his (or his roommates’) sloppiness: a robotic turret that opens fire on anyone who leaves items unattended (video, in German, embedded below). This system uses a set of “clutter sensors” that can be placed in strategic locations around the house and will detect stray objects using ultrasonic sensors. If any are found, the main system is alerted through WiFi. The turret will then search for any persons in its vicinity and start shooting them with little plastic balls.

The turret in question is a beautifully-designed piece of kit made from 3D printed parts and controlled by an ESP32. It can swivel around its axis and tilt up and down using two servos, while its firing mechanism is driven by a DC motor. It tracks its target thanks to a camera-based object sensor that can recognize humans. The whole thing gives us a bit of a RoboCop vibe; we’d half expect it to shout Pick up those clothes. You have twenty seconds to comply.

While this might not be the definitive solution to messy dorm rooms, we like the creative thinking behind it. We’ve seen auto-targeting turrets before, but not in household applications like this. Of course there are plenty of other robots that can help you with domestic tasks.

Continue reading “Automated Turret Keeps Dorm Clean, RoboCop Style”

ESP32 Brings Air Purifier Online With Home Assistant

A lot of hackers are rightfully concerned about the privacy issues that surround many of today’s “smart” gadgets, but it’s hard to argue that the ability to remotely control devices around your home isn’t convenient. Enter self-hosted, open source projects like Home Assistant. This provides the framework for building out a home automation system without having your soul information sold, but as you might expect, you’re going to have to put some effort in to get the most of it.

For example, take a look at this Phillips AC4014 air purifier that [Anton] connected to Home Assistant by way of an ESP32. Rather than getting too bogged down in reverse engineering the purifier’s surprisingly complex internal electronics, he took the easy way out and wired a couple of relays across the power and fan speed buttons; this allows the device to be easily controlled by the microcontroller, without impacting the functionality of the original controls.

But since those front panel controls still work, that meant [Anton] needed a way for the ESP32 to detect the device’s status and report that to Home Assistant so everything stayed in sync. So he looked around on the PCB for a trace that got powered up when the air purifier was up and running, which he connected to a pin of the microcontroller through a transistor. This let’s the firmware determine if the machine is running or not just by checking if the appropriate pin has gone high.

Speaking of the firmware, [Anton] decided to use ESPHome rather than trying to write his own code from scratch. This project allows you to rapidly add new devices to Home Assistant by providing the firmware with a relatively simple YAML configuration file, which he’s provided as an example. In fact, he’s provided quite a lot of examples with this project, down to an annotated image of the PCB that shows where to tap your wires into. He’s done quite a service for anyone who’s got this same model of air purifier.

This unit doesn’t appear to have any capability of actually checking the quality of the air in the room, but we’ve recently seen a low-cost IKEA product that can do exactly that. Even better, it can be easily modified to report its findings over the network using the ESP8266.