When [Michael Wessel] bought his MicroKORG synthesizer/vocoder, he felt less than amused when two years later the MicroKORG S was released, with the ‘S’ standing for ‘sound’, apparently, for the 2+1 speaker system that was added to it. Undeterred, [Michael] figured out that both synthesizers are similar enough that one could likely add a similar speaker system to the original MicroKORG.
The similarities between the two products become apparent when one compares the original with its successor, with the latter seemingly mostly adding said speakers and more presets, along with a snazzy new exterior. (Although the 1970s styling of the original may have more fans.) As the embedded video shows, this mod is fairly clean.
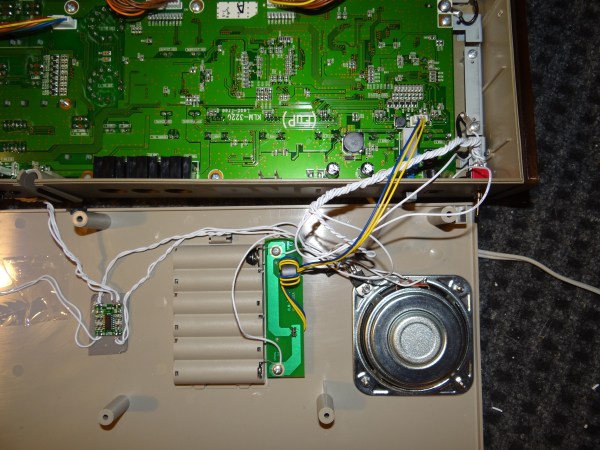
At the core of this mod is a PAM8403-based class D amplifier board. The PAM8403 is a 3 W audio amplifier, originally produced by Power Analog Microelectronics (now Diodes). While not an amazing amplifier, it lends itself well for battery-powered applications like the MicroKORG. Rounding out the build is a 7805 linear regulator to get 5 V for the PAM8403, a few filter capacitors, a switch to turn the speakers on/off, and of course the speakers.
Although there’s quite a bit of space in the enclosure, most speakers tend to be large enough that this can be a bit of a squeeze. [Michael] found some low-profile 20 W full-range speakers that seem to work well for this purpose. To finish wiring this up, all it takes is a hole saw and a way to get the audio output from the MicroKORG.
In this mod, [Michael] opted to get the audio from the output jack on the back, but for a cleaner result it probably could be wired straight into the on-board header.
Continue reading “Turning A MicroKORG Into A MicroKORG S With This Speaker Mod”