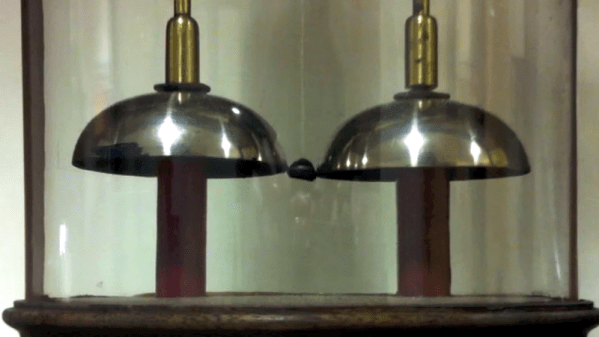
It is good advice to change batteries in your fire alarms at least once a year. Even our low-power LCD calculators need new batteries from time to time. But at the University of Oxford, they have an electric bell that has been ringing essentially non-stop on one set of batteries for about 178 years! Is the energy crisis solved then? Perhaps not. The bells require a high voltage but very little current and the pair of batteries — piles in the parlance of 1840 — have kept the charge flowing for about 10 billion rings. As you can see in the video below, though, the ringing isn’t very vigorous.
How does it work? When you think of converting electrical power to mechanical motion you probably think of a motor, even though there are plenty of other transducers like speakers, muscle wires, and solenoids. Arguably the first device was electrostatic bells that were invented by a Scot named [Andrew Gordon] around 1742. [Ben Franklin] made them famous, though, so they are often called Franklin bells.
Nearly a decade ago my friend [Dru] gave me an unforgettable tour late at night of Stokes Croft, the inner suburb of Bristol known at the time for its counterculture and artistic scene. It’s a place dominated by building-sized graffiti and murals, and it has a particular association with the Bristolian street artist [Banksy]. If you’ve not seen a Banksy in the wild, the place to do it is by Bristol Saturday night street lighting to the sound of passing revelers and traffic on the A38.
[Banksy] is famous aside from his anonymity, for his pranks upon the art world. The (real) elephant in the room or the Dismalland theme park are his stock in trade, and you may have seen another prank of his in the news in the last day. One of his paintings, the 2006 Girl With A Balloon sold at auction for over a million quid, and as the gavel fell a hidden shredder in the picture frame sprang into life and partially shredded the canvas. The report suggests that a number of [Banksy]’s associates were present at the event, and that one of them was detained with a device that might have been a remote control trigger for the shredder. The quote from Sotheby’s Europe head of Contemporary Art, [Alex Branczik] says it all: “We got Banksy’d”.
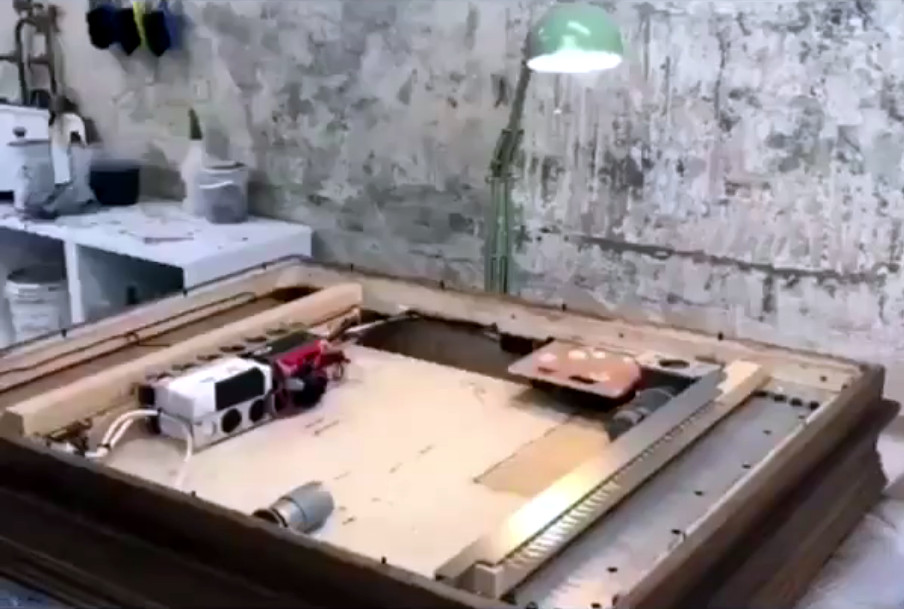
The interior of the Banksy shredder frame, taken from a frame of the video.
[Banksy]’s cool and all that, but where’s the hack? The artist briefly put up a video with a few details, but aside from showing us a row of craft knife blades and a tantalizing but fleeting glimpse of a few equipment enclosures, it’s short on technical details. We can see what appears to be at least one motor, and those white boxes may be batteries, but that’s it.
This hasn’t stopped some fevered speculation as to how the feat was achieved. A home-made shredder would require a significant amount of readily available power, and since this one has seemingly lain undetected within the frame since 2006, that power source needs to have possessed both exceptional energy density and retention. We can’t imagine many consumer grade batteries in 2018 being able to retain a charge for twelve years, so how on earth did he do it? Our best guess is that a primary battery was involved, as anyone who has found a neglected Duracell in a box of electronics from their youth will tell you it’s not unknown for decent quality alkaline cells to live well beyond their shelf lives, and other chemistries are specifically designed with that property in mind. Even so, for the cells to power a receiver circuit in standby for so long would certainly tax their capabilities, so it has also been suggested that a concealed switch could have been flipped by a [Banksy] accomplice during the viewing phase to activate the system. There are still so many unanswered questions that it’s certainly piqued our technical curiosity. Sadly we don’t know [Banksy] to ask him how he did it, but we welcome speculation both informed and otherwise in the comments.
Our own [Joe Kim]’s tribute to the work in question.Meanwhile the piece itself lies half shredded and protruding from the base of the frame. On the face of it that’s ruined the painting as an artwork, but of course this is a Banksy. Normal rules seem not to apply, so the notoriety it has received will no doubt mean that its shredded remains are an artwork in themselves, and possibly even one worth more.
Banksy owners worldwide are no doubt now paying a huge amount more attention to the artist’s frames than previously, but Hackaday readers need not worry. Our London Unconference logo and stickers featured a [Joe Kim] homage to the Banksy in question, which we can guarantee does not incorporate an artist’s shredder.
How does a design go from the computer screen to something you hold in your hand? Not being able to fully answer this question is a huge risk in manufacturing because . One of the important tools engineers use to ensure success is Geometric Dimensioning and Tolerancing (GD&T).
A good technical drawing is essential for communicating your mechanical part designs to a manufacturer. Drafting, as a professional discipline, is all about creating technical drawings that are as unambiguous as possible, and that means defining features explicitly. The most basic implementation of that concept is dimensioning, where you state the distance or angle between features. A proper technical drawing will also include tolerances for those dimensions, and I recently explained how to avoid the pitfall of stacking those tolerances.
Dimensions and tolerances alone, however, don’t tell the complete story. On their own, they don’t specify how closely the geometric form of the manufactured part needs to adhere to your perfect, nominal representation. That’s what we’re going to dig into today with GD&T.
If you want to plug a USB cable into your next project, you’ve got a problem. USB is not UART, and UART is what every microcontroller serial port wants. To add USB to your microcontroller project, you’ll need to add a support chip, probably from FTDI, although there are a multitude of almost-FTDI clones available from the other parts of the Internet. These parts are slightly expensive, and they require some support circuitry. What you really need is a simple device that requires minimal external components, takes in serial from your microcontroller and spits out USB, and costs no more than a dollar. Bonus points if it’s hand-solderable.
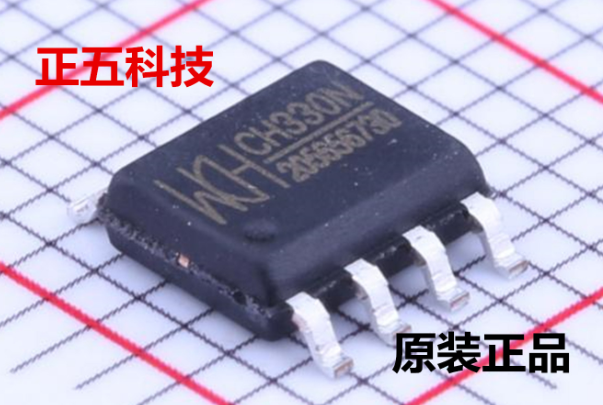
The CH330 is apparently the answer to this problem (That’s a TaoBao link, this is probably going to be the best link going forward). It’s a dead simple chip with eight pins. Two are the data lines on a USB cable, and two are TX and RX for your microcontroller. The other pins are just power, ground, and an RTS line. Best of all, it only costs about fifty cents. You’ve never heard about it, because a few hours after this post is published, it will be the most information you’re going to get on this chip in the English-speaking world.
As far as we can tell, the CH330 is the smallest in a line of USB to UART converters from WCH, although the part isn’t even on the company’s website. The first reference to the phrase ‘CH330’ in reference to a USB chip appeared about a month ago, at the beginning of September. There’s a GitHub for someone who is apparently using this chip in a Pine64 board, but that’s about it. There’s no more information.
Right now, the only documentation for this chip is a single Chinese-language datasheet with an example schematic showing this chip connected to a MAX232 as a USB to RS232 converter. This is it. You’re looking at all the information that exists on this chip in the English-speaking version of the Internet.
The idea of a cheap, small chip that easily turns USB into UART would be great for thousands of projects. An FTDI chip will work, yes, but if you’re making thousands of a thing you might want to go with the fifty cent part over the two dollar part. That said, we’re in untested waters with this part, and you can’t even find it on AliExpress.
Let us know if you’ve gotten your hands on one of these devices. This has the potential to be really useful in a lot of projects and products, and we’re eager to see what the community comes up with. Thanks to [acabx] for sending this one in on the tip line.
For a little while it was possible to spend Bitcoin twice. Think of it like a coin on a string, you put it into the vending machine to get a delicious snack, but if you pull the string quickly enough you could spend it again on some soda too. Except this coin is worth something like eighty-grand.
On September 20, the full details of the latest fix for the Bitcoin Core were published. This information came two days after the fix was actually released. Two vulnerabilities were involved; a Denial of Service vulnerability and a critical inflation vulnerability, both covered in CVE-2018-17144. These were originally reported to several developers working on Bitcoin Core, as well as projects supporting other cryptocurrencies, including ABC and Unlimited.
Let’s take a look at how this worked, and how the network was patched (while being kept quiet) to close up this vulnerability.
Ever since the ESP8266 WiFi-enabled microcontroller came on the scene, it seemed like suddenly everyone came up with WiFi-enabled projects. But the ESP8266 is not the only game in town! Reader [PuceBaboon] notified us of a new product released by Seeed Studios: the imaginatively called Air602 WiFi Development Board.
The core of this board is the tiny WinnerMicro W600 MCU, which integrates a 32-bit ARM Cortex M3 CPU, along with dual UARTs, I2C, SPI and I2S interfaces, as well as a real-time clock (RTC). Add to this hardware crypto, seven I/O pins (five broken out on the development board) and you have a very capable WiFi-enabled MCU which can be programmed using the usual ARM development tools (e.g. Keil) using the provided SDK.
The W600 module can be bought by itself, in all its diminutive 12 mm x 10 mm glory, for a mere $1.90 as of time of writing – without antenna – as noted in [PuceBaboon]’s thoughts on this MCU and the development board.
On a fused deposition modeling (FDM) 3D printer, the nozzle size dictates how small a detail you can print. Put simply, you can’t print features smaller than your nozzle for the same reason you’d have trouble signing a check with a paint roller. If the detail is smaller than the diameter of your tool, you’re just going to obliterate it. Those who’ve been around the block a few times with their desktop 3D printer may have seen this come up in practice when their slicer refused to print lines which were thinner than the installed nozzle (0.4mm on the vast majority of printers).
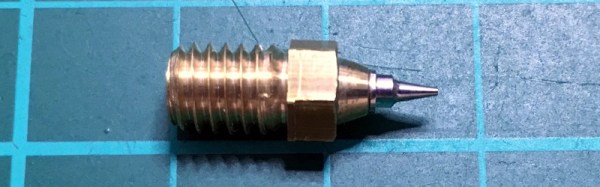
Smaller nozzles exist for those looking to improve their printer’s detail on small objects, but [René Jurack] wasn’t happy with just putting a finer nozzle on a stock E3D-style hotend. In his opinion it’s still a hotend and arrangement intended for 0.4mm printing, and doesn’t quite fully realize the potential of a smaller diameter nozzle. After some experimentation, he thinks he’s found the solution by using airbrush nozzles.
As [René] sees it, the hotend is too close to the subject being printed when using nozzles finer than 0.4mm. Since you’re working on tiny objects, the radiant heat from the body of the hotend being only a few millimeters away is enough to deform what you’re working on. But using the long and tapered airbrush nozzle, the hotend is kept at a greater distance from the print. In addition, it gives more room for the part cooling fan to hit the print with cool air, which is another critical aspect of high-detail FDM printing.
Of course, you can’t just stick an airbrush nozzle on your E3D and call it a day. As you might expect, they are tiny. So [René] designed an adapter that will let you take widely available airbrush nozzles and thread them into an M6 threaded hotend. He’s now selling the adapters, and judging by the pictures he posted, we have to say he might be onto something.

![Our own [Joe Kim]'s tribute to the work in question.](https://hackaday.com/wp-content/uploads/2017/07/london.jpg)