It used to be that you could pop the hood and with nothing more than flat head screwdriver, some baling wire, and tongue held at the optimal angle, you could fix anything that ailed your car. But today, for better or for worse, the average automobile is a rolling computer that runs on gasoline and hope (if it even still has a gasoline engine, that is). DIY repairs and maintenance on a modern car is still possible of course, but the home mechanic’s toolbox has needed to evolve with the times. If you want to do anything more advanced than changing a tire, you’ll really want to have the gear to interface with the vehicle’s computer via the OBD-II port.
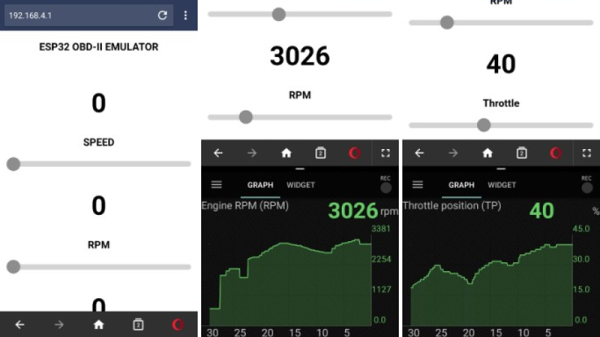
 But for some, even that isn’t enough. [limiter121] recently wrote in to tell us of an interesting project which doesn’t read the OBD-II port in a vehicle, but actually emulates one. Like so many others this hack was born out of necessity, as a way to test an OBD-II project without having to sit out in the driveway all day. It allows you to create fictitious speed and engine RPM values for the OBD-II device or software under test to read, complete with a slick web interface to control the “car”.
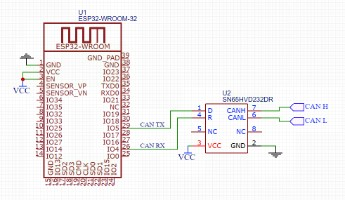
So what makes it tick? Surprisingly little, actually. At the most basic level, an ESP32-WROOM-32 is connected up to a SN65HVD230 CAN transceiver chip. You’ll also need a 3.3V power supply, as well as a USB to serial adapter to do the initial programming on the ESP32. From there it’s just a matter of compiling and flashing the code [limiter121] has made available in the GitHub repo.
If you’re wondering if such products don’t already exist on the commercial market, they do. But like so many other niche projects, the price is a bit hard to swallow for the home hacker. Compared to the nearly $300 USD list price of commercial offerings such as the Freematics OBD-II Emulator, building one of these ESP32 based emulators should only cost you around $20.
Unless you’re developing an OBD-II reader, you probably don’t have much use for an OBD-II emulator. But this project could still be useful for anyone who wants to learn more about OBD from the comfort of their couch.