3D Printed Weather Station Gets A Wireless Upgrade

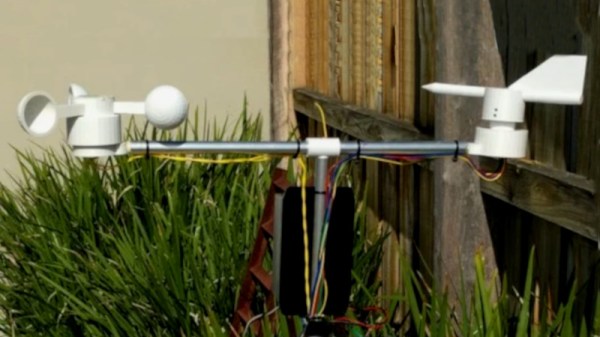
A weather station can be anything from a fun home science exercise, all the way up to a useful tool for planning and weather prediction. [Rob Ward] is one such person who has developed their own weather station, and it recently got a wireless upgrade.

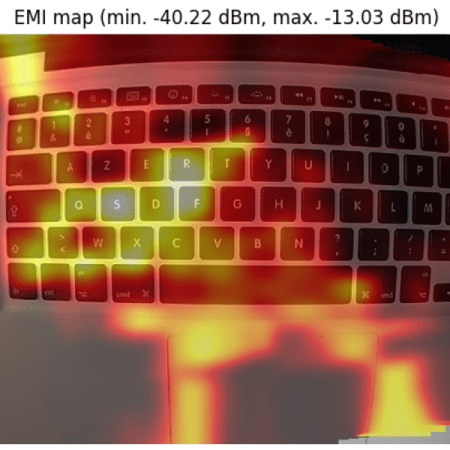
We first featured [Rob]’s work back in 2018, noting that a largely 3D-printed weather station was a particularly useful tool for the home experimenter. The utility of this is now improved, with the addition of a 433 MHz wireless link from the weather sensors back to the base station. Over on Github, [Rob] does a great job of explaining the basics of the Manchester encoding scheme used, and has developed a system that can decode signals from Oregon Scientific weather stations, too.

[Rob] uses the weather station to report weather conditions at Lake Tyers Beach, providing useful information for anyone in the area who might be considering a visit to the coast. It’s not quite as fun as asking whoever’s around on the CB road channel, but it’s a darn sight more accurate for your trouble. Video after the break.

Continue reading “3D Printed Weather Station Gets A Wireless Upgrade”

Simple, Self-Contained LoRa Repeater In About An Hour

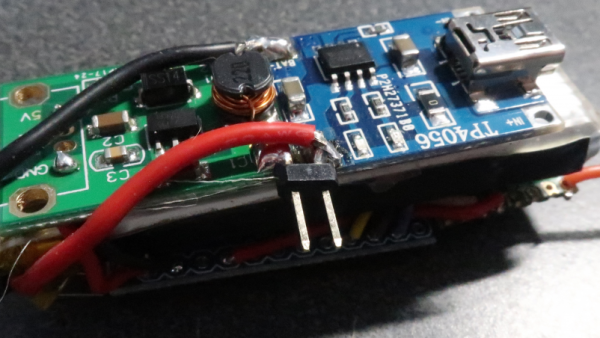
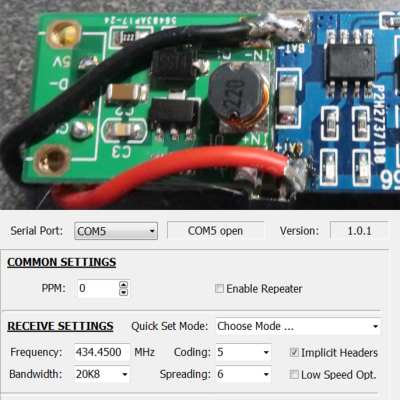
[Dave Akerman]’s interest in high-altitude projects means he is no stranger to long-range wireless communications, for which LoRa is amazingly useful. LoRa is a method of transmitting at relatively low data rates with low power over long distances.

Despite LoRa’s long range, sometimes the transmissions of a device (like a balloon’s landed payload) cannot be received directly because it is too far away, or hidden behind buildings and geography. In these cases a useful solution is [Dave]’s self-contained LoRa repeater. The repeater hardware is simple, and [Dave] says that if one has the parts on hand, it can be built in about an hour.

The device simply re-transmits any telemetry packets it receives, and all that takes is an Arduino Mini Pro and a small LoRa module. A tiny DC-DC converter, battery, and battery charger rounds out the bill of materials to create a small and self-contained unit that can be raised up on a mast, flown on a kite, or carried by a drone.

The repeater’s frequency and other settings can even be reprogrammed (using a small windows program) for maximum flexibility, making the little device invaluable when going hunting for landed payloads like the one [Dave] used to re-create a famous NASA image using a plastic model and a high-altitude balloon. Check out the details on the GitHub repository for the project and start mashing “add to cart” for parts at your favorite reseller.

Camera Sees Electromagnetic Interference Using An SDR And Machine Vision

It’s one thing to know that your device is leaking electromagnetic interference (EMI), but if you really want to solve the problem, it might be helpful to know where the emissions are coming from. This heat-mapping EMI probe will answer that question, with style. It uses a webcam to record an EMI probe and the overlay a heat map of the interference on the image itself.

Regular readers will note that the hardware end of [Charles Grassin]’s EMI mapper bears a strong resemblance to the EMC probe made from semi-rigid coax we featured recently. Built as a cheap DIY substitute for an expensive off-the-shelf probe set for electromagnetic testing, the probe was super simple: just a semi-rigid coax jumper with one SMA plug lopped off and the raw end looped back and soldered. Connected to an SDR dongle, the probe proved useful for tracking down noisy circuits.

[Charles]’ project takes that a step further by adding a camera that looks down upon the device under test. OpenCV is used to track the probe, which is moved over the DUT manually with the help of an augmented reality display that helps track coverage, with a Python script recording its position and the RF power measurements. The video below shows the capture process and what the data looks like when reassembled as an overlay on top of the device.

Even if EMC testing isn’t your thing, this one seems like a lot of fun for the curious. [Charles] has kindly made the sources available on GitHub, so this is a great project to just knock out quickly and start mapping.

Continue reading “Camera Sees Electromagnetic Interference Using An SDR And Machine Vision”

A DIY EMC Probe From Semi-Rigid Coax And An SDR

Do you have an EMC probe in your toolkit? Probably not, unless you’re in the business of electromagnetic compatibility testing or getting a product ready for the regulatory compliance process. Usually such probes are used in anechoic chambers and connected to sophisticated gear like spectrum analyzers – expensive stuff. But there are ways to probe the electromagnetic mysteries of your projects on the cheap, as this DIY EMC testing setup proves.

As with many projects, [dimtass]’ build was inspired by a video over on EEVblog, where [Dave] made a simple EMC probe from a length of semi-rigid coax cable. At $10, it’s a cheap solution, but lacking a spectrum analyzer like the one that [Dave] plugged his cheap probe into, [dimtass] went a different way. With the homemade probe plugged into an RTL-SDR dongle and SDR# running on a PC, [dimtass] was able to get a decent approximation of a spectrum analyzer, at least when tested against a 10-MHz oven-controlled crystal oscillator. It’s not the same thing as a dedicated spectrum analyzer – limited bandwidth, higher noise, and not calibrated – but it works well enough, and as [dimtass] points out, infinitely hackable through the SDR# API. The probe even works decently when plugged right into a DSO with the FFT function running.

Again, neither of these setups is a substitute for proper EMC testing, but it’ll probably do for the home gamer. If you want to check out the lengths the pros go through to make sure their products don’t spew signals, check out [Jenny]’s overview of the EMC testing process.

[via RTL-SDR.com]

WiFi Controlled Plane Is Cheap Flying Fun

The world of radio controlled aircraft used to be an expensive and exclusive hobby, limited to those with the time and money to invest in difficult builds and pricey radio gear. More recently, the hobby has become more accessible, with cheap ready to fly planes available that can be flown in smaller spaces like suburban parks. [Ravi Butani] has built just such a plane, and you can even fly it with your smartphone!

An ESP8266 does double duty here as both the brains and the communication system. A custom smartphone app communicates with the plane over WiFi. Touching the screen increases the throttle, while steering is achieved through tilting the phone. There’s also monitoring of signal strength and battery level, with the phone vibrating if the plane is getting out of range or low on battery.

Flight control is via differential thrust, with power coming courtesy of two small DC motors controlled by tiny SMD MOSFETs. The plane flies remarkably well in still conditions, and the WiFi connection is stable in an open park environment. [Ravi] reports that control is possible at a range of around 70 meters using a Motorola G5S smartphone.

Despite the simplicity of the build and the low cost of the components, the final product performs admirably. It would be a great weekend project, and at the end of it, you get to go and fly your new plane! If you’re worried about keeping your batteries charged, don’t worry – there’s a solution for that. Video after the break.

Continue reading “WiFi Controlled Plane Is Cheap Flying Fun”

Transcending The Stack With The Right Network Protocol

The increase in network-connected devices the past years has been something of a dual-edged sword. While on one hand it’s really nice to have an easy and straight-forward method to have devices talk with each other, this also comes with a whole host of complications, mostly related to reliability and security.

With WiFi, integrating new devices into the network is much trickier than with Ethernet or CAN, and security (e.g. WPA and TLS) isn’t optional any more, because physical access to the network fabric can no longer be restricted. Add to this reliability issues due to interference from nearby competing WiFi networks and other sources of electromagnetic noise, and things get fairly complicated already before considering which top-layer communication protocol one should use. Continue reading “Transcending The Stack With The Right Network Protocol”

Duck And Cover With This WiFi “Geiger Counter”

There’s perhaps no sound more recognizable than the frantic clicking of a Geiger counter. Not because this is some post-apocalyptic world in which everyone is personally acquainted with the operation of said devices, but because it’s such a common effect used in many movies, TV shows, and video games. If somebody hears that noise, even if it doesn’t really make sense in context, they know things are about to get serious.

Capitalizing on this phenomena, [Anton Haidai] has put together a quick hack which turns the ESP8266 into a “Geiger counter” for WiFi. Rather than detecting radiation, the gadget picks up on the strongest nearby WiFi signal and will start clicking in response to signal strength. As the signal gets stronger, so does the clicking. While primarily a novelty, it’s an interesting idea that could potentially be useful for things like fox hunting.

The hardware is really about as simple as it gets, just a basic buzzer attached to one of the digital pins on a NodeMCU development board. This project is more of a proof of concept, but if it were to be developed further it would be interesting to see the electronics placed into a 3D printed replica of one of the old Civil Defense Geiger counters. Perhaps even integrating an analog gauge that can bounce around in response to signal strength.

Software-wise there is the option of locking onto one single network SSID or allowing the device to find the strongest network in the area. Even if you’re not in the market for a chirping WiFi detector, the code is a good example of how you can detect signal RSSI and act on it accordingly; a neat trick which might come in handy in a future project.

If you’re more interested in the real thing, we’ve got plenty of DIY Geiger counters in the archive for you to check out. From diminutive builds that can be mounted to the top of a 9V battery to high-tech solid state versions with touch screen interfaces, you should have plenty of inspiration if you’re looking to kit yourself out before your next drive through the Chernobyl Exclusion Zone.

Continue reading “Duck And Cover With This WiFi “Geiger Counter””