Bolt-On Stepper Motor Driver For The Raspberry Pi

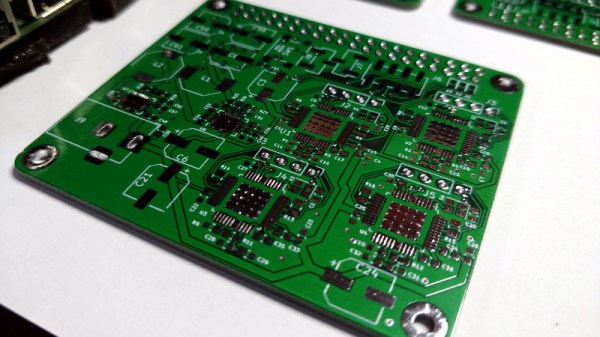
For his entry into the 2019 Hackaday Prize, [Tobius Daichi] is working on adding some motion control capabilities to everyone’s favorite Linux SBC. His 3+Pi board attaches to the Raspberry Pi’s GPIO header and gives you a convenient way to control four individual stepper motors. Perfect for a 3D printer, laser cutter, CNC, or anything else you can think of that needs to move in a few dimensions.

But such a simplistic description of the 3+Pi might be underselling it a bit. While [Tobius] says he was inspired by the classic Arduino CNC Shield that powers countless DIY 3D printers, he’s managed to improve on the concept. Rather than having the host Pi communicate directly with the stepper drivers, the 3+Pi features an onboard STM32F302CBT6 that handles the actual motor control. The Pi just needs to tell it what to do over UART.

If you’re looking to do things in real-time, having an onboard microcontroller handle the low-level aspects of talking to the stepper drivers can be a big help. A natural extension for this board could be support for the Klipper firmware, which leverages the fact that the Raspberry Pi is many times more powerful than your average 3D printer control board. With the Pi handling the math and providing the microcontroller instructions, Klipper allows for faster and more accurate printing than the microcontroller alone could accomplish.

As for the stepper drivers themselves, [Tobius] has decided to go with the Trinamic TMC2041-LA-T. This chip is notable as it puts dual drivers in one 48-QFN package, which is great if you’re looking to save space on your board. Some might complain that the 3+Pi doesn’t allow for easily swapping out the stepper drivers if you manage to cook one like on the Arduino CNC shield, but realistically you could say the same about many purpose-built stepper control boards.

[Tobius] is tackling this project by himself currently, but does mention that he’s open to teaming up with anyone who’s got an interest in this sort of thing. There have been previous attempts at creating Linux-powered 3D printer controllers in the past, but we think this approach holds particular promise if for no other reason than the Raspberry Pi’s popularity.

PaperLedger: An E-Ink Cryptocurrency Ticker

For a long time it seemed like e-ink displays were outside the reach of us lowly hackers, as beyond the handful of repurposed Kindles that graced these pages, we saw precious few projects utilizing this relatively exotic display. But that’s changed over the last couple of years, and we’re thrilled to start seeing hackers bend this incredible technology to their will.

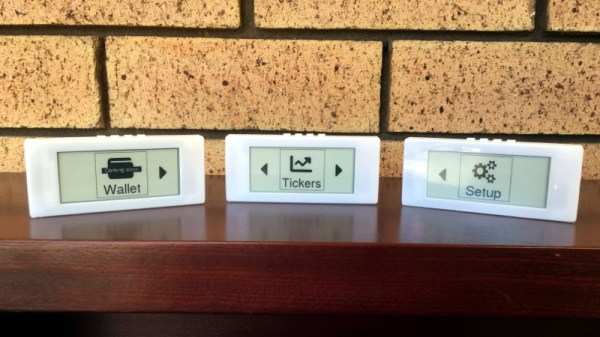
A perfect example is PaperLedger, an entry into the 2019 Hackaday Prize by [AIFanatic]. This wireless device is designed to display the current price of various cryptocurrencies on its 2.9-inch e-ink screen and provide audible price alerts with its built-in speaker. It even has a web portal where users can configure the hardware or view more in-depth price information.

The PaperLedger is based on the TTGO T5 V2.2 ESP32, but it looks like [AIFanatic] is in the process of spinning up a new board for the MIT licensed project to address some nagging issues for this particular application. Unfortunately, it doesn’t look like there are any pictures of the new board yet, but a description of the changes on the Hackaday.IO page shows that most of the work seems to be going into improving support for running on batteries.

Even if you’re not interested in cryptocurrency, the PaperLedger looks like a fantastic little e-ink monitor for pretty much anything else you’d like to keep a close eye on. The GPLv3 licensed firmware is available on the project’s GitHub page, so expanding or completely changing the device’s functionality shouldn’t be too tricky for anyone with a desire to do so and a working knowledge of C++.

We’ve seen several projects using the various TTGO boards that mate an ESP32 with a display at this point, and it looks like a great platform to check out if you want to push some data to a little WiFi screen with the minimum amount of hassle.

A Macro Keyboard In A Micro Package

Remember back in the early-to-mid 2000s when pretty much every cheap USB keyboard you could find started including an abundance of media keys in its layout? Nowadays, especially if you have a customized or reduced-sized mechanical keyboard, those are nowhere to be seen. Whenever our modern selves need those extra keys, we have to turn to external peripherals, and [Gary’s] Knobo is one that looks like it could’ve come straight out of a fancy retail package.

The Knobo is a small macro keypad with 8 mechanical Cherry-style keys and a clickable rotary encoder knob as its main feature. Each key and knob gesture can be customized to any macro, and with five gestures possible with the knob, that gives you a total of thirteen inputs. On top of that, the build and presentation look so sleek and clean we’d swear this was a product straight off of Teenage Engineering’s money-printing machine.

The actions you can do with those inputs range from simple media controls with a volume knob all the way to shortcuts to make a Photoshop artist’s life easier. Right now you can only reprogram the Knobo’s Arduino-based firmware with an In-Circuit Serial Programmer to change what the inputs do, but [Gary] is currently working on configuration software so that users without any programming knowledge will be able to customize it too.

Knobs are just one of those things that everyone wants to use to control their computers, much like giant red buttons. Alternative input devices can range from accessibility-designed to just downright playful. Whatever the inspiration is for them, it’s always nice to see the creativity of these projects.

Continue reading “A Macro Keyboard In A Micro Package”

Eric Weinhoffer Covers Enclosure Design And Manufacturing Tech During Hackaday Prize Mentor Session

Eric Weinhoffer has had plenty of experience in the product design arena, and this hard-earned knowledge is readily apparent in his mentor session for The Hackaday Prize. These serve to link up Prize entrants with industry experts in order to help them take their projects into production. You still have time to get in on the 2019 Hackaday Prize which is accepting entries until August 25th.

Eric’s work as a Prototype Engineer at Bolt stands him in good stead to deliver valuable advice on manufacturing techniques and prototyping. With projects as diverse as CNC milling machiness and ISS payloads under his belt, Eric was able to help out these entrants with a series of tricky problems that will be familiar to anyone who has tried to take a project out of the lab and into the market.

Let’s take a look at the projects and the advice that were shared during this session.

Continue reading “Eric Weinhoffer Covers Enclosure Design And Manufacturing Tech During Hackaday Prize Mentor Session”

CNC Machine Rolls Up An Axis To Machine PVC Pipe

Whether it’s wood, metal, plastic, or otherwise, when it comes to obtaining materials for your builds, you have two choices: buy new stock, or scrounge what you can. Fresh virgin materials are often easier to work with, but it’s satisfying to get useful stock from unexpected sources.

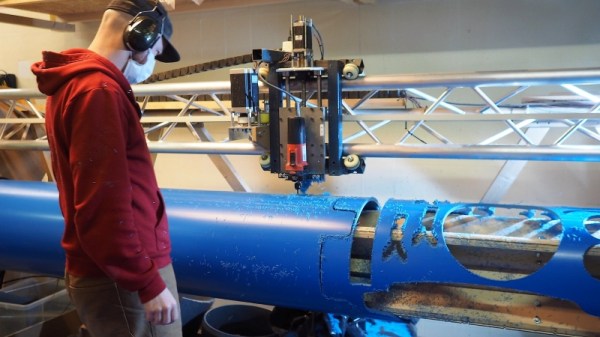
This CNC router for PVC pipe is a great example of harvesting materials from an unusual source. [Christophe Machet] undertook his “Pipeline Project” specifically to explore what can be made from large-diameter PVC pipe, of the type commonly used for sewers and other drains. It’s basically a standard – albeit large-format – three-axis CNC router with one axis wrapped into a cylinder. The pipe is slipped around a sacrificial mandrel and loaded into the machine, where it rotates under what looks like a piece of truss from an antenna tower. The spindle seems a bit small, but it obviously gets the job done; luckily the truss has the strength and stiffness to carry a much bigger spindle if that becomes necessary in the future.

The video below shows the machine carving up parts for some lovely chairs. [Christophe] tells us that some manual post-forming with a heat gun is required for features like the arms of the chairs, but we could see automating that step too. We like the look of the pieces that come off this machine, and how [Christophe] saw a way to adapt one axis for cylindrical work. He submitted this project for the 2019 Hackaday Prize; have you submitted your entry yet?

Continue reading “CNC Machine Rolls Up An Axis To Machine PVC Pipe”

Workbench Fume Extractor Sucks, But Has A Charming Personality

Shop safety is important regardless of what kind of work you do. For those of us soldering, that means extracting the noxious fumes released by heating up the solder flux used in our projects. [yesnoio] brings to us his own spin on the idea of a fume extractor, and it pulls out all stops with bells and whistles to spare.

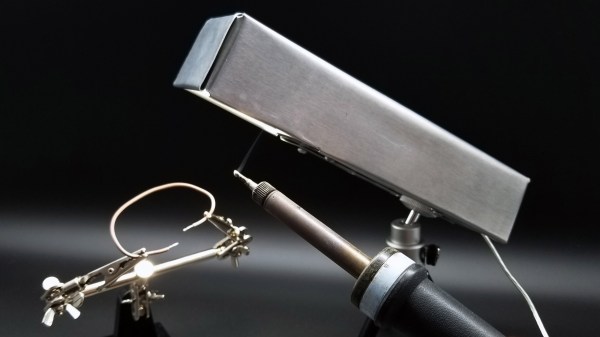
The Workbench Assistant bot, as [yesnoio] describes it, is an integrated unit mounted atop a small tripod which extends over the working area where you’re soldering. Inside the enclosure are RGBW lights, an IR camera, and an Adafruit ItsyBitsy M4 Express driving the whole show. Aside from just shining a light onto your soldering iron though, the camera senses thermal activity from it to decide when to ramp up the server-grade fan inside which powers the whole fume extraction part of the project.

But the fun doesn’t stop there, as [yesnoio] decided to go for extra style points. The bot also comes with an amplified speaker, playing soundbites whenever actions such as starting or stopping the fan are performed. These soundbites are variations on a theme, like classic Futurama quotes or R2-D2’s chattering from Star Wars. The selectable themes are dubbed “performers”, and they can be reprogrammed easily using CircuitPython. This is a neat way to give your little desktop assistant some personality, and a fun way to break up the monotony of soldering up all those tiny SMD components on your next prototype.

If even after all this you still need more than just a cute little robotic voice beeping at you to convince you to get a fume extractor for your bench, then maybe some hands-on results could give you that little push you need. And if you’re already convinced and want to build your own, there is no shortage of DIY solutions we’ve seen around here at Hackaday. Check out this one in action after the break!

Continue reading “Workbench Fume Extractor Sucks, But Has A Charming Personality”

Color Your World With This CNC Painting Robot

Let’s say you’ve watched a few episodes of “The Joy of Painting” and you want your inner [Bob Ross] to break free. You get the requisite supplies for oil painting – don’t forget the alizarin crimson! – and start to apply paint to canvas, only to find your happy little trees are not so happy, and this whole painting thing is harder than it looks.

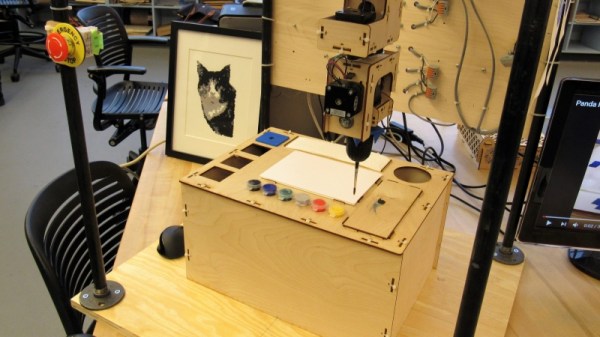
[Saint Bob] would certainly encourage you to stick with it, but if you have not the patience, a CNC painting robot might be a thing to build. The idea behind [John Opsahl]’s “If Then Paint” is not so much to be creative, but to replicate digital images in paint. Currently in the proof-of-concept phase, If Then Paint appears to have two main components: the paint management system, with syringe pumps to squeeze out different paints to achieve just the right color, and the applicator itself, a formidable six-axis device that supports tool changes by using different brushes chucked up into separate hand drill chucks. The extra axes at the head will allow control of how the brush is presented to the canvas, and also allow for cleaning the brush between colors. The videos below show two of the many ways [John] is exploring to clean the brushes, but sadly neither is as exciting as the correct [Bob Ross] method.

It looks like If Then Paint has a ways to go yet, but we’re impressed by some of the painting it has produced already. This is just the kind of project we like to see in the 2019 Hackaday Prize – thought out, great documentation, and a lot of fun.

Continue reading “Color Your World With This CNC Painting Robot”