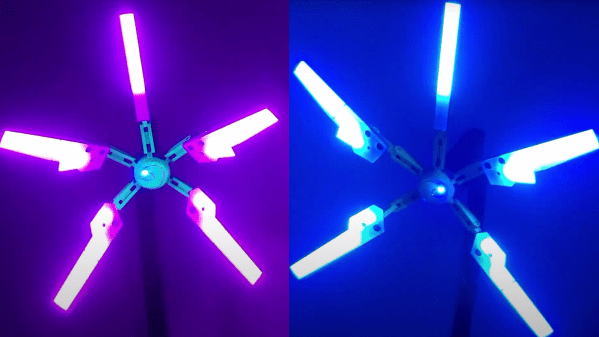
Modular Laptop Maker Provides Mainboard Documentation For Non-Laptop Projects

If you’ve been following the latest advancements in computing for a while, you already know that there’s a big problem with laptops: When they’re no longer useful as a daily driver, it can be a struggle to find a good use for all its parts. Everything is proprietary, and serious amounts of reverse engineering are required if you decide to forge ahead. This is where Framework, a laptop company building modular laptops comes in. They’ve made it clear that when you upgrade your Framework laptop with a new mainboard they want you to be able to continue to use the old mainboard outside of the laptop.

When it's done powering your laptop, use it for a cyberdeck?
When it’s done powering your laptop, use it for a cyberdeck?

To that end, Framework have provided 2D mechanical drawings of their mainboard and 3D printable cases that can of course be modified as needed. “But what about peripherals?” you might ask. Framework has provided pinouts for all of the connectors on the board along with information on which connectors to use to interface with them. No reverse engineering needed!

While it’s possible to buy a mainboard now and use it, their stated goal is to help people make use of used mainboards leftover from upgrades down the line. With just a stick of memory and a USB-C power adapter, the board will spring to life and even has i2c and USB immediately available.

What would you do with a powerful Intel i5-1135G7 mainboard? Framework wants to know, and to that end, they are actually giving away 100 mainboards to makers and developers. Mind you this is a program created and ran by Framework — and is not associated in any way Hackaday or our overlords at Supplyframe.

If you’ve read this far and still don’t know what the Framework laptop is, go check out this introduction by our own [Jenny List].

A DIY CAD Mouse You Can Actually Build

When you spend a lot of time on the computer doing certain more specialised tasks (no, we’re not talking about browsing cat memes on twitter) you start to think that your basic trackpad or mouse is, let’s say, lacking a certain something. We think that something may be called ‘usability’ or maybe ease-of-use? Any which way, lots of heavy CAD users gush over their favourite mouse stand-ins, and one particularly interesting class of input devices is the Space Mouse, which is essentially patented up-to-the-hilt and available only from 3DConnexion. But what about open source alternatives you can build yourselves? Enter stage left, the Orbion created by [FaqT0tum.] This simple little build combines an analog joystick with a rotary knob, with a rear button and OLED display on the front completing the user interface.

The idea is pretty straightforward; you setup the firmware with the application you want to use it with, and it emits HID events to the connected PC, replacing the mouse or keyboard input. Since your machine will take input from multiple sources, it doesn’t replace your mouse, it augments it. It may not be very accurate for detailed PCB layout work, but for moving around in a 3D view, or dialling in a video edit, this could be a very useful addition to your workstation, so why not give it a try? The wiring is simple, the parts easily found and cheap, and it’s only a few printed parts! This scribe is already printing the plastics right now, if you listen carefully you might be able to make out the sound of the Lulzbot in background.

There are many other takes on this idea, with varying levels of complexity, like this incredible build from [Ahmsville] that sadly doesn’t make the PCBs available openly, and here’s one we covered earlier mashing the expensive 3DConnexion spacemouse into a keeb.

Continue reading “A DIY CAD Mouse You Can Actually Build”

Practical Print Makes IPad A Magnificent Eye Piece

Be it the ever shrinking size of components, the miniscule size of the printing on such pieces, or the steady march of time that makes visits to the optometrist an annual ritual, many of us could use some assistance when things start getting fuzzy at the workbench. Arm-mounted LED magnifying lenses can be a handy helper. Zooming in on a macro photo on a smartphone is also a common option that we’ve used many times.

[Timo Birnschein] started down a similar path when he realized that his iPad Pro comes with an app called simply “Magnifier”. A 12” iPad isn’t exactly the most convenient device to hold while trying to solder small parts, so he spent some time designing and 3D printing a specialty iPad stand that he calls a “Quick and Dirty High Performance EE Microscope.” We call it a magnificent tool hack!

Rotating the iPad diagonally so that the camera is closest to the subject leaves plenty of room to work and makes great use of the available screen space. [Timo] reports that at 50% magnification the 12” screen makes even 0603 SMD parts easy to read. Now he rejoices to have more to do with his iPad than watching YouTube and reading Hackaday- although we don’t know why you couldn’t do both.

The STL files have been released on Thingverse for your experimentation. [Timo] notes that he’d like to add an LED ring to brighten things up, and a fume extractor to protect the delicate lens on the iPad. We have to wonder if some plastic wrap over the lens might produce the same effect at almost no cost. Whatever [Timo] decides to do, we’re sure it’ll be brilliant.

If you don’t have an iPad and a 3D printer, you might enjoy an earlier post that shows how you can use your phone as a microscope. If Lego and Raspberry Pi are your go-to parts, you can set your sights on this Lego/Pi/Arduino microscope.

Do you have your own preferred solution for seeing yourself through a hazy situation? Be sure to write it up, and then drop it in the Tip Line!


3D Printed Joystick Using Spherical Flexure Joint

One of the many advancements brought about by 3D printing is the rapid development of compliant mechanisms and flexure joints. One such example is [jicerr]’s joystick, which uses a pair of spherical flexure joints recently developed by researchers from Delft University of Technology in the Netherlands, See the videos after the break.

Both flexure joint designs make use of tetrahedron-shaped elements, allowing an object to pivot around a fixed point in space like a ball-and-socket joint. One of the joints, named Tetra 2, is perfect for printing on a standard FDM printer, and the 3D files were uploaded to Thingiverse by [Jelle_Rommers], one of the researchers. [jicerr] took the design and created a base to mount an HMC5883 3-axis magnetometer a short distance from the focal point, which senses the rotation of a small magnet at the focal point. An Arduino takes the output from the magnetometer, does the necessary calculation, and interfaces to a PC as a joystick. Demonstrates this by using it to rotate and pan the design in Solidworks. One thing to keep in mind with this design is that it needs a fixed base to prevent it from moving around. It should also be possible to integrate the design directly into the housing of a controller.

Another amusing application is to turn it into a pen holder with a chicken head on the front, as demonstrated by [50Pro]. If you have any ideas for other applications, drop them in the comments.

Compliant mechanisms have a number of interesting applications, including harmonic drives, dial indicators and thrust vectoring mounts.

Continue reading “3D Printed Joystick Using Spherical Flexure Joint”

Nintendo Headquarters Plaques

3D Print A Piece Of Nintendo History Before The Real One Is Gone

Nintendo wasn’t always in the videogames business. Long before Mario, the company was one of the foremost producers of Hanafuda playing cards in Japan. From 1930 until 1959, Nintendo ran its printing business from a four-story art deco style building that featured distinctive plaques at the front entrance. We now have a chance to print those former Nintendo HQ plaques at home thanks to [Mr. Talida] who shared some 3D models on Twitter. Talida, a self-described “retro video game archivist”, recreated the plaques via photogrammetry from a number of reference photos he took from a visit to the Kyoto site late last year.

These 3D models come at a crucial time as the old Nintendo HQ building, which sat dormant for years, is set to be turned into a boutique hotel next year. According to JPC, the hotel will feature twenty rooms, a restaurant, and a gym and is expected to be completed by summer 2021 (although that estimate was from the “before” times). The renovation is expected to retain as much of the original exterior’s appearance as possible, but the Nintendo plaques almost assuredly will not be included. For a first-person tour of the former Nintendo headquarters building, there is a video from the world2529 YouTube channel provided below.

It is encouraging to see examples of this DIY-style of historical preservation. Many companies have proven themselves to be less-than-stellar stewards of their own history. Though if his Twitter timeline is any indication, [Mr. Talida] is up to something further with this photogrammetry project. A video export exhibiting a fully textured 3D model of the old Nintendo headquarters’ entrance was published recently along with the words, “What have I done.”

Continue reading “3D Print A Piece Of Nintendo History Before The Real One Is Gone”

Plastic Prosthetics For Rubber Duckies

Will someone please think of the rubber duckies?!

For decades they’ve been reduced to a laughing stock: a caricature of waterfowl. Left without a leg to stand on, their only option is to float around in the tub. And they don’t even do that well, lacking the feet that Mother Nature gave them, they capsize when confronted with the slightest ripple. But no more!

Arise!

Due to the wonders of 3D printing, and painstaking design work by [Jan] from the Rubber Ducky Research Center, now you can print your own rubber ducky feet. We have the technology! Your ducks are no longer constrained to a life in the tub, but can roam free as nature intended. The video (embedded below) will certainly tug at your heartstrings.

OK, it’s a quick print and it made my son laugh.

The base and legs probably don’t fit your duck as-is, but it’s a simple matter to scale them up or down while slicing. (Picture me with calipers on the underside of a rubber ducky.) The legs were a tight press-fit into the body, so you might consider slimming them down a tiny bit when doing the scaling, but this probably depends on your printer tolerances.

It looks snazzy in gold-fleck PETG, and would probably work equally well for some more elaborate rubber duckies as well.

Continue reading “Plastic Prosthetics For Rubber Duckies”

[Hari] Prints An Awesome Spider Robot

Although we have strong suspicions that the model’s designer failed entomology, this spider robot is very cool. [Hari Wiguna] made one, and is justifiably thrilled with the results. (Watch his summary on YouTube embedded below.)

Thanks to [Regis Hsu]’s nice design, all [Hari] had to do was order a hexapod’s dozen 9g servos for around $20, print out the parts, attach an Arduino clone, and he was done. We really like the cutouts in the printed parts that nicely fit the servo horns. [Hari] says the calibration procedure is a snap; you run a sketch that sets all the servos to a known position and then tighten the legs in place. Very slick.

The parts should print without support on basically any printer. [Hari]’s is kinda janky and exhibits all sorts of layer-to-layer irregularities (sorry, man!) but the robot works perfectly. Which is not to say that [Hari] doesn’t have assembly skills — check out the world’s smallest (?) RGB LED cube if you think this guy can’t solder. Of course, you can entirely sidestep the 3D-printed parts and just fix a bunch of servos together and call it a robot. It’s harder to make building a four-legger any easier than these two projects. What are you waiting for?

Continue reading “[Hari] Prints An Awesome Spider Robot”