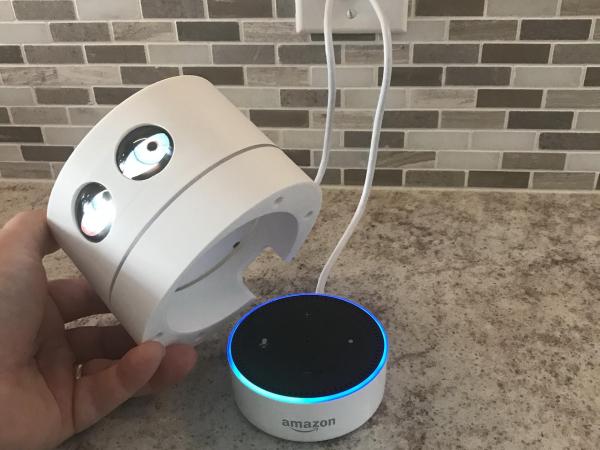
Mini Space Station Keeps Tabs On The Real One

Over the years, we’ve seen a number of projects that can blink an LED or otherwise notify you when the International Space Station is overhead. It’s a neat trick that brings space a little closer to home, but not exactly a groundbreaking achievement in 2020. That said, we think this version built by [Lance] deserves some special recognition for the unbearably adorable miniature ISS he designed it around.

Especially once you realize that its tiny little solar panels are actually functional. Well, more or less. [Lance] says conditions have to be pretty ideal for the panels to actually charge up the internal battery, so there’s the option to top things off with a USB cable if need be. To try and reduce power consumption as much as possible, he uses some pretty aggressive power saving tricks which are interesting in their own right.

As the ISS silently passes over your head several times per day, the notifier can’t spend too much time sleeping on the job. The Particle Photon needs to wake up regularly to pull down the time of the next pass given the current geographical position, then go back to sleep until right before showtime. When the Station is nearby, it blinks an Adafruit Smart NeoPixel positioned under a small 3D printed model of the Earth, and finally goes back to sleep until the process starts over.

If you’re looking for something a little less complicated, this two dimensional representation of the Space Station might be more your speed. Then again, an even more complicated take on the idea using lasers sounds pretty good too.

Making Custom 3D Printed Slide Switches

For a little over a year now we’ve been covering the incredible replicas [Mike Gardi] has been building of educational “computers” from the very dawn of the digital age. These fascinating toys, many of which are now extremely rare, are recreated using 3D printing and other modern techniques for a whole new generation to enjoy and learn from.

He’s picked up a trick or two building these replicas, such as this method for creating bespoke slide switches with a 3D printer. Not only does this idea allow you to control a custom number of devices, but as evidenced in the video after the break, the printed slider sounds absolutely phenomenal in action. Precisely the sort of “clunk” you want on your front panel.

Of course, [Mike] doesn’t expect anyone to create this exact switch. He’s designed it as part of his Working Digital Computer (WDC-1) project that he’s documenting on Hackaday.io, so it has a rather specific set of design parameters. But with the steps he outlines in the write-up, you should have no problem adapting the concept to fit your specific needs.

So how does it work? One half of the switch is a track is printed with indents for both reed switches and 6 x 3 mm disc magnets. The other is a small shuttle that itself has spaces for two of the same magnets. When it slides over the reed switches they’re activated by the magnet on one side, while the magnet on the other side will be attracted to the one embedded into the track. This not only gives the switch detents that you can feel and hear while moving it, but keeps the shuttle from sliding off the intended reed switch.

If you like this, you’ll absolutely love his mostly 3D printed binary encoder that we featured recently. With his track record, we’re excited to follow the WDC-1 project as it develops, and thrilled that [Mike] has brought it to Hackaday.io.

Continue reading “Making Custom 3D Printed Slide Switches”

Quadruped Robot Disguises Itself As A Ball

When the Skynet baseball bot swarms attack, we’ll be throwing [Carl Bugeja] some dirty looks for getting them started. He’s been working on 4B, a little quadruped robot that can transform itself into a sphere almost perfectly.

Before [Carl] was distracted by the wonders of PCB actuators more than a year ago, he started working on this little guy. He finally found some time to get it moving on its own, and the preliminary results look promising to say the least. Inside the 6 cm sphere is a total of 12 servos, 3 for each leg. All of the mechanical parts were 3D printed in nylon on an SLS machine, and the custom PCB has a BLE microcontroller module, an IMU and IR proximity sensors onboard. Everything is open source with all the files available on the Hackaday.io project page.

The microcontroller runs a full inverse kinematic model, so only the desired tip and base coordinate for each leg is input and the servo angles are automatically calculated. Ultimately [Carl] aims to have the robot both walking and rolling controllably. So far he’s achieved some degree of success in both, but it still needs some work (see the videos below. We’re eager to see what the future holds for this delightfully creepy bot.

Walking robots are always an interesting challenge. For more of our future overlords, check out this adorable little cat and this truly terrifying strandbeest.

Simple “Computer” From The ’60s Now 3D Printed

Now is an amazing time to be involved in the hobby electronics scene. There are robots to build, cheap microcontrollers which are easy to program, and computers themselves are able to be found for very low prices. That wasn’t the case in the 1960s though, where anyone interested in “electronics” might have had a few books about ham radios or some basic circuits. If you were lucky though, you may have found a book from 1968 that outlined the construction of a digital computer made out of paperclips that [Mike Gardi] is hoping to replicate.

One of the first components that the book outlines is building an encoder, which can convert a decimal number to binary. In the original book the switches were made from paper clips and common household parts, but [Mike] is using a more reliable switch and some 3D prints to build his. The key of the build is the encoder wheel and pegs, which act as the “converter” between decimal and binary and actually performs the switching.

It’s a fairly straightforward build, but by working through the rest of the book the next steps are to build two binary encoders and hook all of them up to an ALU which will give him most of a working computer from long lost 1960s lore. He’s been featured recently for building other computers from this era as well.

Thanks to [DancesWithRobots] for the tip!

3D Printed Metro Charger Ready For The Wasteland

In the video game Metro 2033 and its subsequent sequels, players fight their way through a post-apocalyptic version of Russia using improvised weapons and tools cobbled together from the sort of bits and bobs the survivors of a nuclear war might be able to scavenge from the rubble. One of the most useful devices in the game is known as the “Universal Charger”: a hand-operated dynamo that the player must use periodically recharge their electrical devices.

The in-game Universal Charger

Being a fan of the series, [Nikola Petrov] wanted to build his own version of the Metro 2033 charger; but rather than going for an exact screen replica, he decided to explore the mechanism itself and see if he could 3D print a functional device.

As demonstrated in the video after the break, his charger manages to produce enough energy to light an LED on each squeeze of the trigger. Though if we were packing our gear to go fight mutated beasties in alternate-future Moscow, we might look for something with a bit more kick.

Beyond the 3D printed parts, the charger uses a couple short pieces of 8 mm rod, a NEMA 17 stepper motor, and a one-way bearing that’s usually used for pull starting small gasolene engines.

Interestingly, [Nikola Petrov] is no stranger to 3D printed electrical generation. If you’re interested in getting some real power out of a NEMA 17 stepper, his fantastic printed wind turbine is a must-see.

Continue reading “3D Printed Metro Charger Ready For The Wasteland”

An Open Assistive Robotic Arm To Help People Feed Themselves

Despite being otherwise capable, not everyone is able to feed themselves. [Julien]’s robot arm project aims to bring this crucial independence back to those people. Assistive devices in this space do exist, but as always they’re prohibitively expensive and the approval process is a nightmare. The development of the arm started by working closely with people who needed it at a local hospital. We note with approval, quite a few cardboard mock-ups to get the size and shape right before more formal work was done in CAD.

The robot arm only has to support a very light payload so its construction can be quite light. A frame of steel rods or plywood is all that’s required. We like how the motion is transferred from stepper motors to the joints of the arm by generously sized timing belts allowing the weight of the arm to remain towards the base. The team behind the project has gotten it to a point, but they’re hoping it will inspire community involvement as they move forward with it.

It’s worth noting, this is not the first assistive eating aid we’ve covered.

Winter Is Coming, This Clock Will Let You Know When

For Game of Thrones fans, it’s an awkward time. The show has ended its run on HBO (not without a certain level of controversy), the planned prequel is still years away, and who knows when George R. R. Martin will actually get around to writing the final books in the series. Fans have no choice but to entertain themselves while waiting for further tales of adventure from Westeros, which is how we get things like this motorized clock from [Techarge].

Inspired by the now iconic opening sequence from the HBO series, elements of the 3D printed model spin around while the theme song is played courtesy of a DFPlayer Mini MP3 player module and small 2 watt speaker. The audio hardware, motor, and four digit LED display module in the front are all connected to an Arduino with a custom PCB shield, giving the inside of the clock a very clean and professional appearance.

Around the back side [Techarge] has two small push buttons to set the hour and minutes, and a large toggle to control the music and movement. As of right now it needs to be switched on and off manually, but a future enhancement could see it kick on hourly.  We’d also like to see an RTC module added to the PCB, or better yet, switch over to the ESP8266 and just pull the time down from NTP.

Who knows? By the time you’ve built one of these clocks for yourself, and the hand-made Iron Throne phone charger stand to go with it, maybe ol’ George will have slipped out a new book. But don’t count on it.