Sentry Robot Turns Bad Cat To Good

The household of [James Watts] has cats, and those cats have decided that various spots of carpet are just great for digging up with their claws. After some efforts at training the cats, [James] enlisted a robotic cat trainer with remote wireless sensors. The automated trainer does only one job, but it does that one job reliably and tirelessly, which is just what is needed in this case. A task like “automate training the cats to stop clawing the carpet” is really made up of many smaller problems, and [James] implemented a number of clever ideas in his solution.

First of all, the need for an automated solution has a lot to do with how pets form associations, and the need to have the negative reinforcement be in the right place at the right time to be effective. A harmless spritz of water in this case is used for correction and needed to be applied immediately, consistently, and “from out of nowhere” (instead of coming from a person.) Otherwise, as [James] discovered, spraying water when the cats clawed the carpet simply meant that they stopped doing it when he was around.

There were a number of tricky problems to solve in the process. One was how to reliably detect cats actually clawing the carpet. Another was how to direct the harmless spray of water to only the spot in question, and how to rig and manage a water supply without creating another mess in the process. Finally, the whole thing needed to be clean and tidy; a hackjob with a mess of wires strung everywhere just wouldn’t do.

base_front
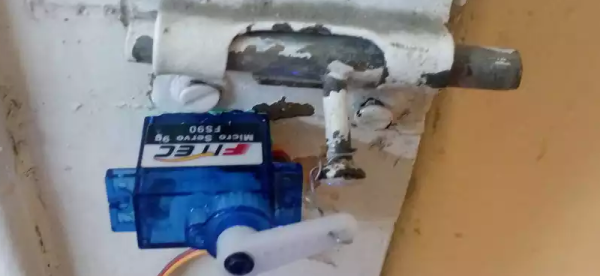
To achieve all this, [James] created a main sprayer unit that is wirelessly connected to remote sensor units using NRF24L01+ serial packet radios. When a remote senses that a trouble spot is being clawed, the main unit uses an RC servo to swivel a spray nozzle in the correct direction and give the offending feline a watery reminder.

The self-contained remote sensors use an accelerometer to detect the slight lifting of the carpet when it’s being clawed. [James] programmed the MMA8452Q three axis accelerometer to trigger an external pin when motion is sensed above a certain threshold, and this event is sent over the wireless link.

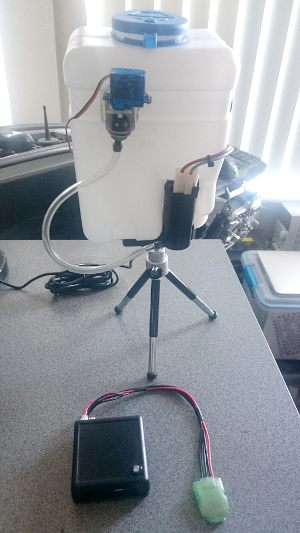
For the main sprayer unit itself, [James] cleverly based it around an off-the-shelf replacement windshield washer tank. With an integrated pump, tubing, and assortment of nozzles there was no need to design any of those elements from scratch. If you want to give the project a shot, check out the github repository — probably worth it it since one night is all it took to change the cat behavior which explains the lack of any action video.

Pet projects usually center around automating the feeding process, but it’s nice to see other applications. For something on the positive-reinforcement end of training, check out this cat exercise wheel that integrates a treat dispenser to encourage an exercise regimen.

Homebrew Dash Cam Enables Full Suite Of Sensors

You heard it here first: dash cams are going to be the next must-have item for your daily driver. Already reaching market saturation in some parts of the world but still fairly uncommon in North America, we predict that car makers will soon latch onto the trend and start equipping cars with dash cams as standard equipment. And you can just bet that whatever watered-down, overpriced feature set they come up with will be sure to disappoint, so you might want to think about building your own Raspberry Pi dash cam with an accelerometer and lots of LEDS.

Still very much in the prototyping phase, [CFLanger]’s project is at its heart a dash cam, but it looks like he wants to go far beyond that. Raspivid and a PI NoIR camera take care of the video streaming, but the addition of a Pi SenseHAT gives [CFLanger] a bunch of options for sensing and recording the car’s environment. Not content with the SenseHAT’s onboard accelerometer, he added an ADXL345 to the sensor suite. The 64-pixel LED display is just for fun – it displays pitch and roll of the platform – and a yet-to-be-implemented bar-graph display will show acceleration in the X-axis. He figures the whole thing is good for a couple of days of video, but we hope he adds audio capture and perhaps ECU data from an OBDII-Bluetooth adapter.

We’ve seen surprisingly few DIY dash cams on Hackaday, at least so far. There has been a dash cam teardown and retasking, and there are plenty of dashboard computer builds, though. Seems like most hackers want that DIY self-driving car first.

Continue reading “Homebrew Dash Cam Enables Full Suite Of Sensors”

Design And Hacking Drilldown: SuperCon Badge

One can imagine a political or business conference without an interactive badge — but not a hacker conference. Does this make the case for hackers being a special breed of people, always having something creative to show for their work? Yes, I think it does.

Following the Hackaday Belgrade conference in April of this year, we met at the Supplyframe offices to discuss the badge for the Hackaday SuperConference that will happen in Pasadena on 5+6th of November. The Belgrade conference badge (which was fully documented if you’re curious) was surprisingly popular, and I was asked to design the new one as well.

I was prepared to come up with something completely new, but [Mike Szczys] suggested keeping with the same basic concept for the project: “No reason to change anything, we have a badge that works”. To which I responded: “Well, the next one will also work”. But then I realized that “works” does not stand for “being functional”. The key is that it was embraced by visitors who played with it, coded on it, and solved a crypto challenge with it.

The World Doesn’t Have Enough LEDs

led-modules-versus-smd
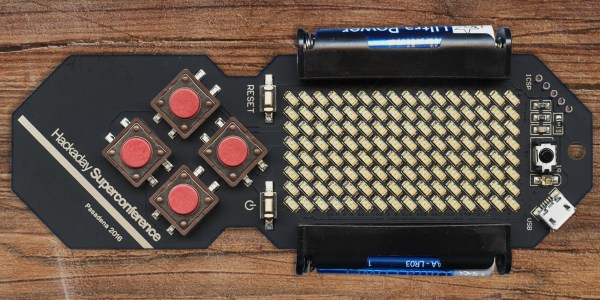
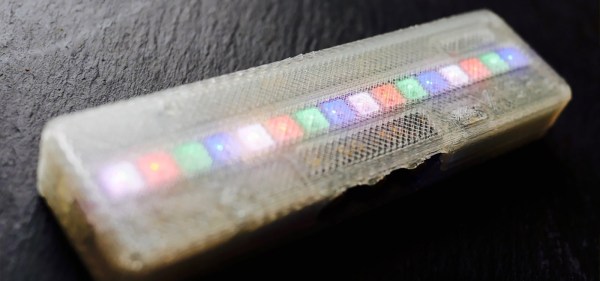
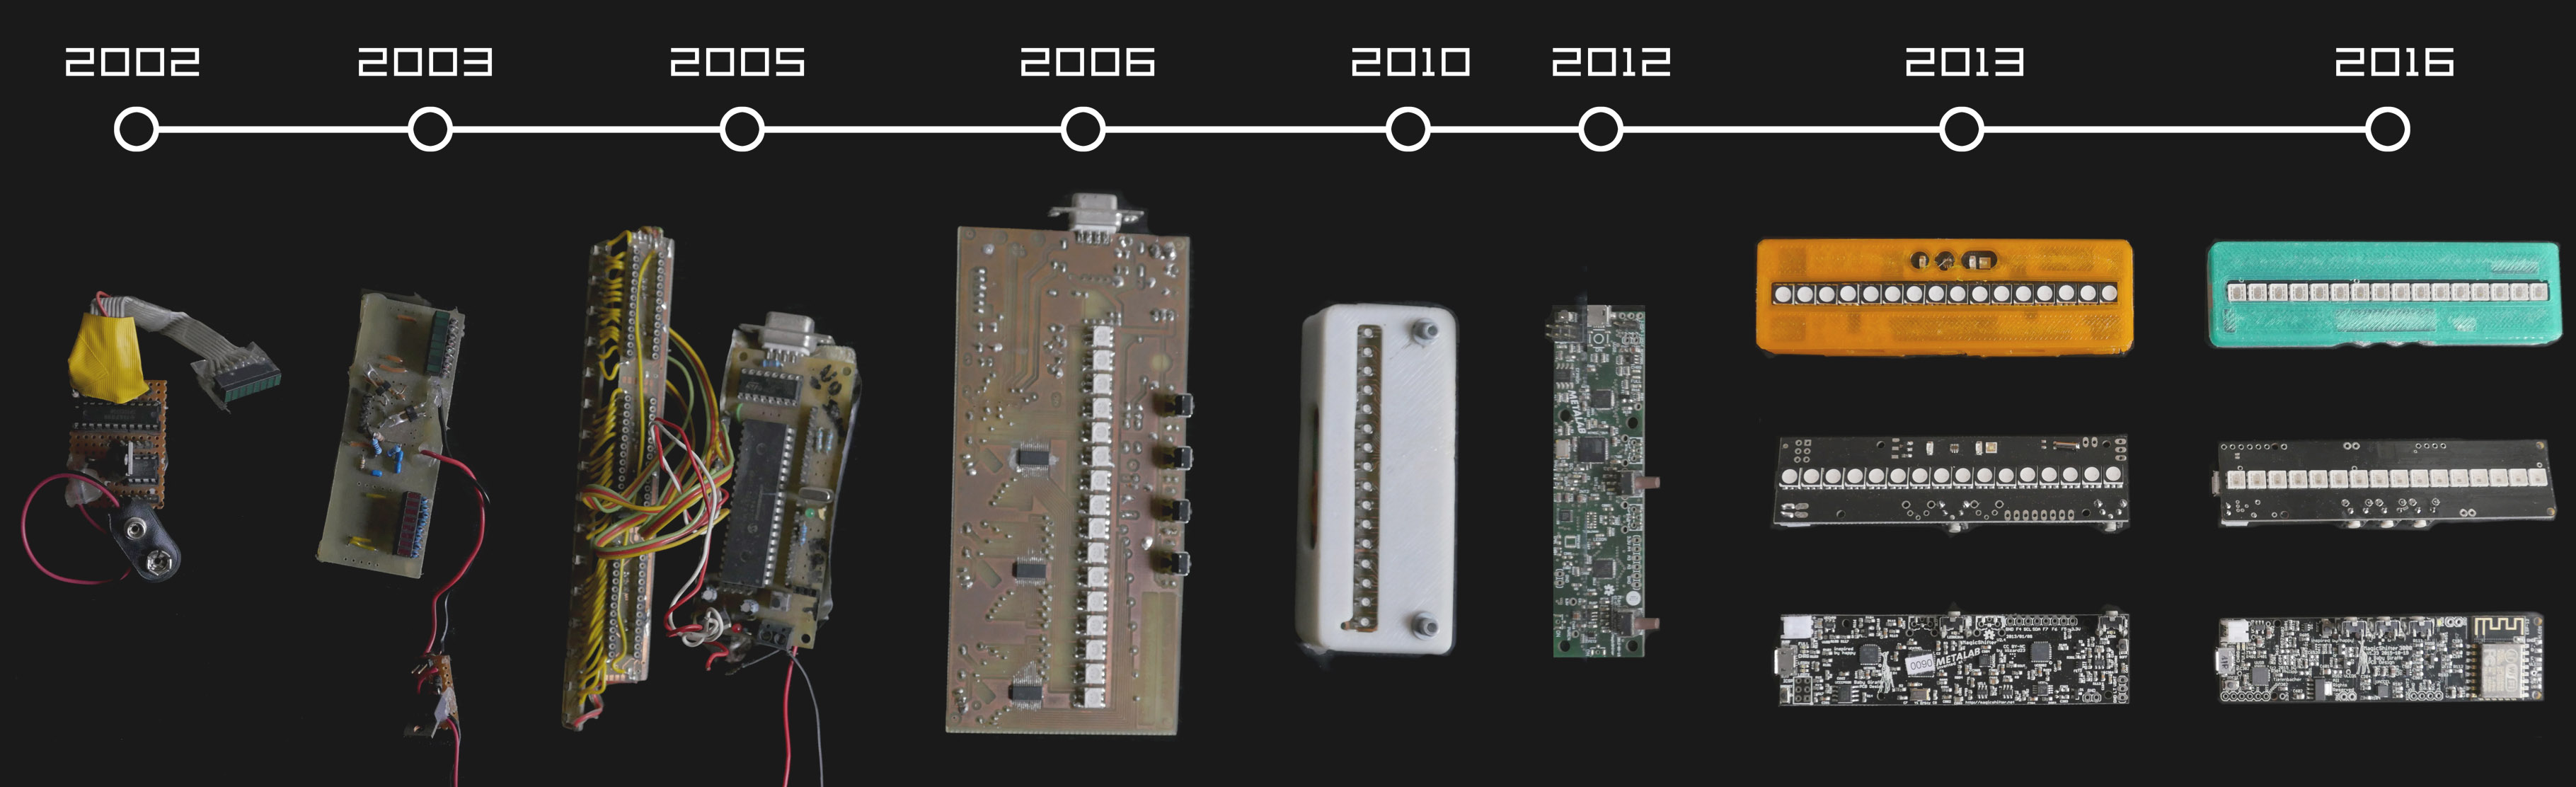
Fast forward six months — here are the modifications made to the basic concept. First, the existing LED matrix, which was composed of two compact 8×8 blocks, was replaced by 128 discrete SMD LEDs. It was a much needed change to help scale down the dimensions and clunkiness, but also to avoid another painful experience of trying to purchase and have the matrix displays shipped, which seriously threatened the production of the previous badge.

It’s a long story which I discussed in my Belgrade talk — it turned out we did not manage to get enough common anode (CA) displays from all distributors in the whole world. We had a plan B, which also fizzled, leaving us with the plan C which actually included two “C”s: Common Cathode. We cleaned up all the supplies at five distributors, and managed to get 122 CA red, 340 CC red and 78 CA green displays (enough for only 270 badges) — the entire world supply. After that, you couldn’t get any 38 mm Kingbright’s display for months! The only problem was that there were two different versions of PCBs, one for CA and the other for CC displays, but luckily only one version of software, as it could autodetect the display type.

accelerometer-on-the-boardMotion and Expansion

So, what else was new in the concept? In the Belgrade version, the badge supported an accelerometer module and included an unpopulated footprint in case you decided to install it, but now the badge has the MEMS chip LIS3 as an integral part. There are nine pads (with five I/O ports, driven directly from the MCU) to which you can add a 9-pin expansion connector. There will be a number of these connectors at the Design Lab, so that anyone can expand their badge for their convenience, on the spot.

The Visual Design

The biggest change was in the visual design. What we came up with ended up being a fair bit smaller, lighter, with a more convenient shape, and less than half the thickness of the previous one. After we had scrapped quite a few ideas during the development process (including stylized skull, frog, etc), we were left with a couple of options which you can see on the image below. The wireframe drawing on the left hand side is the Belgrade badge, shown here for a size comparison. At this point the locale and date of the conference weren’t yet definitive, which is why you see San Francisco written on the images.

design-options-2016-supercon-badge

Design number 4 prevailed, so the PCB layout could begin. I don’t like autorouted PCBs, so I was in for quite a rough time trying to solve the routing manually having only 2 layers on the board at my disposal.

Routing a Compact LED Matrix

The LED matrix is so dense that there was virtually no room on the LED layer, so most of the tracks on the component layer had to be routed as if it was a single layer PCB. To make matters worse, the LED layer is routed as a matrix, with a bunch of horizontal and vertical tracks, otherwise a good reason to use a 4-layer PCB. To stay inside the budget, everything had to be placed on 2 layers, and that’s why the final result seems so confusing at the populated area between batteries:

Continue reading “Design And Hacking Drilldown: SuperCon Badge”

Bicycle Seismograph Measures The Streets

Riding the streets of the Netherlands on a bicycle is a silky-smooth experience compared to doing the same on those of Germany. So says [Kati Hyyppä], who made the move with her trusty Dutch bike. The experience led her to record the uneven cobblestones and broken asphalt of the German roads on a home-made seismograph, a paper chart recorder driven by the bike’s motion and recorded upon by a pen free to vibrate as it passed over any bumps.

The resulting instrument is a wooden frame with a ballpoint pen mounted in a sliding holder weighted with some washers and kept under some tension with elastic bands. The paper roll is driven from the motion of the bike by the drive from a mechanical speedometer feeding a set of FischerTechnik gears, and the whole unit is suspended from the crossbar.

You can see it in action in the video below the break, and if you would like to build one yourself she has put the project up on Instructables as well as posting the description linked above.

Continue reading “Bicycle Seismograph Measures The Streets”

Hand Waving Unlocks Door

Who doesn’t like the user interface in the movie Minority Report where [Tom Cruise] manipulates a giant computer screen by just waving his hands in front of it? [AdhamN] wanted to unlock his door with hand gestures. While it isn’t as seamless as [Tom’s] Hollywood interface, it manages to do the job. You just have to hold on to your smartphone while you gesture.

The project uses an Arduino and a servo motor to move a bolt back and forth. The gesture part requires a 1sheeld board. This is a board that interfaces to a phone and allows you to use its capabilities (in this case, the accelerometer) from your Arduino program.

The rest should be obvious. The 1sheeld reads the accelerometer data and when it sees the right gesture, it operates the servo. It would be interesting to do this with a smart watch, which would perhaps look a little less obvious.

We covered the 1sheeld board awhile back. Of course, you could also use NFC or some other sensor technology to trigger the mechanism. You can find a video that describes the 1sheeld below.

Continue reading “Hand Waving Unlocks Door”

MagicShifter 3000: An Over-Engineered POV Stick With A 15-Year Journey

3 hackers, 16 LEDs, 15 years of development, one goal: A persistence of vision display stick that fits into your pocket. That’s the magicShifter 3000. When waved, the little, 10 cm (4 inches) long handheld device draws stable images in midair using the persistence of vision effect. Now, the project has reached another milestone: production.

The design has evolved since it started with a green LED bargraph around 2002. The current version features 16 APA102 (aka DotStar) RGB LEDs, an ESP-12E WiFi module, an NXP accelerometer/magnetometer, the mandatory Silabs USB interface, as well as a LiPo battery and charger with an impressive portion of power management. An Arduino-friendly firmware implements image stabilization as well as a React-based web interface for uploading and drawing images.

After experimenting with Seeedstudio for their previous prototypes, the team manufactured 500 units in Bulgaria. Their project took them on a roundtrip through hardware manufacturing. From ironing out minuscule flaws for a rock-solid design, over building test rigs and writing test procedures, to yield management. All magicShifter enclosures are — traditionally — 3D printed, so [Overflo] and [Martin] are working in shifts to start the 500 prints, which take about 50 minutes each to complete. The printers are still buzzing, but assembled units can be obtained in their shop.

Over all the years, the magicShifter has earned fame and funding as the over-engineered open hardware pocket POV stick. If you’re living in Europe, chances are that you either already saw one of the numerous prototype units or ran into [Phillip Tiefenbacher] aka [wizard23] on a random hacker event to be given a brief demo of the magicShifter. The project always documented the status quo of hardware hacking: Every year, it got a bit smaller, better, and reflected what parts happened to be en vogue.

magicshifter-timeline

The firmware and 3D-printable enclosure are still open source and the schematics for the latest design can be found on GitHub. Although, you will search in vain for layout or Gerber files. The risk of manufacturing large batches and then being put out of business by cheap clones put its mark on the project, letting the magicShifter reflect the current, globalized status of hardware hacking once more. Nevertheless, we’re glad the bedrock of POV projects still persists. Check out the catchy explanatory video below.

Continue reading “MagicShifter 3000: An Over-Engineered POV Stick With A 15-Year Journey”

Pokemon Go Physical Pokeball Catches ‘Em All

There’s something irresistible about throwing Pokeballs at unexpectedly appearing creatures. But wait. When did you actually, physically throw a Pokeball? Swiping over colored pixels wasn’t enough for [Trey Keown], so he built a real, throwable, Pokemon-catching Pokeball for Pokemon Go.

Continue reading “Pokemon Go Physical Pokeball Catches ‘Em All”