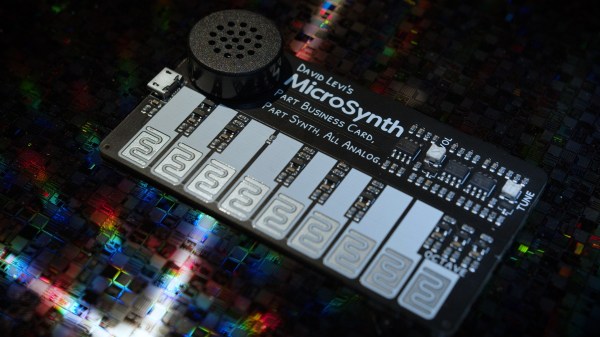
Kelly Heaton’s Artwork Blurs The Line Between Traditional And Electronic

Digital electronics are all well and good, but it’s hard to ignore the organic, living qualities of the analog realm. It’s these circuits that Kelly Heaton spends her time with, building artistic creations that meld the fine arts with classic analog hardware to speak to the relationship between electronics and nature. During her talk at the 2019 Hackaday Superconference, Kelly shared the story of her journey toward what she calls Electronic Naturalism, and what the future might bring.

The Pool of Reflection Loop was one of Kelly’s early electronic installation pieces.

Kelly got her start like many in the maker scene. Hers was a journey that began by taking things apart, with the original Furby being a particular inspiration. After understanding the makeup of the device, she began to experiment, leading to the creation of the Reflection Loop sculpture in 2001, with the engineering assistance of Steven Grey. Featuring 400 reprogrammed Furbys, the device was just the beginning of Kelly’s artistic experimentation. With an interest in electronics that mimicked life, Kelly then moved on to the Tickle Me Elmo. Live Pelt (2003) put 64 of the shaking Muppets into a wearable coat, that no doubt became unnerving to wear for extended periods.

Analog electronics parallel living organisms while programmable logic merely simulates life.

Forrest Mims

Wanting to create art with a strong relationship to organic processes, Kelly focused on working with discrete components and analog circuitry. Basic building blocks such as the astable multivibrator became key tools that were used in different combinations to produce the desired effects. Through chaining several oscillators together, along with analog sequencers, circuits could be created that mimicked the sound of crickets in a backyard, or a Carolina wren singing in a tree.

Continue reading “Kelly Heaton’s Artwork Blurs The Line Between Traditional And Electronic”

RTFM: ADCs And DACs

It’s tough to find a project these days that doesn’t use an analog-to-digital converter (ADC) or digital-to-analog converter (DAC) for something. Whether these converters come as built-in peripherals on a microcontroller, or as separate devices connected over SPI, I2C, or parallel buses, all these converters share some common attributes, and knowing how to read the specs on them can save you a lot of headaches when it comes to getting things working properly.

There are some key things to know about these devices, and the first time you try to navigate a datasheet on one, you may find yourself a bit confused. Let’s take a deep dive into the static (DC) properties of these converters — the AC performance is complex enough to warrant its own follow-up article.

Continue reading “RTFM: ADCs And DACs”

[Ben Krasnow] Looks Inside Film Camera Date Stamping

Honestly, we never wondered how those old film cameras used to put the date stamp in the lower right-hand corner of the frame. Luckily, [Ben Krasnow] does not suffer from this deplorable lack of curiosity, and his video teardown of a date-stamping film camera back (embedded below) not only answers the question, but provides a useful lesson in value engineering.

For the likely fair fraction of the audience who has never taken a photo on film before, cheap 35-mm cameras were once a big thing. They were really all one had for family snapshots and the like unless you wanted to invest in single-lens reflex cameras and all the lenses and accessories. They were miles better than earlier cartridge cameras like the 110 or – shudder – Disc film, and the cameras started getting some neat electronic features too. One was the little red-orange date stamp, which from the color we – and [Ben] assumed was some sort of LED pressed up against the film, but it ends up being much cooler than that.

Digging into the back of an old camera, [Ben] found that there’s actually a tiny projector that uses a mirror to fold the optical path between the film and a grain-of-wheat incandescent bulb. An LCD filter sits in the optical path, but because it’s not exactly on the plane of the film, it actually has to project the image onto the film. The incandescent bulb acts as a point source and the mirror makes the optical path long enough that the date stamp image appears sharp on the film. It’s cheap, readily adapted to other cameras, and reliable.

Teardowns like this aren’t fodder for [Ben]’s usual video fare, which tends more toward homemade CT scanners and Apollo-grade electroluminescent displays, but this was informative and interesting, too.

Continue reading “[Ben Krasnow] Looks Inside Film Camera Date Stamping”

High Precision Analog IO With Digital Pins

Reading the temperature of your environment is pretty easy right? A quick search suggests the utterly ubiquitous DHT11, which speaks a well documented protocol and has libraries for every conceivable microcontroller and platform. Plug that into your Arduino and boom, temperature (and humidity!) readings. But the simple solution doesn’t hit every need, sometimes things need to get more esoteric.

The technique summarized by an image from Microchip Appnote AN685

For years we’ve been watching [Edward]’s heroic efforts to build accessible underwater sensing hardware. When we last heard from him he was working on improving the accuracy of his Arduino’s measurements of the humble NTC thermistor. Now the goal is the same but he has an even more surprising plan, throw the ADC out entirely and sample an analog thermistor using digital IO. It’s actually a pretty simple trick based on an intuitive observation, that microcontrollers are better at measuring time than voltage. 

The basic circuit

The circuit has a minimum of four components: a reference resistor, the thermistor, and a small capacitor with discharge resistor. To sense you configure a timer to count, and an edge interrupt to capture the value in the timer when its input toggles. One sensing cycle consists of discharging the cap through the discharge resistor, enabling the timer and interrupt, then charging it through the value to measure. The value captured from the timer will be correlated to how long it took the cap to charge above the logic-high threshold when the interrupt triggers. By comparing the time to charge through the reference against the time to charge through the thermistor you can calculate their relative resistance. And by performing a few calibration cycles at different temperatures ([Edward] suggests at least 10 degrees apart) you can anchor the measurement system to real temperature.

For all the gory details, including tips for how to save every last joule of energy, check out [Edward]’s post and the Microchip appnote AN685 he references. Besides this series [Edward]’s Cave Pearl Project has already yielded an impressive number of Hackday posts. For more great hardware writeups check out a general hardware build for a single sensing node, or the “temperature sensor” [Edward] made with no external parts at all!

Low-Level Analog Measurement Hack Chat

Join us on Wednesday 17 July 2019 at noon Pacific for the Low-Level Analog Measurement Hack Chat with Chris Gammell!

A lot of electronics enthusiasts gravitate to the digital side of the hobby, at least at first. It’s understandable – an Arduino, a few jumpers, and a bit of code can accomplish a lot. But in the final analysis, digital circuits are just analog circuits with the mystery abstracted away, and understanding the analog side opens up a fascinating window on the world of electronics.

Chris Gammell is well-known around hacker circles thanks to his Amp Hour Podcast with Dave Jones, his KiCad tutorials, and his general hacker chops. He’s also got a thing for the analog world, and wants to share some of the tips and tricks he’s developed over his two decades as an electrical engineer. In the next Hack Chat, we’ll be joining Chris down in the weeds to learn the ins and outs of low-level analog measurements. Join us with your questions and insights, or just come along to peel back some of the mysteries of the analog world.

join-hack-chatOur Hack Chats are live community events in the Hackaday.io Hack Chat group messaging. This week we’ll be sitting down on Wednesday July 17 at 12:00 PM Pacific time. If time zones have got you down, we have a handy time zone converter.

Click that speech bubble to the right, and you’ll be taken directly to the Hack Chat group on Hackaday.io. You don’t have to wait until Wednesday; join whenever you want and you can see what the community is talking about.

ESP32 Video Tricks Hack Chat With Bitluni

Join us Wednesday at noon Pacific time for the ESP32 Video Tricks Hack Chat!

The projects that bitluni works on have made quite a few appearances on these pages over the last couple of years. Aside from what may or may not have been a street legal electric scooter, most of them have centered around making ESP32s do interesting tricks in the analog world. He’s leveraged the DACs on the chip to create an AM radio transmitter, turned an oscilloscope into a video monitor, and output composite video. That last one was handy for turning a Sony Watchman into a retro game console. He’s also found ways for the ESP32 to output VGA signals. Looks like there’s no end to what he can make the versatile microcontroller do.

Although the conversation could (and probably will) go anywhere, we’ll start with video tricks for the ESP32 and see where it goes from there. Possible topics include:

  • Tricks for pushing the ESP32 DACs to their limits;
  • When to use an external DAC;
  • Optimizing ESP32 code by running on separate cores; and
  • What about HDMI on the ESP32?

You are, of course, encouraged to add your own questions to the discussion. You can do that by leaving a comment on the ESP32 Video Tricks Hack Chat and we’ll put that in the queue for the Hack Chat discussion.

join-hack-chatOur Hack Chats are live community events on the Hackaday.io Hack Chat group messaging. This week we’ll be sitting down on Wednesday, March 27, at noon, Pacific time. If time zones have got you down, we have a handy time zone converter.

Click that speech bubble to the right, and you’ll be taken directly to the Hack Chat group on Hackaday.io. You don’t have to wait until Wednesday; join whenever you want and you can see what the community is talking about.

Simple Timer Evolves Into Custom Kid’s Watch

Sporting a new wristwatch to school for the first time is a great moment in a kid’s life. When it’s a custom digital-analog watch made by your dad, it’s another thing altogether.

As [Chris O’Riley] relates, the watch he built for his son [Vlad] started out as a simple timer for daily toothbrushing, a chore to which any busy lad pays short shrift unless given the proper incentive. That morphed into an idea for a general purpose analog timepiece with LEDs taking the place of hands. [Chris] decided that five-minute resolution was enough for a nine-year-old, which greatly reduced the number of LEDs needed. An ATtiny841 tells a 28-channel I2C driver which LEDs to light up, and an RTC chip keeps [Vlad] on schedule. The beautiful PCB lives inside a CNC machined aluminum case; we actually commented to [Chris] that the acrylic prototype looked great by itself, but [Vlad] wanted metal. The watch has no external buttons; rather, the slightly flexible polycarbonate crystal bears against a PCB-mounted pushbutton to control functions.

With a snappy wristband, [Vlad] will be rolling fancy on the schoolyard. It’s a great looking piece that needed a wide range of skills to execute, as all watches do. Check out some other watch builds, like this lovely pure analog, another digital-analog hybrid, or this pocket watch that packs an Enigma machine inside.

Continue reading “Simple Timer Evolves Into Custom Kid’s Watch”