Fix Old Caps, But Keep That “Can Capacitor” Look

Vintage electronics and capacitor replacements tend to go hand-in-hand. Why? Because electrolytic capacitors just don’t last, not the way most other components do, anyway.

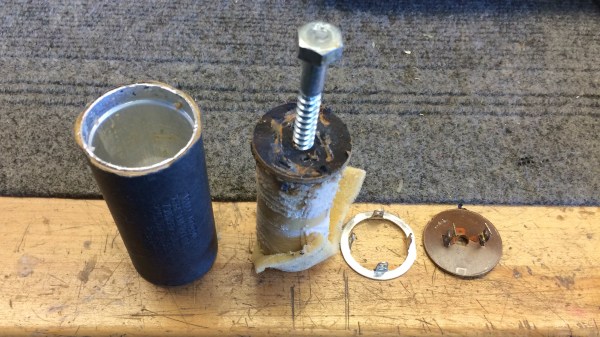
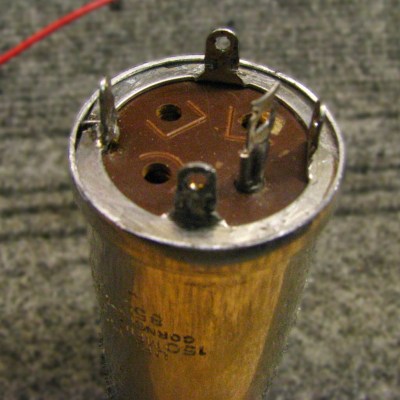
The metal terminal ring and the central plate are kept for re-use, and the metal case re-crimped after the internals of the capacitor are replaced with a modern equivalent.

It’s one thing to swap old caps with modern replacements, but what about electronics where the components are not hidden away, and are an important part of the equipment’s look? [lens42] shares a method for replacing antique can-style capacitors in a way that leaves them looking completely original. All it takes is some careful application of technique.

The first thing to do is carefully file away the crimp of the metal can until one can release the ring and plate that hold the terminals. Once that is off, the internals can be pulled from the metal can for disposal. Since the insides of the old cap won’t be re-used, [lens42] recommends simply drilling a hole, screwing in a lag bolt to use as a handle, and pulling everything out. There’s now plenty of space inside the old can to hold modern replacements for the capacitor, and one can even re-use the original terminals.

That leaves the job of re-crimping the old can around the terminal ring to restore a factory-made appearance. To best do this, [lens42] created a tapered collar. Gently hammering the can forces the bottom into the taper, and the opening gradually crimps around the terminal ring. It’s also possible to carefully hammer the flange directly, but the finish won’t be as nice. This new crimp job may not look exactly the same as before, but once the cap is re-installed into the original equipment, it won’t be possible to tell it has been modified in any way.

If this sounds a bit intimidating, don’t worry. [lens42] provides plenty of pictures. And if this kind of thing is up your alley, you may want to check out the Caps Wiki, an effort to centralize and share details about tech repair, especially for vintage electronics.

New OS For Commodore 64 Adds Modern Features

The Commodore 64 was a revolutionary computer for its day and age. After four decades, though, it gets harder and harder to use these computers for anything more than educational or hobby electronics projects. [Gregory Nacu] is fiercly determined to challenge this idea, though, and has gone to great extremes to make this hardware still relevant in the modern age by writing a completely new operating system for the Commodore machines.

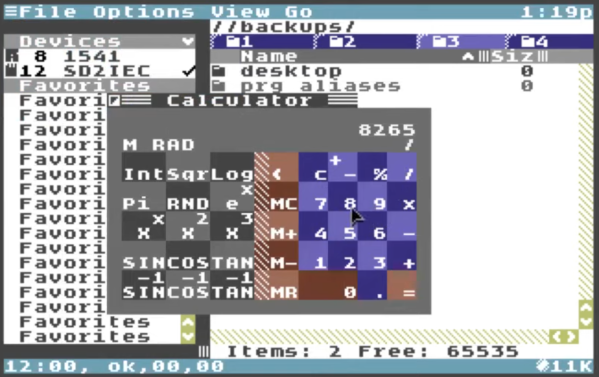
Known as C64OS, it squeezes everything it can out of the 8 bit processor and 64 kB of memory. The new OS includes switchable desktop workspaces, a windowing system, draggable icons, a Mac-style menu bar at the top, and drop-down menus for the icons (known as aliases in the demonstrations). The filesystem is largely revamped as well and enables a more modern directory system to be used. There are still some limitations like a screen resolution of 320×200 pixels and a fixed color palette which only allows for a handful of colors, but this OS might give Windows 3.1 a run for its money.

The project is still being actively developed but it has come a long way into a fairly usable state. It can be run on original hardware as well as long as you have a method of getting the image to the antique machine somehow. If not, the OS can likely run on any number of C64 emulators we’ve featured in the past.

Thanks to [Stephen] for the tip!

Continue reading “New OS For Commodore 64 Adds Modern Features”

A ’70s TV With ’20s Parts

Keeping older technology working becomes exponentially difficult with age. Most of us have experienced capacitor plague, disintegrating wire insulation, planned obsolescence, or even the original company failing and not offering parts or service anymore. To keep an antique running often requires plenty of spare parts, or in the case of [Aaron]’s vintage ’70s Sony television set, plenty of modern technology made to look like it belongs in a machine from half a century ago.

The original flyback transformer on this TV was the original cause for the failure of this machine, and getting a new one would require essentially destroying a working set, so this was a perfect candidate for a resto-mod without upsetting any purists. To start, [Aaron] ordered a LCD with controls (and a remote) that would nearly fit the existing bezel, and then set about integrating the modern controls with the old analog dials on the TV. This meant using plenty of rotary encoders and programming a microcontroller to do the translating.

There are plenty of other fine details in this build, including audio integration, adding modern video and audio inputs like HDMI, and adding LEDs to backlight the original (and now working) UHF and VHF channel indicators. In his ’70s-themed display wall, this TV set looks perfectly natural. If your own display wall spotlights an even older era, take a look at some restorations of old radios instead.

Continue reading “A ’70s TV With ’20s Parts”

IBM PalmTop Running Modern (Modified) Linux

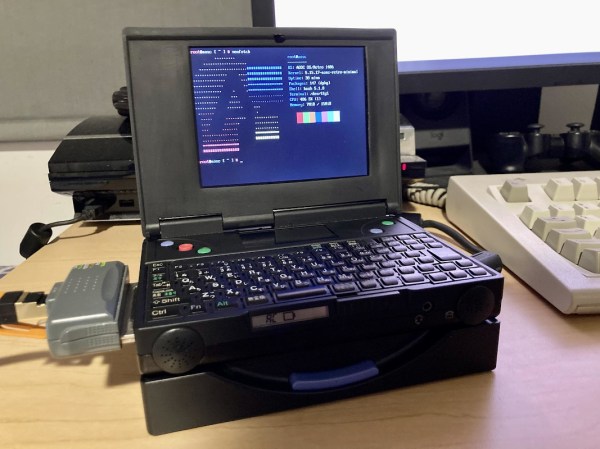
The handheld computing market might seem dominated by smartphones today, but before their mass adoption there were other offerings for those who needed some computing power on-the-go. If a 90s laptop was too bulky, there was always the IBM PalmTop which packed punch for its size-to-weight ratio, and for the era it was created in. [Mingcong Bai] still has one of these antiques and decided to see if it was still usable by loading a customized Linux distribution on it.

The PalmTop sported modest hardware even for its time with an Intel 486SL running at 33 MHz with 20 MiB of RAM. This one also makes use of a 1 GB CompactFlash card for storage and while [Mingcong Bai] notes that it is possible to run Windows 95 on it, it’s not a particularly great user experience. A Linux distribution customized for antique hardware, AOSC/Retro, helps solve some of these usability issues. With this it’s possible to boot into a command line and even do some limited text-based web browsing as long as the Ethernet adapter is included.

While the computer is running at its maximum capacity just to boot and perform basic system functions, it’s admirable that an antique computer such as this still works, especially given its small size and limited hardware functionality. If you’re curious about more PalmTop-style computers, take a look at the first one ever produced: the HP-200LX.

Continue reading “IBM PalmTop Running Modern (Modified) Linux”

Modern Features In Classic Radio

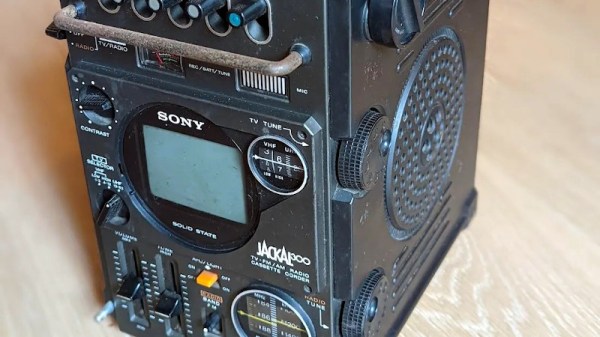
As consumer electronics companies chase profits on tighter and tighter margins, it seems like quality is continually harder to find for most average consumer-grade products. Luckily, we don’t have to hunt through product reviews to find well-built merchandise since we have the benefit of survivorship bias to help us identify quality products from the past that have already withstood the test of time. [Tom] has forever been fond of this particular Sony TV/radio combo from the ’70s so he finally found one and set about modernizing it in a few key ways.

Among the modifications to this 1978 Sony FX-300 include the addition of a modern color display, Bluetooth, an upgraded FM radio, and a microphone. At the center of all of this new hardware is a Teensy 4 which [Tom] has found to be quite powerful and has enough capabilities to process the audio that’s being played in order to make visual representations of the sound on the screen. He also implemented a bitcrusher filter and integrated it into the controls on the original hardware. He’s using an optimized version of this library to cram all of that processing ability into such a small chip, and the integration of all this new hardware is so polished that it looks like it could be an original Sony stereo from the modern era.

While some may complain about restomod-type builds like this, we don’t really see any need to be arbitrarily or absolutely faithful to bygone eras even if the original hardware was working properly in the first place. What works is taking the proven technology of the past and augmenting it with modern features to enjoy the best of both worlds. Much like this hi-fi stereo which blends the styles and technology of the 90s with that of the 60s in an equally impressive way.

IBM Cheese Cutter Restoration

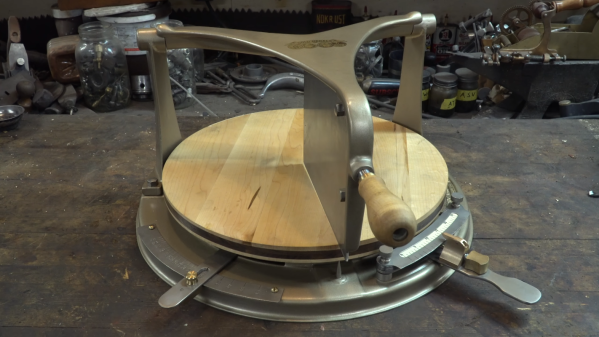
For a while now, Mac Pro towers have had the nickname “cheese grater” because of their superficial resemblance to this kitchen appliance. Apple has only been a company since the 70s, though, and is much newer than one of its historic rivals, IBM. In fact, IBM is old enough to have made actual cheese-related computers as far back as the 1910s, and [Hand Tool Rescue] recently obtained one of these antique machines for a complete restoration.

The tool arrived to the restoration workshop in a state so poor that it was difficult to tell what many of the parts on the machine did except for the large cleaver at the top. The build starts with a teardown to its individual parts, cleaning and restoring them to their original luster, machining new ones where needed, and then putting it all back together. The real mystery of this build was what the levers on the underside of the machine were supposed to do, but after the refurbishment it was discovered that these are the way that portions the cheese wheel would be accurately sized and priced before a cut was made.

By placing a section of a wheel of cheese on the machine and inputting its original weight with one of the levers, the second lever is adjusted to the weight of cheese that the customer requested, which rotates the wheel of cheese to the correct position before a cut is made. To us who are spoiled with a world full of electronic devices, a mechanical computer like this seems almost magical, especially with how accurate it is, but if your business in the 1910s involved cheese, this would have been quite normal. In fact, it would be 50 more years before IBM created the machines that they’re more commonly known for.

Thanks to [Jasper Jans] for the tip!

Continue reading “IBM Cheese Cutter Restoration”

Super 8 Camera Brought Back To Life

The Super 8 camera, while a groundbreaking video recorder in its time, is borderline unusable now. Even if you can get film for it (and afford its often enormous price), it still only records on 8mm film which isn’t exactly the best quality of film around, not to mention that a good percentage of these cameras couldn’t even record audio. They were largely made obsolete by camcorders in the late ’80s and early ’90s, although some are still used for niche artistic purposes. If you’d rather not foot the bill for the film, though, you can still put one of these to work with the help of a Raspberry Pi.

[befinitiv] has a knack for repurposing antique analog equipment like this while preserving its aesthetic. While the bulk of the space inside of this camera would normally be used for housing film, this makes a perfect spot to place a Raspberry Pi Zero, a rechargeable battery, and a power converter circuit all in a 3D printed enclosure that snaps into the camera just as a film roll would have. It uses the Pi camera module but still makes use of the camera’s built in optics which include a zoom function. [befinitiv] also incorporated the original record button so that from the outside this looks like a completely unmodified Super 8 camera.

The camera can connect to a WiFi network and can stream live video to a computer, or it can record video files to an internal SD card. As a bonus, thanks to the power converter circuit, it is also capable of charging a cell phone. [befinitiv] notes that many of the aesthetic properties of 8 mm film seem to be preserved when using this method, and he has several theories as to why but no definitive answer. If you’d like to take a look at some of his other projects like this, check out this analog camera that is now able to take digital pictures. Continue reading “Super 8 Camera Brought Back To Life”