Scrap Bin Mods Move Science Forward

A first-time visitor to any bio or chem lab will have many wonders to behold, but few as captivating as the magnetic stirrer. A motor turns a magnet which in turn spins a Teflon-coated stir bar inside the beaker that sits on top. It’s brilliantly simple and so incredibly useful that it leaves one wondering why they’re not included as standard equipment in every kitchen range.

But as ubiquitous as magnetic stirrers are in the lab, they generally come in largish packages. [BantamBasher135] needed a much smaller stir plate to fit inside a spectrophotometer. With zero budget, he retrofitted the instrument with an e-waste, Arduino-controlled magnetic stirrer.

The footprint available for the modification was exceedingly small — a 1 cm square cuvette with a flea-sized micro stir bar. His first stab at the micro-stirrer used a tiny 5-volt laptop fan with the blades cut off and a magnet glued to the hub, but that proved problematic. Later improvements included beefing up the voltage feeding the fan and coming up with a non-standard PWM scheme to turn the motor slow enough to prevent decoupling the stir bar from the magnets.

[BantamBasher135] admits that it’s an ugly solution, but one does what one can to get the science done. While this is a bit specialized, we’ve featured plenty of DIY lab instruments here before. You can make your own peristaltic pump or even a spectrophotometer — with or without the stirrer.

Continue reading “Scrap Bin Mods Move Science Forward”

3D Printed Moon Phase Clock

Someone once observed that the moon is a harsh mistress. But that doesn’t mean you can’t keep track of her, specially with this awesome moon phase clock that [G4lile0] designed and built.

It uses a 3D printed moon model combined with a series of LEDs to create the phases. These LEDs are driven by an Arduino that calculates the phase to show, as well as driving a small OLED display that shows the date and time. There is even a party mode for all of those lunar raves that you host.

[G4lile0] has done an excellent job of documenting the code that drives the lamp, so it would be easy to add features, or adapt this design to show the phases of another moon or add other features. It’s an excellent overall design, and kudos to [G4lile0] for doing it all with open source tools like FreeCAD.

Continue reading “3D Printed Moon Phase Clock”

Only One Button? No Problem!

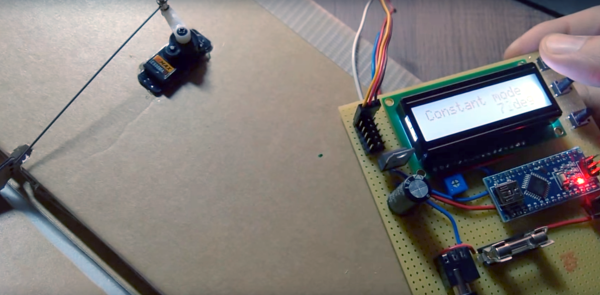
Sometimes less is more. This is especially true when dealing with microcontrollers with limited I/O pins. Even if you have lots of I/O, sometimes you are need to pack a lot into a little space. [Hugatry] was inspired by the simple interface found on a lot of flashlights: one button. Push it and it turns on. Push it again, and it switches modes. You cycle through the modes until you finally turn it back off. One button provides mutliple functions. The question is how can you use a power switch as an I/O device? After all, when you turn the power off, the microprocessor stops operating, right?

[Hugatry’s] answer is quite simple. He connects a resistor/capacitor network to an I/O pin (or multiple pins). When the processor turns on initially, the pin will read low and the capacitor will charge up. If you turn the power off, the CPU voltage will fall rapidly to zero, but the voltage on the capacitor will discharge slower. If you wait long enough and turn the power on, there’s no difference from that first power on event. But if you turn the power on quickly, the capacitor voltage will still be high enough to read as a logic one.

What that means is that the processor as part of its start up can detect that it was recently turned off and take some action. If it remembers the previous state in nonvolatile memory, you can have the code cycle through multiple states, just like a flashlight. You can see a video of the setup, below.

Continue reading “Only One Button? No Problem!”

A Laser Effect Projector Built With Safety In Mind

There’s just something about wielding a laser pointer on a dark, foggy night. Watching the beam cut through the mist is fun – makes you feel a little Jedi-esque. If you can’t get enough of lasers and mist, you might want to check out this DIY “laser sky” effect projector.

The laser sky effect will probably remind you of other sci-fi movies – think of the “egg scene” from Alien. The effect is achieved by sweeping a laser beam in a plane through swirling smoke or mist. The laser highlights a cross section of the otherwise hidden air currents and makes for some trippy displays. The working principle of [Chris Guichet]’s projector is simplicity itself – an octagonal mirror spun by an old brushless fan motor and a laser pointer. But after a quick proof of concept build, he added the extras that took this from prototype to product. The little laser pointer was replaced with a 200mW laser module, the hexagonal mirror mount and case were 3D printed, and the mirrors were painstakingly aligned so the laser sweeps out a plane. An Arduino was added to control the motor and provide safety interlocks to make sure the laser fires only when the mirror is up to speed. The effect of the deep ruby red laser cutting through smoke is mesmerizing.

If laser sky is a little too one-dimensional for you, expand into two dimensions with this vector laser projector, and if monochrome isn’t your thing try an RGB vector projector.

Continue reading “A Laser Effect Projector Built With Safety In Mind”

Power Wheels engine compartment

Power Wheels Rescued, Restored And Enhanced

It seems power wheels are like LEGO — they’re handed down from generation to generation.  [Nicolas] received his brand-new Peg-Perego Montana power wheels in 1997 as a Christmas present. After sitting in a barn for a decade, and even being involved in a flood, it was time to give it to his godchildren, though not without some restoration and added features. His webpages have a very good write-up, just shy of including schematics, but you’ll find an abbreviated version below.

Continue reading “Power Wheels Rescued, Restored And Enhanced”

RC receiver to arduino converter for BB-8

Ask Hackaday: How Do You Convert Negative Voltages To Positive?

I have a good background working with high voltage, which for me means over 10,000 volts, but I have many gaps when it comes to the lower voltage realm in which RC control boards and H-bridges live. When working on my first real robot, a BB-8 droid, I stumbled when designing a board to convert varying polarities from an RC receiver board into positive voltages only for an Arduino.

Today’s question is, how do you convert a negative voltage into a positive one?

In the end I came up with something that works, but I’m sure there’s a more elegant solution, and perhaps an obvious one to those more skilled in this low voltage realm. What follows is my journey to come up with this board. What I have works, but it still nibbles at my brain and I’d love to see the Hackaday community’s skill and experience applied to this simple yet perplexing design challenge.

The Problem

RC toy truck and circuit with no common

I have an RC receiver that I’ve taken from a toy truck. When it was in the truck, it controlled two DC motors: one for driving backwards and forwards, and the other for steering left and right. That means the motors are told to rotate either clockwise or counterclockwise as needed. To make a DC motor rotate in one direction you connect the two wires one way, and to make it rotate in the other direction you reverse the two wires, or you reverse the polarity. None of the output wires are common inside the RC receiver, something I discovered the hard way as you’ll see below.

Continue reading “Ask Hackaday: How Do You Convert Negative Voltages To Positive?”

Arduino With A… PIC?

Before the Arduino took over the hobby market (well, at least the 8-bit segment of it), most hackers used PIC processors. They were cheap, easy to program, had a good toolchain, and were at the heart of the Basic Stamp, which was the gateway drug for many microcontroller developers.

[AXR AMR] has been working with the Pinguino, an Arduino processor based on a PIC (granted, an 18F PIC, although you can also use a 32-bit device, too). He shows you how to build a compatible circuit on a breadboard with about a dozen parts. The PIC has built-in USB. Once you flash the right bootloader, you don’t need anything other than a USB cable to program. You can see a video of this below.

You will need a programmer to get the initial bootloader, but there’s plenty of cheap options for that. The IDE is available for Windows, Linux, and the Mac. Of course, you might wonder why you would use a PIC device instead of the more traditional Arduino devices. The answer is: it depends. Every chip has its own set of plusses and minuses from power consumption to I/O devices, to availability and price. These chips might suit you, and they might not. That’s your call.  Of course, the difference between Microchip and Atmel has gotten less lately, too.

We’ve covered Pinguino before with a dedicated board. If you never played with a Basic Stamp, you might enjoy learning more about it. If you’re looking for more power than a PIC 18F can handle, you might consider the Fubarino, a PIC32 board you can use with the Arduino IDE.

Continue reading “Arduino With A… PIC?”