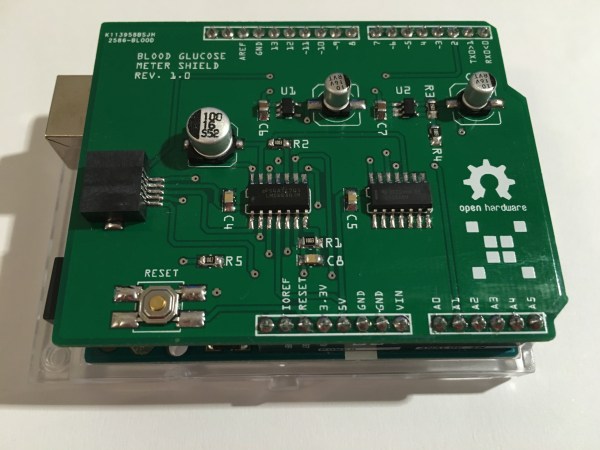
Hackaday Prize Entry: Open Source FFT Spectrum Analyzer

Every machine has its own way of communicating with its operator. Some send status emails, some illuminate, but most of them vibrate and make noise. If it hums happily, that’s usually a good sign, but if it complains loudly, maintenance is overdue. [Ariel Quezada] wants to make sense of machine vibrations and draw conclusions about their overall mechanical condition from them. With his project, a 3-axis Open Source FFT Spectrum Analyzer he is not only entering the Hackaday Prize 2016 but also the highly contested field of acoustic defect recognition.

open_fft_machineFor the hardware side of the spectrum analyzer, [Ariel] equipped an Arduino Nano with an ADXL335 accelerometer, which is able to pick up vibrations within a frequency range of 0 to 1600 Hz on the X and Y axis. A film container, equipped with a strong magnet for easy installation, serves as an enclosure for the sensor. The firmware [Ariel] wrote is an efficient piece of code that samples the analog signals from the accelerometer in a free running loop at about 5000 Hz. It streams the digitized waveforms to a host computer over the serial port, where they are captured and stored by a Python script for further processing.

From there, another Python script filters the captured waveform, applies a window function, calculates the Fourier transform and plots the spectrum into a graph. With the analyzer up and running, [Ariel] went on testing the device on a large bearing of an arbitrary rotating machine he had access to. A series of tests that involved adding eccentric weights to the rotating shaft shows that the analyzer already makes it possible to discriminate between different grades of imbalance.

The HackadayPrize2016 is Sponsored by:

A Pi Robot Without A Hat

Daughter boards for microcontroller systems, whether they are shields, hats, feathers, capes, or whatever, are a convenient way to add sensors and controllers. Well, most of the time they are until challenges arise trying to stack multiple boards. Then you find the board you want to be mid-stack doesn’t have stackable headers, the top LCD board blocks the RF from a lower board, and extra headers are needed to provide clearance for the cabling to the servos, motors, and inputs. Then you find some boards try to use the pins for different purposes. Software gets into the act when support libraries want to use the same timer or other resources for different purposes. It can become a mess.

The alternative is to unstack the stack and use external boards. I took this approach in 2013 for a robotics competition. The computer on the robots was an ITX system which precluded using daughter boards, and USB ports were my interface of choice. I used a servo controller and two motor controllers from Pololu. They are still available and I’m using them on a rebuild, this time using the Raspberry Pi as the brain. USB isn’t the only option, though. A quick search found boards at Adafruit, Robotshop, and Sparkfun that use I2C.

Continue reading “A Pi Robot Without A Hat”

Hackaday Prize Entry: Cheap, Open LiDAR

[adam] is a caver, meaning that he likes to explore caves and map their inner structure. This is still commonly done using traditional tools, such as notebooks (the paper ones), tape measure, compasses, and inclinometers. [adam] wanted to upgrade his equipment, but found that industrial LiDAR 3D scanners are quite expensive. His Hackaday Prize entry, the Open LIDAR, is an affordable alternative to the expensive industrial 3D scanning solutions out there.

The 3D scan of a small cave near Louisville (source: [caver.adam's] Sketchfab repository)
The 3D scan of a small cave near Louisville from [caver.adam’s] Sketchfab repository
LiDAR — Light Detection And Ranging —  is the technology that senses the distance between a sensor and an object by reflectively measuring the time of flight of a light beam between the two. By acquiring a two-dimensional array of multiple distance readings, this can be used for 3D scanning. Looking at how the industrial LiDAR scanners capture the environment using fast spinning mirrors, [adam] realized that he could basically achieve the same by using a cheap laser range finder strapped to a pan and tilt gimbal.

The gimbal he designed for this task uses stepper motors to aim an SF30-B laser rangefinder. An Arduino controls the movement and lets the eye of the sensor scan an object or an entire environment. By sampling the distance readings returned by the sensor, a point cloud is created which then can be converted into a 3D model. [adam] plans to drive the stepper motors in microstepping mode to increase the resolution of his scanner. We’re looking forwards to see the first renderings of 3D cave maps captured with the Open LIDAR.

The HackadayPrize2016 is Sponsored by:

Hackaday Prize Entry: Dtto Modular Robot

A robot to explore the unknown and automate tomorrow’s tasks and the ones after them needs to be extremely versatile. Ideally, it was capable of being any size, any shape, and any functionality, shapeless like water, flexible and smart. For his Hackaday Prize entry, [Alberto] is building such a modular, self-reconfiguring robot: Dtto.

ditto_family To achieve the highest possible reconfigurability, [Alberto’s] robot is designed to be the building block of a larger, mechanical organism. Inspired by the similar MTRAN III, individual robots feature two actuated hinges that give them flexibility and the ability to move on their own. A coupling mechanism on both ends of the robot allows the little crawlers to self-assemble in various configurations and carry out complex tasks together. They can chain together to form a snake, turn into a wheel and even become four (or more) legged walkers. With six coupling faces on each robot, that allow for connections in four orientations, virtually any topology is possible.

Each robot contains two strong servos for the hinges and three smaller ones for the coupling mechanism. Alignment magnets help the robots to index against each other before a latch locks them in place. The clever mechanism doubles as an ejector, so connections can be undone against the force of the alignment magnets. Most of the electronics, including an Arduino Nano, a Bluetooth and a NRF24L01+ module, are densely mounted inside one end of the robot, while the other end can be used to add additional features, such as a camera module, an accelerometer and more. The following video shows four Dtto robots in a snake configuration crawling through a tube.

Continue reading “Hackaday Prize Entry: Dtto Modular Robot”

Brasilia Espresso Machine PID Upgrade Brews Prefect Cup Of Energy

Coffee, making and hacking addictions are just bound to get out of control. So did [Rhys Goodwin’s] coffee maker hack. What started as a little restoration project of a second-hand coffee machine resulted in a complete upgrade to state of the art coffee brewing technology.

coffee_hack_arduinoThe Brasilia Lady comes with a 300 ml brass boiler, a pump and four buttons for power, coffee, hot water and steam. A 3-way AC solenoid valve, wired directly to the buttons, selects one of the three functions, while a temperamental bimetal switch keeps the boiler roughly between almost there and way too hot.

To reduce the temperature swing, [Rhys] decided to add a PID control loop, and on the way, an OLED display, too. He designed a little shield for the Arduino Nano, that interfaces with the present hardware through solid state relays. Two thermocouples measure the temperature of the boiler and group head while a thermal cut-off fuse protects the machine from overheating in case of a malfunction.

Also, the Lady’s makeup received a complete overhaul, starting with a fresh powder coating. A sealed enclosure along with a polished top panel for the OLED display were machined from aluminum. [Rhys] also added an external water tank that is connected to the machine through shiny, custom lathed tube fittings. Before the water enters the boiler, it passes through a custom preheater, to avoid cold water from entering the boiler directly. Not only does the result look fantastic, it also offers a lot more control over the temperature and the amount of water extracted, resulting in a perfect brew every time. Enjoy [Rhys’s] video where he explains his build:

Continue reading “Brasilia Espresso Machine PID Upgrade Brews Prefect Cup Of Energy”

Venduino Serves Snacks, Shows Vending Is Tricky Business

Seems like just about every hackerspace eventually ends up with an old vending machine that gets hacked and modded to serve up parts, tools, and consumables. But why don’t more hackerspaces build their own vending machines from scratch? Because as [Ryan Bates] found out, building a DIY vending machine isn’t as easy as it looks.

[Ryan]’s “Venduino” has a lot of hackerspace standard components – laser-cut birch plywood case, Parallax continuous rotation servos, an LCD screen from an old Nokia phone, and of course an Arduino. The design is simple, but the devil is in the details. The machine makes no attempt to validate the coins going into it, the product augurs are not quite optimized to dispense reliably, and the whole machine can be cleaned out of product with a few quick shakes. Granted, [Ryan] isn’t trying to build a reliable money-making machine, but his travails only underscore the quality engineering behind modern vending machines. It might not seem like it when your Cheetos are dangling from the end of an auger, but think about how many successful transactions the real things process in an environment with a lot of variables.

Of course, every failure mode is just something to improve in the next version, but as it is this is still a neat project with some great ideas. If you’re more interested in the workings of commercial machines, check out our posts on listening in on vending machine comms or a Tweeting vending machine.

Continue reading “Venduino Serves Snacks, Shows Vending Is Tricky Business”

Raspberry Pi Gets Turned On

The Raspberry Pi and other similar Linux-based single board computers simplify many projects. However, one issue with Linux is that it doesn’t like being turned off abruptly. Things have gotten better, and you can certainly configure things to minimize the risk, but–in general–shutting a Linux system down while it is running will eventually lead to file system corruption.

If your project has an interface, you can always provide a shutdown option, but that doesn’t help if your application is headless. You can provide a shutdown button, but that leaves the problem of turning the device back on.

[Ivan] solved this problem with–what else–an Arduino (see the video below). Simplistically, the Arduino reads a button and uses a FET to turn off the power to the Pi. The reason for the Arduino, is that the tiny processor (which draws less than a Pi and doesn’t mind being shut down abruptly) can log into the Pi and properly shut it down. The real advantage, though, is that you could use other Arduino inputs to determine when to turn the Pi on and off.

Continue reading “Raspberry Pi Gets Turned On”