Tiny Operating System For Tiny Computer

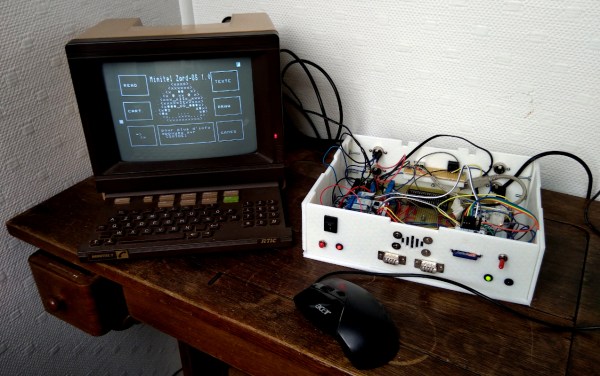
Before the World Wide Web became ubiquitous as the de facto way to access electronic information, there were many other ways of retrieving information online. One of the most successful of these was Minitel, a French videotex service that lasted from 1980 all the way until 2012. But just because the service has been deactivated doesn’t mean its hardware can’t be used for modern builds like this Arduino-based operating system. (Google Translate from French)

Called ZARDOS, the operating system is built to run on an Arduino MEGA although a smaller version is available for the Uno. The Arduino is connected by a serial cable to the Minitel terminal. It can take input from a keyboard and PS/2 mouse and displays video on the terminal screen with the same cable. There is functionality built-in for accessing data on a cartridge system based on SD cards which greatly expands the limited capabilities of the Atmel chip as well, and there is also support for a speaker and a Videotex printer.

Even though the build uses a modern microcontroller, it gives us flashbacks to pre-WWW days with its retro terminal. All of the code is available on the project site for anyone looking to build an Arduino-based operating system, although it will take a little bit of hardware hacking to build a Minitel terminal like this. Either way, it’s a great way to revive some antique French hardware similar to a build we’ve seen which converts one into a Linux terminal.

Thanks to [troisieme_type] for the tip!

Miata Sci-Fi Digital Dash

One of the hardest, but sometimes best, things you can do for a project is to walk away. [Jroobi] had spent hundreds of hours crafting the digital dash for his MX5 Miata (video, embedded below) and after spending far too long chasing down I2C bugs, he made the difficult decision to step away for a while. However, as of May 2021, [Jroobi] returned to the project and found a power supply was under-specified and was causing brownouts that resulted in crashes.

All in all, it’s an incredible work of engineering. Everything from the massive codebase that describes all the different states to the tasteful graphic design is masterfully done. The Star-Trek-inspired theme and attention to detail really show in the different modes on the tachometer. The dynamic soft RPM limit based on engine temperature is particularly ingenious.

Under the hood of this custom dash are two Ardunios running the show. The center media console offers more controls with a generous touch screen while the instrument cluster shows most of the data. They talk over I2C to each other and communicate with other parts in the car, such as the RGB cabin lighting and the TEIN electronic suspension dampeners. Fuel and temperature levels come in as voltage levels which can be read via an ADC. The gear position is calculated based on RPMs and speed given the wheel size and the transmission in the vehicle.

It is a phenomenal labor of love and if you’re inspired to further upgrade your Miata you might want to see how to put carbs on the engine or RGB light rings in the instruments. Continue reading “Miata Sci-Fi Digital Dash”

Can The Solenoid Engine Power A Car?

[Emiel] aka [The Practical Engineer] makes all kinds of fun projects in his fully-featured shop, and one of his tangents has been building a series of solenoid engines. These engines mimic the function of an internal combustion engine, with each solenoid acting as a piston. The only problem with [Emiel]’s concept engines, though, was that he never actually put them into a vehicle to prove their effectiveness. This build finally proves that they can work at powering a vehicle.

The project starts with a new engine. [Emiel] chose a V4 design using four solenoids and an Arduino-based controller. After some trouble getting it to operate properly, he scavenged a small circuit board he built in his V8 solenoid engine to help with timing. With that installed, the solenoids click away and spin the crankshaft at a single constant speed. The vehicle itself was mostly 3D printed, with two aluminum tubes as support structures to mount the engine. Even the wheels were 3D printed with a special rubber coating applied to them. With a small drive train assembled, it’s off to the races for this tiny prototype.

While the small car doesn’t have steering and only goes at a constant speed, the proof of concept that these tiny electric engines actually work is a welcomed addition to [Emiel]’s collection of videos on these curious engines. Of course they’re not as efficient as driving the wheels directly with an electric motor, but we all know there’s no fun in that. If you haven’t seen his most intricate build, the V8 is certainly worth checking out, and also shows off the timing circuitry he repurposed for this car.

Continue reading “Can The Solenoid Engine Power A Car?”

Big Spinning Disk Makes A Small Color Video Display

Believe it or not, the Mickey Mouse clip used for this demonstration is actually in the public domain.

The earliest televisions used a spinning disk technology called the Nipkow disk, which is exactly what [Science ‘n’ Stuff] recreated with their Arduino-based mechanical color television (video link, also embedded below.) The device reads video and audio from an SD card, and displays the video using a precisely-timed RGB LED visible through a perforated spinning disk. The persistence of vision effect results in a video that is small, relative to the size of the disk, but perfectly watchable. A twist is that the video is in color!

A Nipkow disk is a fairly simple and electromechanical device that relies on timing; something a modern microcontroller and RGB LED is perfectly capable of delivering. In this device, the holes in the disk create 32 vertical scanlines with 96 “pixels” making up each of those lines. Spinning disk technology was always limited to being monochromatic, but in this implementation, each “pixel” is given its own unique color by adjusting the RGB LED accordingly.

The first video shows off the device and demonstrates it working; note that it may look like there are multiple little screens, but the center one can be thought of as the “true” display with the others essentially being artifacts due to light leakage. If you’re interested in the nuts and bolts of exactly how a Nipkow disk works, then the second video is what you’ll be more interested in, because it goes through all the details of exactly how everything functions.

Another neat thing about Nipkow disks is that image acquisition is really not much more complex than image display.

[via Arduino Blog]

Continue reading “Big Spinning Disk Makes A Small Color Video Display”

Forget Smart Watch; Build A Smart Hat

Smart watches are pretty common today, but how many people do you know with a smart hat? [Oliver] built Wilson which he bills as “the IoT hat.” We wonder if the name was inspired by the Home Improvement character of the same name who only appeared as a hat above the fence line. You can see a video of the project, below.

The project is pretty straightforward for hardware. An LED strip, an Arduino, and a Bluetooth module. Oh. And a hat. The software, as you might expect, is a bit more complex. It allows you to display SMS messages to your hat.

Continue reading “Forget Smart Watch; Build A Smart Hat”

Arduino Nano Memory Upgrade With No Soldering

Ok, we’ll come clean. [Design Build Destroy] didn’t really add any memory to his Arduino Nano. But he did get about 1.5K more program space when compared to the stock setup. The trick? On some Nano boards and clones, the bootloader is set to use a large block of reserved memory, but Optiboot only requires a fraction of that reserved memory. By reprogramming the bootloader and changing the configuration fuses, you can reclaim that unused memory.

Of course, you can’t easily overwrite the bootloader and fuses over the serial port to prevent you from bricking your device. The video below shows how to connect another Arduino to do the programming. You could also use any dedicated AVR programmer you happen to have. Oddly, the Uno already uses Optiboot with the same processors, and is set correctly and the video shows the differences in the configuration between the two in their default state.

Of course, depending on where you get your Nano devices and their age, you may already have this set up at which point you won’t gain anything, but you should be able to easily tell if you need to go through the steps or not. The same trick will probably work with any older Arduino boards you have laying around if Optiboot supports them. What can you do with the extra memory? Maybe speech recognition?

Continue reading “Arduino Nano Memory Upgrade With No Soldering”

Compact M&M Sorter Goes Anywhere

Let’s face it — eating different colored candy like M&Ms or Skittles is just a little more fun if you sort your pile by color first. The not-fun part is having to do it by hand. [Jackofalltrades_] decided to tackle this time-worn problem for engineering class because it’s awesome and it satisfies the project’s requirement for sensing, actuation, and autonomous sequencing. We’d venture to guess that it satisfies [Jackofalltrades_]’ need for chocolate, too.

Here’s how it works: one by one, M&Ms are selected, pulled into a dark chamber for color inspection, and then dispensed into the proper cubby based on the result. [Jackofalltrades_] lived up to their handle and built a color-detecting setup out of an RGB LED and light-dependent resistor. The RGB LED shines red, then, green, then blue at full brightness, and takes a voltage reading from the photocell to figure out the candy’s color. At the beginning, the machine needs one of each color to read in and store as references. Then it can sort the whole bag, comparing each M&M to the reference values and updating them with each new M&M to create a sort of rolling average.

We love the beautiful and compact design of this machine, which was built to maximize the 3D printer as one of the few available tools. The mechanical design is particularly elegant. It cleverly uses stepper-driven rotation and only needs one part to do most of the entire process of isolating each one, passing it into the darkness chamber for color inspection, and then dispensing it into the right section of the jar below. Be sure to check out the demo after the break.

Need a next-level sorter? Here’s one that locates and separates the holy grail of candy-coated chocolate — peanut M&Ms that didn’t get a peanut.

Continue reading “Compact M&M Sorter Goes Anywhere”